5 Photography Tips to Take Gorgeous Bag Photos
This week we have a guest post from the handmade bag expert, Javeriya Sid from Sew Some Stuff and Road to Online Bagpreneur. She has amazing advice on her websites and is sharing some awesome tips for photographing your handmade bags today. But the tips also apply to any type of product photography so be sure to have a read through!
And if you want a little helping hand when it comes to writing descriptions to go with your photos, sign up to receive the FREE PRODUCT DESCRIPTION TEMPLATE & WORKSHEETS:
Now…onto Javeriya’s awesome advice!
Would you ever make your cakes without good flour? No right? It will ruin the taste of the ENTIRE cake. Then why put your bags out there WITHOUT good photos which are the most important ingredient of a good online store?
No matter how good your cake recipe is, if by the end of the day, the cake tastes bad because of bad flour, no one will eat it. Same goes for photography. No matter how good your finished bags are, if you can’t bring out their beauty using pictures, you won’t be able to win your customers or get a spot in a craft show.
I know, I know, you must be thinking it takes gazillion amount of time and investment to become a professional photographer. But guess what, here’s the truth. You DON’T have to be a TOP notch photographer to take gorgeous bag photos. Promise.
All you need is just a little info on the BASICS of photography, good lighting, nice background and a good camera.
In this post I’m sharing 5 basics of photography EVERY bag biz owner needs to know to take beautiful bag photos. And I promise I’ll make it as simple as possible to digest. Ready? Let’s get started!
1) Lighting/brightness
Lighting is the BACKBONE of photography. Bad lighting can RUIN the look of your bags and repel your customers like two like magnetic poles. I swear. On the other hand, good lighting can beautify your bags SO much that the customer will fall head over heels in love with it and BEG you to take their money.
So the question is, how do you make sure you’re taking photos in good lighting? Follow these DOs:
- ALWAYS make use of natural light if you don’t have any special studio lighting kits at hand.
- Take your photos 1 hour after sunrise or 1 hour before sunset when you get a nice cool light.
- When taking photos indoors, use indoor lighting kits to add extra lighting.
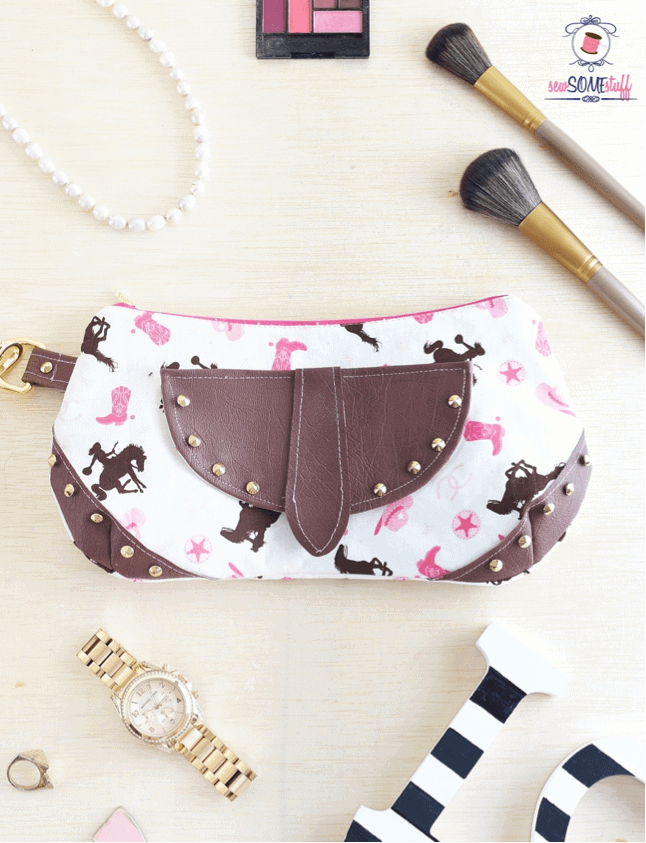
The picture below was taken indoors using studio lighting kit. See how good lighting brings out the best in the bag and looks pleasing to the eyes.
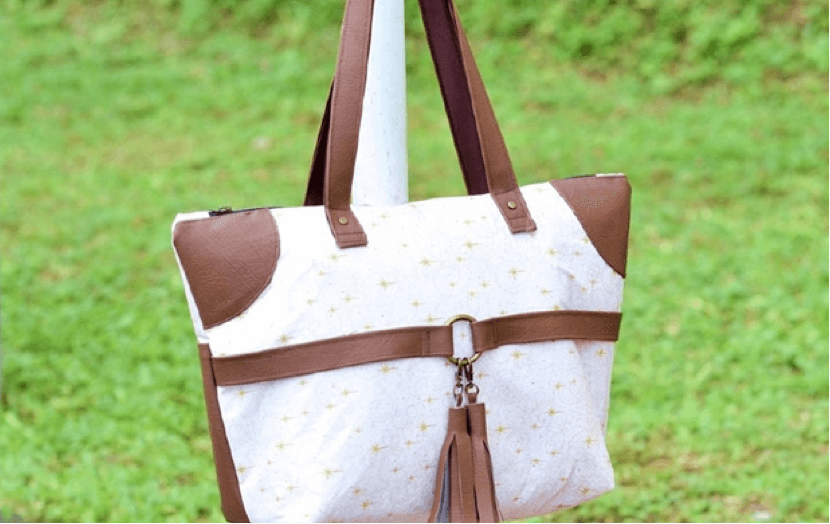
The picture below was taken outdoors in natural light 1 hour before the sunset.
At the end of the day, it doesn’t matter if you use artificial or natural lighting for your photos, what’s important is the end result.
To make sure you get the best lighting, avoid these DON’Ts at all costs:
- Don’t EVER take photos at night in yellow light. That’s the worst thing you can do to your bags as well as your bag biz. It comes off as an un-professional approach which not only tarnishes your image but also turns the customer off.
- DON’T take photos under harsh sunlight as it will cast all sorts of shadows on your bag and ruin its look. I know, I know, I said make use of natural light and now I’m saying stay away from sunlight but the thing is there are different types of natural lights and we want to use the COOL natural light.
- DON’T take photos in the dark and try to add artificial light using a photo editing software because this is just another recipe of ruining the look of your bags. When you try to add extra brightness using a software, it also adds a lot of grains and noise to your photos which, when zoomed in, are a torture to the eyes. And you definitely don’t want your customers to feel that way. Do you?
2) Contrast
Contrast basically means making the shadows darker and highlights (bright areas of the picture) brighter.
Why do you need it? To make the pictures look crisp and sharp and to pop the colours.
There are two places you need to keep contrast in mind:
- While taking pictures
- After taking pictures
While taking pictures, contrast plays a huge role. Let’s say you’re taking a picture of a bag made from dark fabric. For this bag it’ll be best to choose a background which compliments the dark color and makes the bag stand out rather than blending in. So what’s the best type of background to use? Obviously, something light. So the rule of thumb is:
For dark coloured bags, use a light background; for light coloured bags, use a dark background for a good contrasting effect.
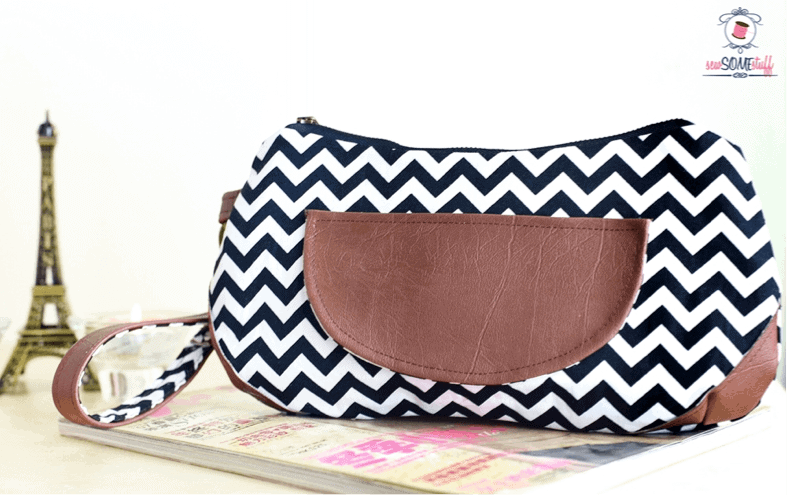
Here’s an example of a good contrast photo. I kept the background light and plain to enhance the look of the chevron print.
After taking pictures, you can fix the contrast using a photo editing software to pop the colours and it’s something you should do for literally all your pictures to make them look professional and get more sales. The point to keep in mind here is that there’s no measure as to what’s the best contrast level, it all depends on your gut feeling and will come with practice. I suggest checking out pictures submitted on websites like Craftgawker to see how they are edited and try to add that effect to your photos. You can learn to edit contrast through the free tutorial I shared here in my Road to Online Bagpreneur school. You have to first sign up though to access the tutorial.
3) White Balance
White balance is all about fixing the temperature of a photo. Sometimes a picture might appear too bluish while sometimes it may look yellowish when taken at night under a yellow lamp. That my dear friend is because of the wrong white balance which can completely change the colour of the bags making a pink bag look red or a blue bag look green.
Therefore, you need to know how to fix this to take gorgeous bag photos. The first method is to adjust your camera settings following a tutorial given in the manual or just checking one out on Google. The second method is to use a photo-editing software. I have a FREE tutorial for it on my Road to Online Bagpreneur school that you can access by signing up here.
4) Saturation
Saturation helps in making colours pop as well. Let’s say you take a picture of a bright pink bag, you transfer it to the PC and to your disappointment, the bag looks pale pink, making you wonder what on earth happened during the process of taking and transferring the picture.
Well, the thing is, cameras are just cameras, they’re not as smart as our brains which are able to define each and every color correctly. But no worries, a simple photo-editing software can fix this small error in less than a second. So, when the colours in your pictures are dull, just fix the saturation using any software and you’ll be good to go.
5) Cropping
Cropping helps in giving a more staged look to your photos. At times you must have noticed a lot of negative spaces become a part of your photo, taking the person’s attention away from the bag. This can be easily fixed using any photo-editing software.
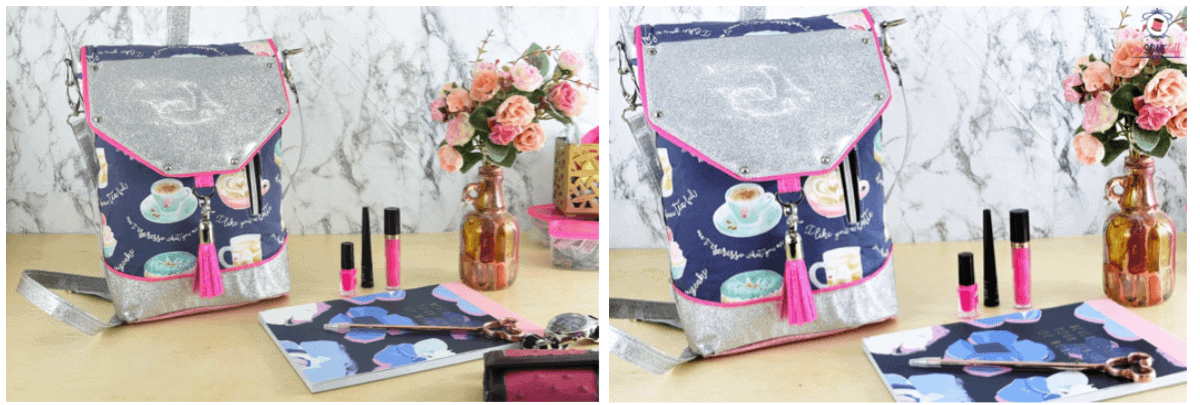
Here’s an example of how cropping can effect your photos. On the left is the uncropped image where on the sides you can see some distractions that take the focus away from the bag. Whereas the picture on the right shows what a huge effect a little bit of cropping can have at the presentation of your bags and make it look more put together.
Here’s a fun question, can you name other photography adjustments done to the image below? Find out the answer at the end. No cheating okay?
You can learn to adjust the crop in this free tutorial that I’ve shared in my Road to Online Bagpreneur school here. You have to first sign-up to access it though.
The End
Alright, with that we have reached the end of our post sharing 5 photography basics every bag/handmade biz owner needs to know.
Now let’s have a little recap. To take good bag photos here are the things you need to keep in mind:
- Never take photos in dim light, always make use of natural light or studio lights if shooting indoors
- Use a contrasting, uncluttered background. If your bag fabric is dark in color, use a light background and vice versa.
- Fix the white balance of your photos if they appear too bluish or too yellowish in colour.
- Fix the saturation of the photos if the colours appear too dull.
- Crop your photos to make them look more staged.
- NEVER put your pictures in the shop WITHOUT editing them on a photo-editing software.
And now for the answer, I adjusted the white balance as well as the contrast of the picture to make it look more professional. Did you get that right? I knew you were a born genius!
Now that you know about the 5 photography basics, you should also check out 5 must have photography tools for breath-taking bag photos.
Bio
Hey there! I’m Javeriya, bag pattern designer and blogger at Sew Some Stuff. Currently, I’m helping bag makers set up a bag biz with strong base for a long term success. Check out my blog Road to Online Bagpreneur for tips and resources if you’re looking to start on online handmade bag biz.

Hey, I’m Erin 🙂 I write about small business and craft show techniques I’ve learned from being a small business owner for almost 2 decades, selling at dozens of craft shows, and earning a diploma in Visual Communication Design. I hope you find my advice helpful!
This is surely the best article I have ever come across on this topic. Thanks a lot