5 Things Every Craft Show Display Should Include
There are many directions you can go in with your craft show display. And there really isn’t a right or wrong way to display your products; different techniques work for different businesses.
What’s most important is that your display helps you make sales.
If your display doesn’t:
>> grab shoppers’ attention and get them to stop
>> make it easy for shoppers to browse your products
>> convince shoppers your products are right for them…
You can’t make sales.
The following are 5 elements that will help you complete those 3 essential steps and make sales.
1) A Showstopper
Something must catch a shopper’s eye from across the room and draw them to your space.
A showstopper is usually something unexpected.
It may be:
- a bold pop of color
- an oversized item
- e.g. a prop, a photo, a large product, etc.
- a unique item
- e.g. something that makes shoppers think “what’s is that?”, or “I need a closer look at that”.
- signage
- e.g. your business name or logo may catch your target market’s eye (e.g. “Lumberjack Beard Care” would catch the eye of men with beards), “free samples” could grab shoppers’ attention, or a tagline that appeals to your target market, such as “The perfect diaper bag”.
- something displayed above eye level
- e.g. a lightweight oversized prop or sign might be hung above your table or booth so it can be seen over shoppers’ heads. Sturdy stands can also be used to hang signage above eye level or display products higher.
Your entire display may be a showstopper, or it may just be one element.
For example, a booth that is all black and white would create an entire show-stopping space. On the other hand, a large sign hanging above a table could also grab attention.
Brainstorm ways you can catch shoppers off guard. Think about a typical craft show display and how you can go in a different direction.
Also, keep your target market in mind and what they would be excited to see.
2) A Theme
Every craft show display needs a theme.
Think of a theme as a commonality that everything in your craft show booth shares.
A theme may be based on a:
- Product (e.g. statement necklace)
- Purpose (e.g. travel)
- Benefit (e.g. eco-friendly)
- Style (e.g. bohemian)
- Color (e.g. neon colors)
- Prints or material (e.g. florals)
- Type of customer (e.g. dog owners)
- Occasion (e.g. wedding, birthday, retirement)
Here’s an example of a craft show display by Our Blue Abode, focusing on home decor, and more specifically, table decor. It also follows a color theme of white, gold, and green:

The more commonalities your products and display elements share, the more eye-catching your display will be.
For example, if every item in a craft show display follows the theme of “hats” (e.g. all products are hats, photos are of hats, the vendor is wearing a hat, etc.) that makes a clear and bold statement to shoppers. If you add another commonality, perhaps a color theme, and every hat is either hot pink, teal, or black, it creates a stronger, eye-catching statement.
A strong theme will also help attract the right shopper.
Too much variety in a craft show display makes it hard for shoppers to understand what you sell, why you sell it, and who it’s for.
Someone who needs a hat is going to head straight to a booth full of hats. They’re not going to look at that booth and wonder what the vendor is selling, or contemplate if they’ll be able to find an option that fits them.
If you’re shopping for a new hat, you’re going to stop at a hat store. On the other hand, you’ll contemplate stopping at a shoe store that has a couple of hats hanging on a side rack; it’s less likely you’ll find what you need.
If you can’t think of a theme that can run throughout every element of your display, consider if you’re offering too much variety (that can actually harm sales, here’s proof).
If your products already follow a theme, use props, display fixtures, and signage to strengthen that theme.
You can also create smaller themes within your space.
3) A Color Story
Every display should use color strategically. You may already be applying this if your display’s theme is focused on color.
The fewer colors you use in your display, the more impactful it will be.
Imagine a craft show table with a white tablecloth, white products, white display fixtures, a vendor dressed in white, etc.
That would catch your eye.
Of course, there will be other colors present in your display (e.g. black for signage font), but one color can be the most dominant.
When you start to incorporate too many colors among your display fixtures and props, and your products, the space starts to look messy.
If your products are very colorful, consider keeping your display elements neutral (e.g. white, or black, or beige, etc.)
To organize a colorful selection of products, you can group them into clear color stories.
Color stories should focus on 1 – 3 colors.
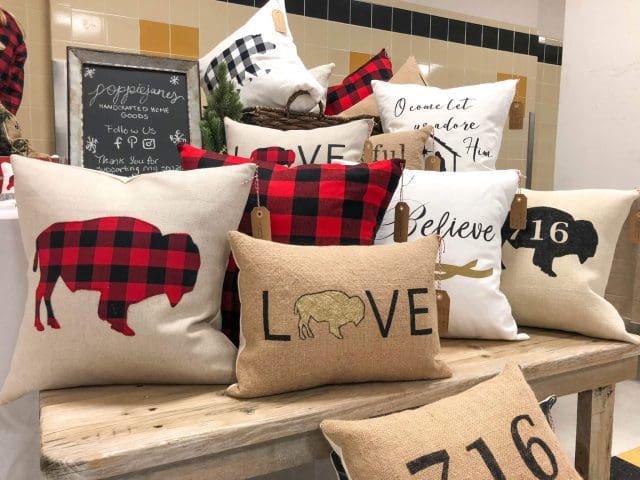
Here’s a great example by Poppiejanes focusing on black, white, beige, and red. Even the vendor (you can see her arm in the top left of the photo) is wearing red and black buffalo plaid to match her pillows:
For example:
- blue and green pieces grouped together
- yellow, orange, and red pieces grouped together
- purple, pink, and teal pieces grouped together
Grouping products by color helps create organization within your display and an eye-catching element.
4) Collections
Collections are groupings of products that work together.
You can read more about collections and how to create them in your display here.
They not only tidy up your display so it’s visually appealing, but they also make it easier for people to shop.
A craft show table should have 3 – 5 collections (depending on the size of your space and products).
For example, a vendor selling jewelry may have one collection of gold jewelry, one for rose gold jewelry, and one for silver jewelry. Or, they may create groupings by product (e.g. a necklace collection, an earring collection, a bracelet collection).
Find common themes among your products and group them in your display accordingly.
>> Learn more about creating collections here.
5) A checkout
Your craft show table may be small, but you can still create sections or zones in your space.
If you place your showstopper at the same end of your table as your “cash desk” (i.e. where you keep your cash box, shopping bags, etc.), people trying to shop are going to be in the way of people trying to pay, and vice versa.
In a small space, you can simply dedicate one end of your table to your checkout.
Consider the flow of traffic and how most people will approach your table. Your showstopper should go at that end, and your checkout at the other.
If traffic comes from all directions, you can direct shoppers with the placement of your products and display elements. Your showstopper at one end of the table will tell shoppers “start here”.
>> Learn more about creating zones and directing shopper traffic in this article.
The checkout section of your display will help you complete transactions with ease.
Shoppers won’t feel in the way or rushed to get out of the way if you have a dedicated spot for them to stand while you take payment and wrap their purchase.
Think about the checkout area at the grocery store. It’s stocked with easy-to-buy items, such as chocolate bars, gum, magazines, batteries, etc.
When you’re standing in front of those items at a grocery store, you’re not in the way of people still shopping, and they’re items you can easily add to your cart.
They’re impulse-buy items.
For your craft show display, think of add-on items to display in your checkout area.
If they’re smaller, lower-priced, and low-contemplation (i.e. they’re not items you need to try on, assess, think about, etc.), customers are more likely to add them to their purchase during checkout. However, they’re not best-selling products other shoppers are constantly browsing or reaching across paying customers to grab. Those types of items should be on the other end of your table, or in the middle.
For example, in a checkout area, a jewelry vendor may display jewelry cleaners, jewelry storage bags, gift boxes and cards, or phone charms.
A bag vendor may display accessories that go with a bag purchase, but aren’t often purchased alone. Such as matching sunglass cases, bag charms (e.g. pom-poms, tassels, or feathers that clip onto a bag), or coin purses.
For more add-on product ideas, check out: How to Use Add-Ons to Sell More Handmade
There are many other elements to consider when it comes to your craft show display, but these 5 are a great place to start.
The elements explained in this article will take your display to the next level.
And if you want a complete guide to creating an amazing display for your next craft show, check out: 5 DAYS TO A STANDOUT CRAFT SHOW DISPLAY

Hey, I’m Erin 🙂 I write about small business and craft show techniques I’ve learned from being a small business owner for almost 2 decades, selling at dozens of craft shows, and earning a diploma in Visual Communication Design. I hope you find my advice helpful!