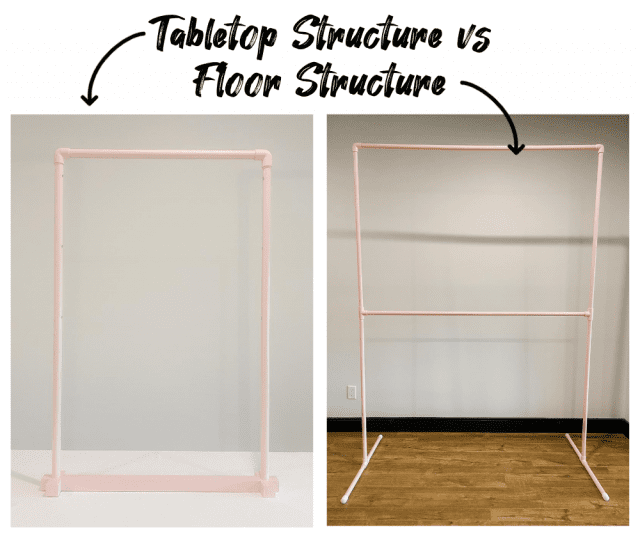
Cheap & Versatile Craft Show Display Rack
Chances are, you’ve seen backdrop frames made from PVC of copper pipes and connector pieces.
I wanted to play around with this structure to see if there were different ways it could be used, aside from a backdrop.
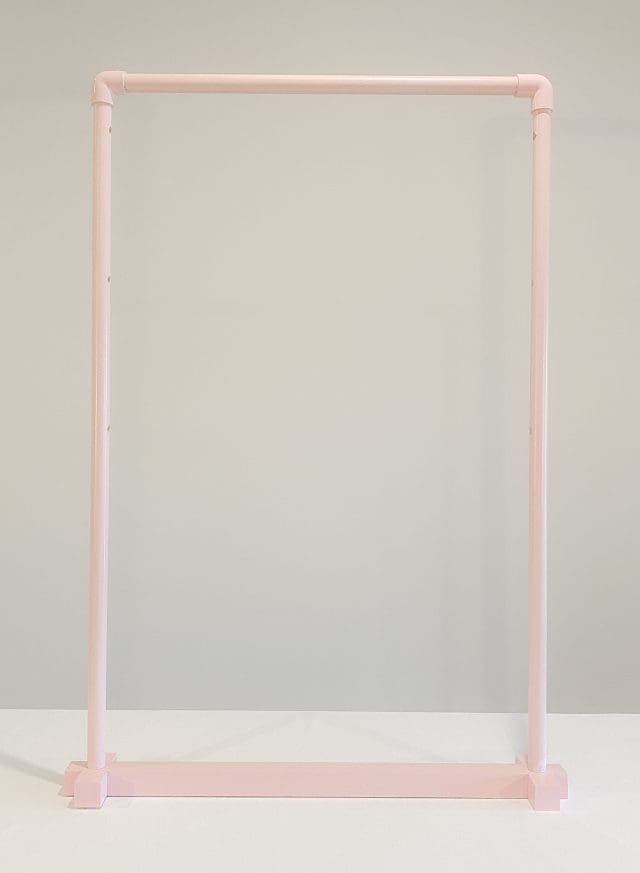
I created a tabletop version of the PVC frame and below are a few ways it can be used to add height and vertical display space on a craft show table.
Unfortunately, I didn’t find the floor fixture to be as versatile. The taller and wider you make the frame, the less sturdy it is.
So unless you add a lot more support pieces, I wouldn’t recommend the floor version to be used for much more than hanging a lightweight piece of fabric (or other lightweight items).
Weight Limit
It’s important for you to test this structure at home, with your products displayed on it, to be sure it will be sturdy.
At a craft show, there may be people bumping into it or touching items on the structure, and you don’t want it tipping over.
The taller and wider you make your PVC frame, the less sturdy it is.
I did test several configurations in hopes of finding one that would allow me to hang heavier items such as framed photos from the taller floor structure. However, I didn’t find a setup I felt comfortable sharing.
With the right configuration and enough support pieces, it could work.
Please be sure to test your structure at home, with products on it, to ensure it is sturdy enough to be used at a craft show. You are responsible for making sure your structure is safe.
Tabletop display ideas for a craft show
Here are a few ways to use the smaller, tabletop structure.
Ladder system
You can create a ladder structure by adding additional horizontal PVC pieces (you’ll need 2 additional 3-way connector pieces for each horizontal bar you add), or by drilling holes into the vertical PVC pieces and running a dowel through them.
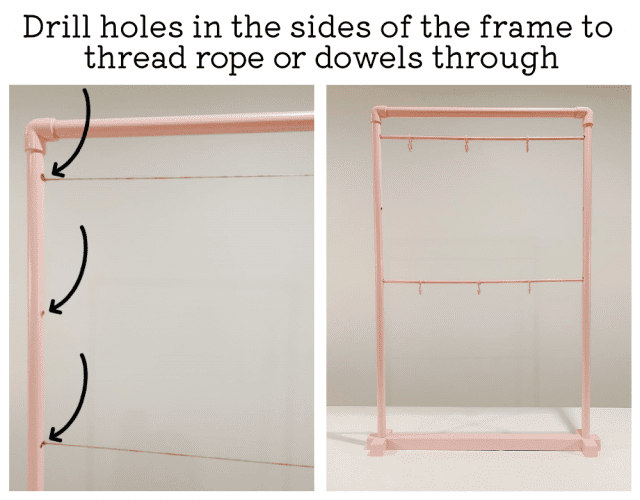
This ladder system can be used to display a variety of products, as long as they’re lightweight, such as:
- Scarves
- Tea towels
- Bags

You may hang items directly over the dowels or use S-hooks, binder rings, bulldog clips, etc. to clip or hook an item to the dowel.
You can find larger S-hooks on Amazon to hook onto the PVC pipe. Just be sure the width of the hook is bigger than the diameter of the PVC pipe.
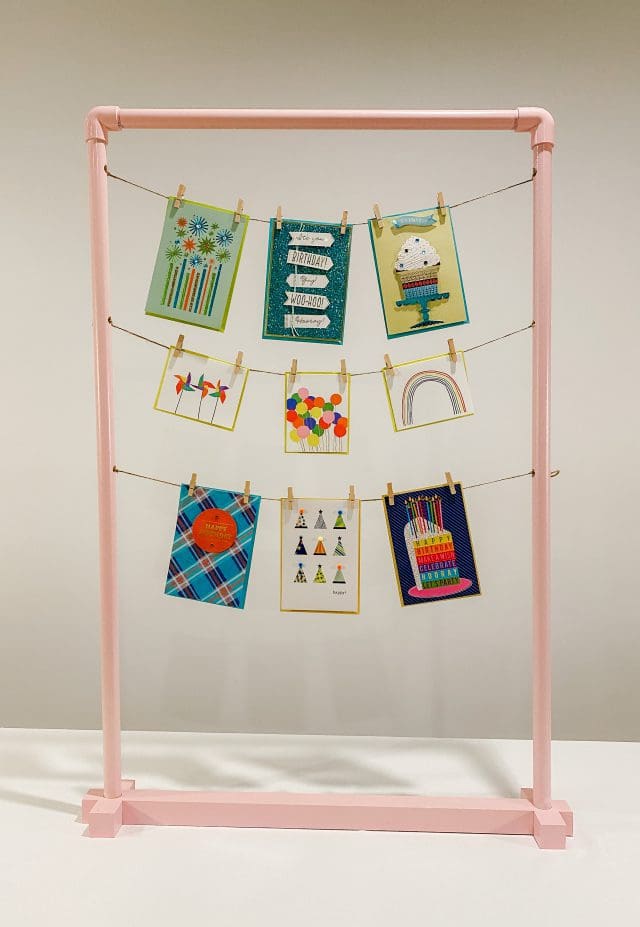
Clothesline
Drill holes into the vertical PVC pipes and then thread rope through each hole and tie a knot on each end to create a clothesline.
You may use clothespins or bullhorn clips to hang items such as:
- Greeting cards
- Art prints
- Mittens
- Tea towels
- Etc.
Pegboard
A pegboard is a heavier structure on its own, so please create the proper support for it.
If you plan to use this as a fixture people can shop from (meaning, shoppers will be touching items on the pegboard), you’ll likely need to extend the feet of your structure so it has more front-to-back support and won’t tip.
If you don’t have the room to add longer legs, you may sit the structure near the back edge of your table, and use clamps to secure the base to the table.
A pegboard is too heavy to hang from the floor structure.
Cut a piece of pegboard to size and hang it within the tabletop frame using:
- binder rings
- twine
- zip-ties
- large s-hooks
- ribbon
- etc
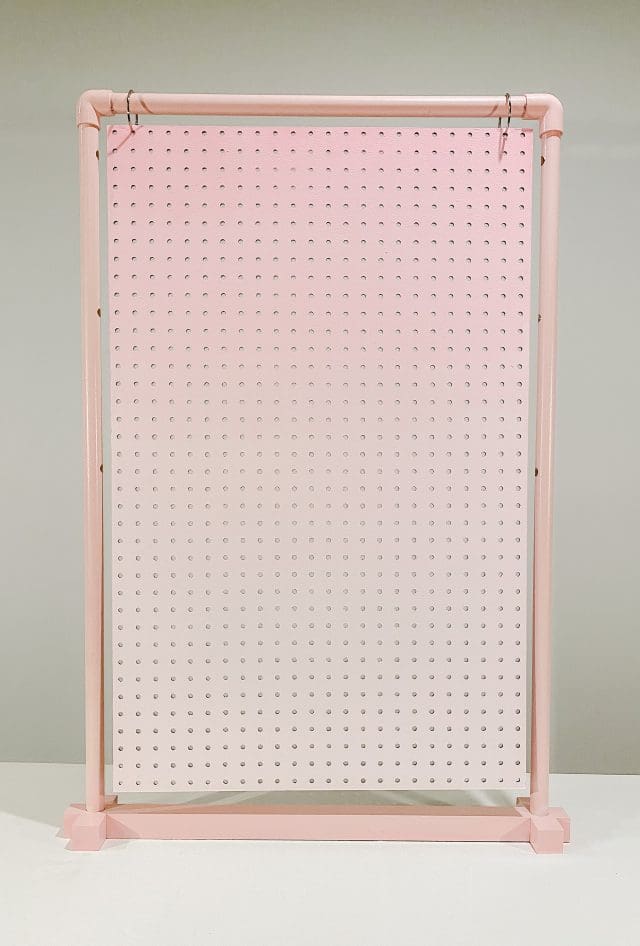
Pegboard accessories (hooks, baskets, bars, etc.) will allow you to display a variety of items.
Test your fixture at home, with products on it so you can be sure it’s sturdy enough and won’t tip over on anyone.
(When painting a pegboard, use spray paint or paint and a roller, as opposed to paint and a paintbrush. The paintbrush will push a lot of paint into the tiny holes.)
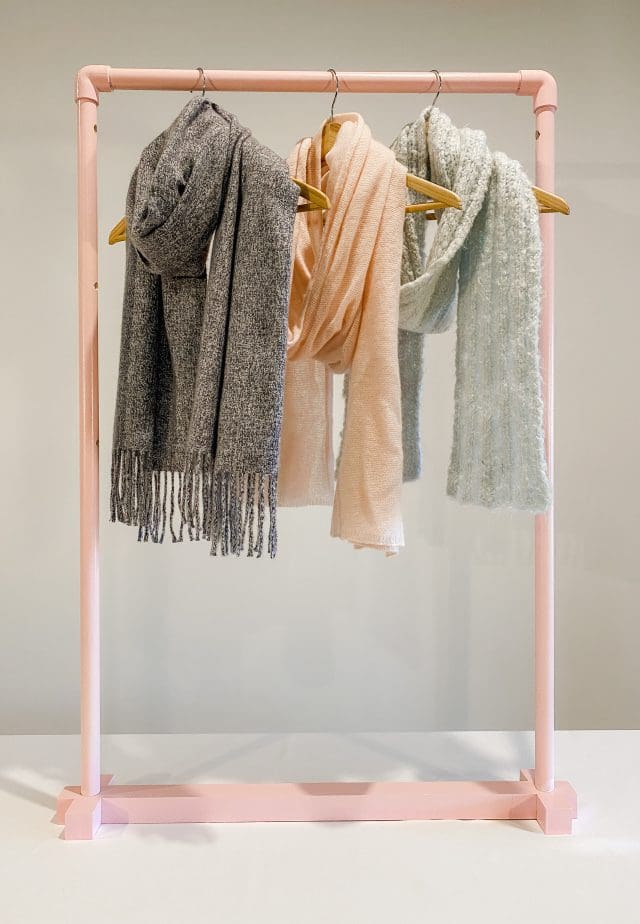
Hang bar
You can treat this structure as a mini hang bar/rollbar (minus the roll).
If you’re simply displaying your products on hangers, and it’s more of a look-but-don’t-touch display, you won’t need as much support as you will if shoppers can slide hangers back and forth on the rack.
You’ll also want to add a couple coats of sealing spray on top of your spray paint. Otherwise, the paint will chip off as hangers are slid back and forth.
Gridwall
You can create a mini grid wall by using plastic mesh or chicken wire. Chicken wire can be difficult to work with, unless you can find a lightweight metal, so I opted for a roll of black plastic “deer fencing”.
Zip-ties work well to tightly secure the mesh to the frame. If you don’t like the look of zip-ties, you can cover them with ribbon.
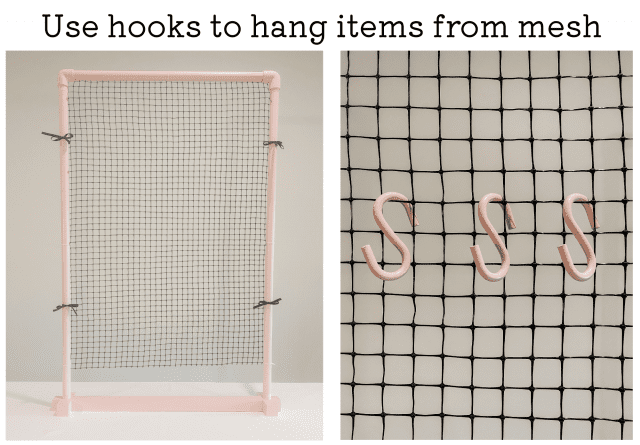
Depending on what you’re displaying, you may also be able to use screen mesh. In this case, you’ll need to use smaller hooks or pins to hang items on the mesh.
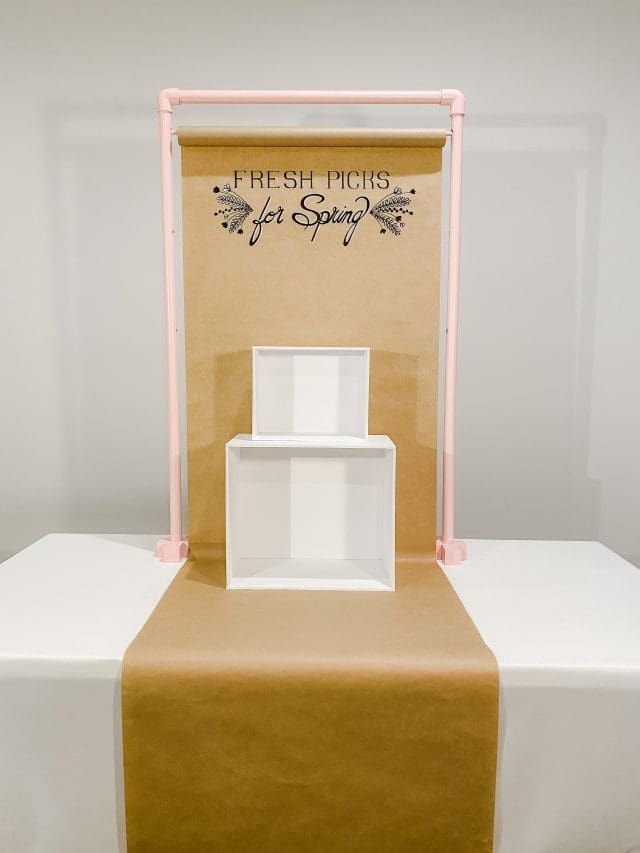
Paper roll
There are many options for having signage professionally printed. However, signage may need to change to fit a craft show’s theme, a holiday, or products you’re promoting.
Professionally printing new signage for each event will get expensive.
Instead, you may use a roll of craft paper and pen/markers/paint/stickers, etc. to create a simple sign.
Roll the top of a long piece of craft paper a few times to create a tube.
Tape the end of the paper in place so it doesn’t unroll.
You can thread the top PVC pipe or a dowel through the tube to hang your signage.
Cut the paper to your preferred length; you can even have it come down onto, and in front of, your table for extra signage space.
Sketch your text or images on the craft paper with a pencil and then go over it with markers or paint once you’re happy with your design.
Add some risers and slot your latest product collection in.
Sign holder
You can turn any sign into a hanging sign by drilling/punching/cutting two holes at the top, then using binder rings, S-hooks, ribbon, or rope to hang the sign from the frame.
There are many options for signs:
- professionally printed on canvas
- create a sign on foamcore
- acrylic sign
- chalkboard sign
- wood sign
Try to keep your sign lightweight so your structure remains sturdy.
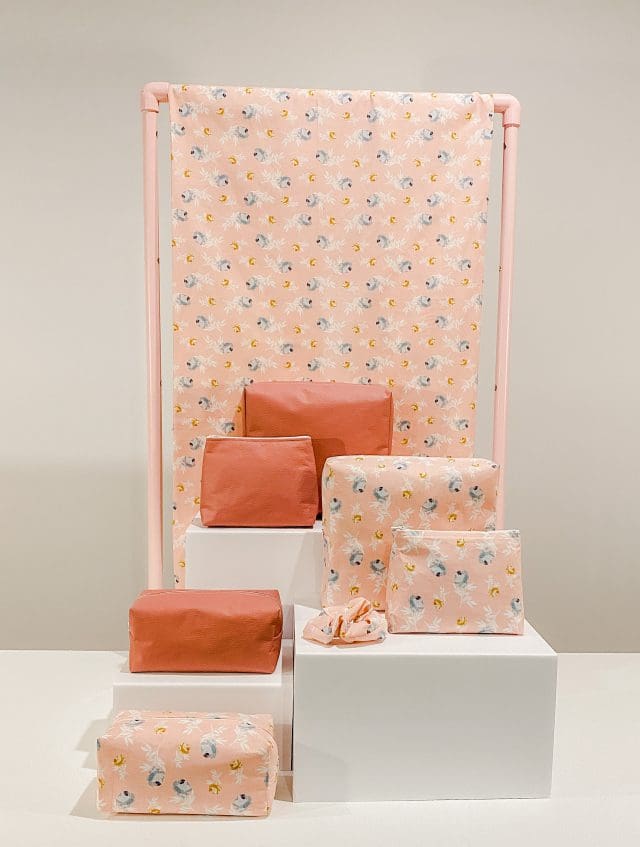
Fabric
Using fabric to create a backdrop for your display (or part of it) will help keep shoppers’ attention on your space because they won’t be distracted by tables and people behind you.
The backdrop also creates a more visually pleasing display, as it eliminates visual clutter going on behind your table (if your table doesn’t back onto a clean wall).
To create the backdrop, you might:
- purchase two tablecloths and turn one into a curtain that hangs from the frame.
- buy extra fabric in a material used in your products to highlight a new collection.
- buy a curtain panel in a color that works with your brand and products.
Hanging fabric from the smaller tabletop structure can highlight a new product collection or bestseller.
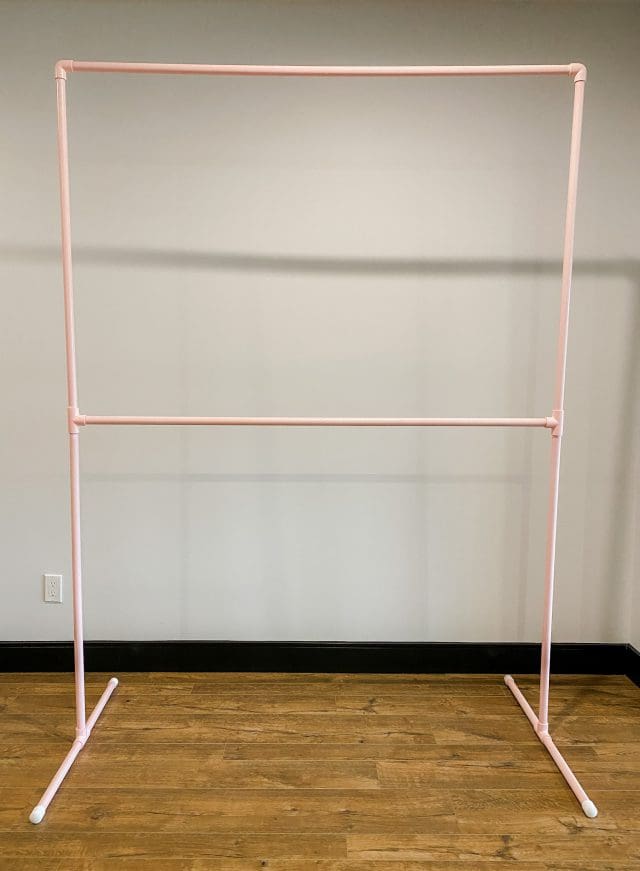
The larger floor frame can be used to create a backdrop for your entire table.
How to make a PVC backdrop frame
Follow the instructions below to create your PVC frame. You can cut the pieces to length based on how tall and wide you want your structure to be.
Remember, the taller and wider it gets, the less stable it is.
You’ll need to add more horizontal and vertical support pieces, and a wider/heavier base, and test the structure for stability.
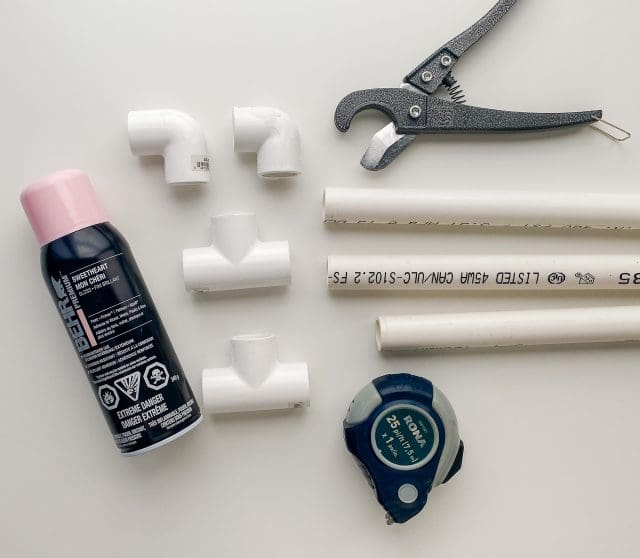
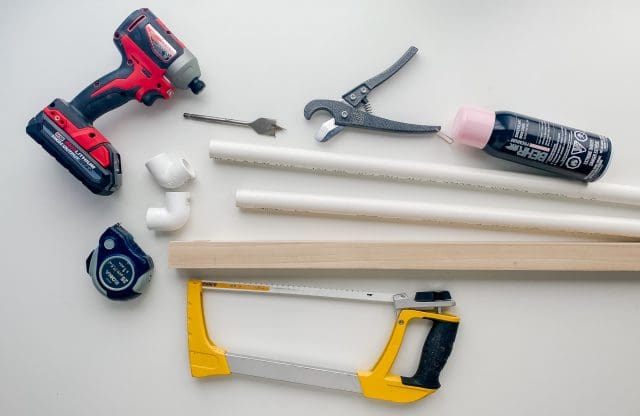
Materials Needed:
- PVC pipe (length depends on height and width of structure)
- 2 corner connector pieces (be sure to get the correct size to match the diameter of the pipe)
- 2 3-way connector pieces (if you plan to make the feet/base of your frame out of PVC)
- Plastic pipe cutters (or hand or electrical saw) Alternatively, you can ask someone at the hardware store to cut your PVC pipe to desired lengths
- Measuring tape
- Safety glasses (to wear while cutting the pipe)
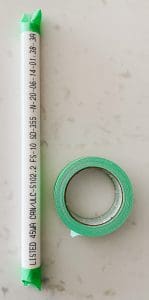
- Tape (to tape off ends of pipe while spray painting)
- Spray paint (primer, paint color, and sealer)
* Steps to create a wood base instead of a PVC base/feet can be found at the end of this article
And if you plan to create the floor structure to create a backdrop for your display, you’ll need:
- 2 more 3-way connector pieces so you can add the middle horizontal support
- 4 end cap pieces for the ends of the feet
Cutting the PVC pipe
There are a few ways to cut your plastic pipe. I used a plastic pipe cutter but you can also use a handsaw, jigsaw, or even a miter saw if you know what you’re doing (safety first!).
Using the pipe cutters, I position them, squeeze to pinch the blade into the pipe, and then rotate the pipe so the blade slowly cuts through the plastic. It takes a few rotations to get through.
Step 1 – Cut side and top pieces
Decide on the height of your structure and cut 2 PVC pipes to that length.
Decide on the width of your structure and cut 1 PVC pipe to that length.
If you need an exact height and width, be sure to account for the height and width the base and connector pieces will add.
My tabletop structure is: 40” tall and 24” wide.
So I cut 2 PVC pipes 40” long and one pipe 24” long
Step 2 – Cut feet
The feet will keep the structure from tipping forward or backward.
If you’re using PVC for the feet, try to make the feet 1/3 of the total height of your frame.
For example, my tabletop frame is 40” tall, so my feet (in total) should be at least 13”.
The end caps will go on your frame’s feet.
Instructions for creating the wood base shown in the photos are after Step 4.
Step 3 – Paint
It’s a good idea to use a primer, so your spray paint sticks to the pipe. It also helps cover the text printed on the pipes.
A sealer will protect your paint color and help ensure it doesn’t chip off.
One can each of primer, color, and sealer should be enough for a tabletop structure.
Avoiding fit issues
 You’ll notice that the PVC pipes are a tight fit into the connector pieces. If you put too many coats of paint on the ends, it may make it too hard to get the pipes in.
If you’re painting each piece separately, go light with the paint on the ends, or mark where the connector piece ends, and then tape off that portion of the pipe, so paint doesn’t build up on it.
You can put the structure together and paint it, which will prevent paint from getting on the ends of the pipes. But be sure you don’t “glue” the pipe and connector pieces together with paint. Twist the pieces apart after each coat of paint dries.
Spray paint is the easiest, but there are other options.
Depending on your brand, you may choose to:
- cover in silver or gold leaf – adhesive and gold/silver sheets are relatively inexpensive. Paint the adhesive on the PVC parts, apply the gold leaf, then brush off. The pipes require a bit of twisting to put together, so you’ll want to use a metal leaf sealer to so it doesn’t rub off during assembly.
- cover in tissue paper – you can use a similar idea to gold leaf and glue colored or printed tissue paper or even wrapping paper.
- use copper pipe – if you don’t mind spending a bit more money, you can use copper pipe and connectors for a more polished look. Copper is beautiful on its own, so you don’t have to cover it in anything. Unless you wanted a more rustic look, then you can patina it with vinegar and salt.
- spray paint – I’m really loving Behr’s line of spray paints. They have a good variety of colors.
- create a fabric sleeve – if you can sew, you can sew a long tube out of fabric that you slide on once the structure is together (minus the feet/base) and cover the PVC.
Step 4 – Assemble
The nice thing about this structure is that it’s lightweight and can be taken apart into pieces for transport.
Twist your pipes and connector pieces together.
Using a rubber mallet will make your structure more secure. But it will also make it harder to get the pieces apart. So be mindful of that.
You can also use your rubber mallet to get your pieces apart.
Wood Base
The wood base gives you more room on the table. I also think it looks a little more polished.
Instead of a wood strip, you could use two heavy wood blocks. Or, if you know how to create molds and work with concrete, you could create a concrete base.
For this version, you’re removing the bottom connector pieces and PVC feet.
So you can remove the 2 3-way connector pieces, and 4 end caps from your shopping list.
Instead, you’ll drill two holes in the wood that the PVC frame will fit into.
Follow all the steps above to create your frame, skipping step 2 for the feet.
Extra materials needed:
- Heavy strip of wood (to create a base to hold up the frame and create feet with (if needed))
- Clamps (to hold wood pieces together while glue dries)
- Safety glasses (to wear while cutting and drilling the wood)
- Sandpaper
- Glue
- Paint or stain (to finish the piece of wood)
Step 1 – Cut wood base
Cut your wood strip 2 – 4 inches longer than the width of your structure.
Step 2 – drill holes in base
Attach the two corner connector pieces to the top piece so you have the exact distance between the holes.
Place that piece on your wood strip and trace around the bottom of the connector piece so you know where to drill your holes.
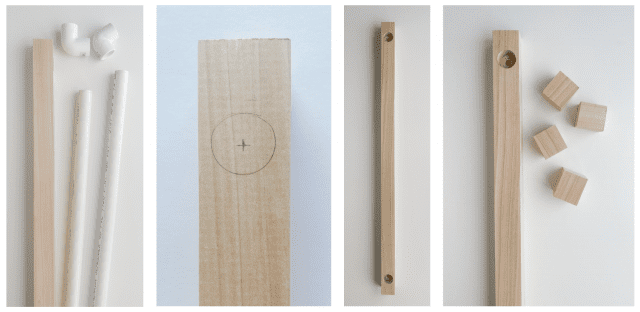
Find the centre of the circle and make sure it’s centered on your wood strip.
Put on your safety glasses (some chips of wood did go flying as I drilled), clamp the wood strip to a sturdy surface, and start drilling.
You don’t need to go all the way through; I drilled the hole a little more than half the thickness of the wood.
Step 3 – Add feet
Depending on the weight and width of your piece of wood, you may need to add feet so it’s sturdier and doesn’t tip forward or backward.
I found these short feet made my structure sturdy enough, but the heavier the items you’ll be hanging from the frame and the more interaction shoppers will have with items on the frame, the longer you’ll want your feet to be.
I used wood glue to attach the feet to the base and clamps to hold them in place while the glue dried.
Alternatively, you could use screws to attach the feet.
Step 4 – Finish
Use finishing sandpaper to smooth any rough edges.
Paint, stain, or apply another finish to your base, so it matches or compliments your PVC pieces.
I hope you found this article helpful! Please let me know in the comments if you have questions 🙂

Hey, I’m Erin 🙂 I write about small business and craft show techniques I’ve learned from being a small business owner for almost 2 decades, selling at dozens of craft shows, and earning a diploma in Visual Communication Design. I hope you find my advice helpful!
I’ve been looking for a vertical way to display my greeting cards without adding too much bulk to my loading and unloading routine. And something that can withstand the wind because I do a lot of outdoor markets. This is a fantastic idea! I am definitely pricing this out before my next market!
Hi Kelsey! For wind, I would suggest clamping the structure to your table. Unless you create a really sturdy/heavy base (e.g. like a smaller version of this concrete umbrella stand x2 for either side of your frame https://www.youtube.com/watch?v=ZGD-58s8ToY), the structure would probably be blown over by a wind gust.
Here’s an example of a table clamp that might work (just be sure to check how wide the clamp opens in comparison to the thickness of your table + frame base) https://www.amazon.com/VIVO-C-Clamp-inch-20-Thickness-MOUNT-CP02/dp/B09WJMCDCZ/ref=sr_1_5?crid=3DXNZ27G6GXWX&keywords=table+clamps&qid=1681931267&sprefix=table+clamps%2Caps%2C168&sr=8-5
I hope that helps!
~Erin
If it is larger make sure it will fit into your car! We have to drive to shows with our car seats all the way forward
Great point Rue! You can also use additional connector pieces so you can use shorter lengths of pipe.
So if you want your structure to be 60″ tall, instead of using 2 – 60″ long pieces, you can use 4 – 30″ long pieces, using a 3-way connector piece to connect 2 of the 30″ pieces. Once it’s broken down, the pieces should be able to sit between the two front seats so you don’t have to have an uncomfortable ride 😉
~Erin
These are great ideas. Wind is often a real problem at outdoor events so the option with mesh is good for that. You could also hang them from your canopy instead of standing them and tie down the bottoms. Depending on product you could leave them merchandised to cut down on your set up and breakdown time.
Great points Ethel! Hanging the structure on your canopy is a great option.
~Erin
What a great idea, Erin – thank you so much for sharing.
One can certainly make this as multifunctional in terms of size variation according to needs at any given time, in that you could cut and make up different lengths of PVC pipe to accommodate both table top and floor standing displays so you will always have options.
I love this idea and will definitely be making this up.
Thank you Caz! Glad you found it helpful 🙂 The PVC pipes definitely allow you to be versatile. The bigger you go, the more playing around it requires to make it sturdy, but there are several configurations that would work.
~Erin