How To Make a Scrunchie Display Stand (for under $25)
When I first started selling at craft shows, I was in a tiny apartment. I didn’t have much room to store display fixtures and I didn’t have power tools to cut pieces of wood.
I also didn’t have any way to cary big and heavy pieces of wood home.
So to me, this DIY is perfect.
It’s:
- Low-cost
- No power tools required
- Easy to transport
- Easy to make
- Quick to make
- Customizable
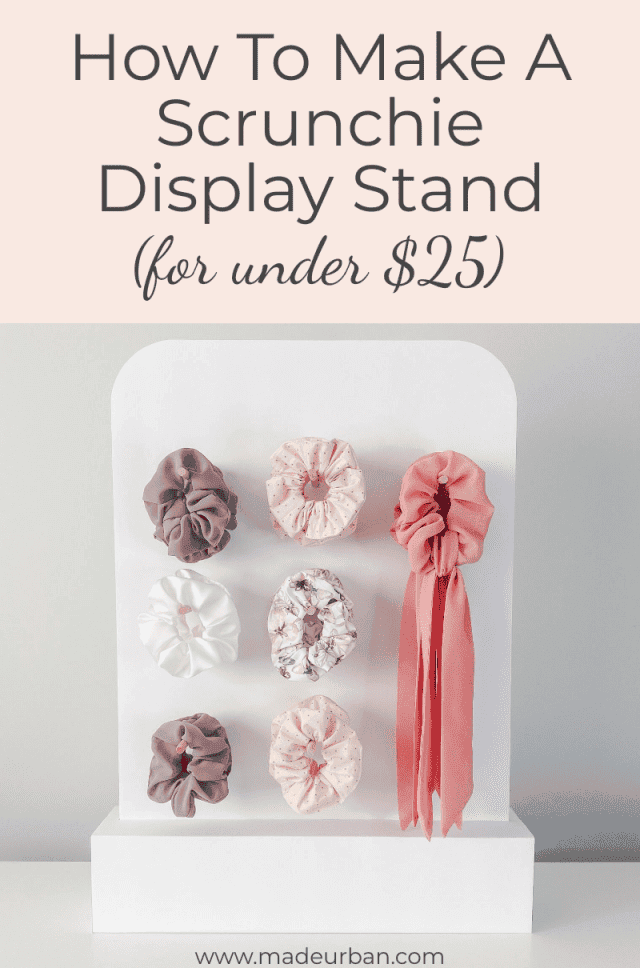
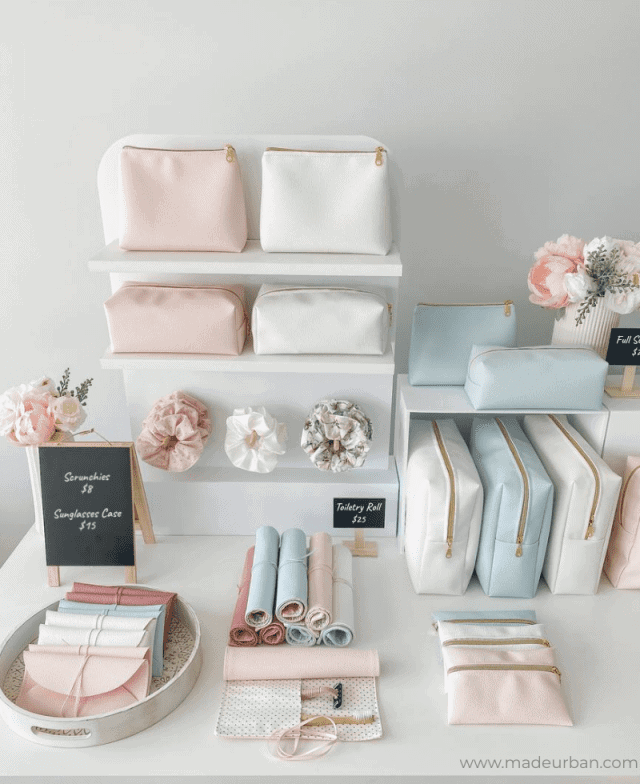
You can also alter this stand to add shelves, which slide onto the dowels. I’ll explain how to do that in another DIY. Below is an example of combining shelves and hanging space:
Materials Required
Sourcing materials from Hobby Lobby, this display stand can be made for around $20. Where you’re able to buy your materials will impact the cost of this DIY.
- Foam core board x 4 – I used 20” x 30” boards, but you can go bigger or smaller depending on your needs.
- Dowels (6 – 9) – You can purchase any size you prefer. I purchased a pack of 12” long dowels that are 3/8” in diameter. If you have a way to cut the dowel to length, it is cheaper to buy one or two long pieces. I did cut my dowels in half so they were 6” long, but if you don’t have the tools to cut them, you can simply use a 12″ long dowel and have it centred in your panel, so 6” of the dowel comes out the front, and 6” comes out the back.
- Rice (2kg) – Any rice can be used, the cheaper the better. It’s simply a material to add weight to the base so the stand doesn’t tip over. You can use another material as well (e.g. dried beans, pebbles or even rocks). You can use a glue gun but you must be able to work fast. You must add glue and position your pieces within seconds before the hot glue cools and dries. Using craft glue is a little more forgiving and gives you time to get the pieces lined up.
- Painter’s tape – This will hold pieces in place while your glue dries. If you use a glue gun, you won’t need painter’s tape, as the hot glue will dry in seconds.
- X-acto knife
- Ruler
- Pencil
Notes
We’re basically creating a tissue box-style base, with an opening that tightly fits around 2 pieces of foam core glued together.
We’ll fill the base with rice so that it adds weight and your display won’t tip over.
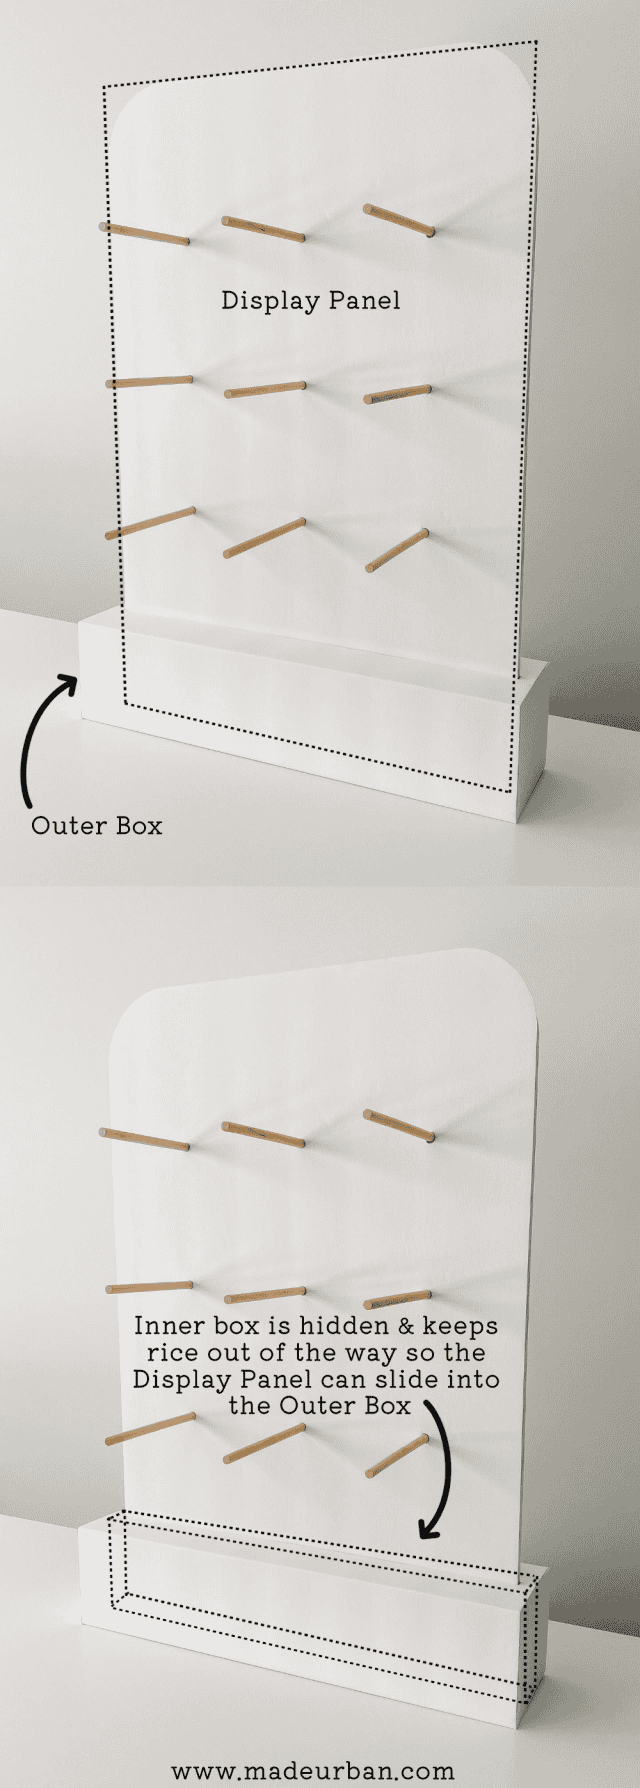
There are 3 main components to this display fixture:
- display panel
- outer box
- inner box
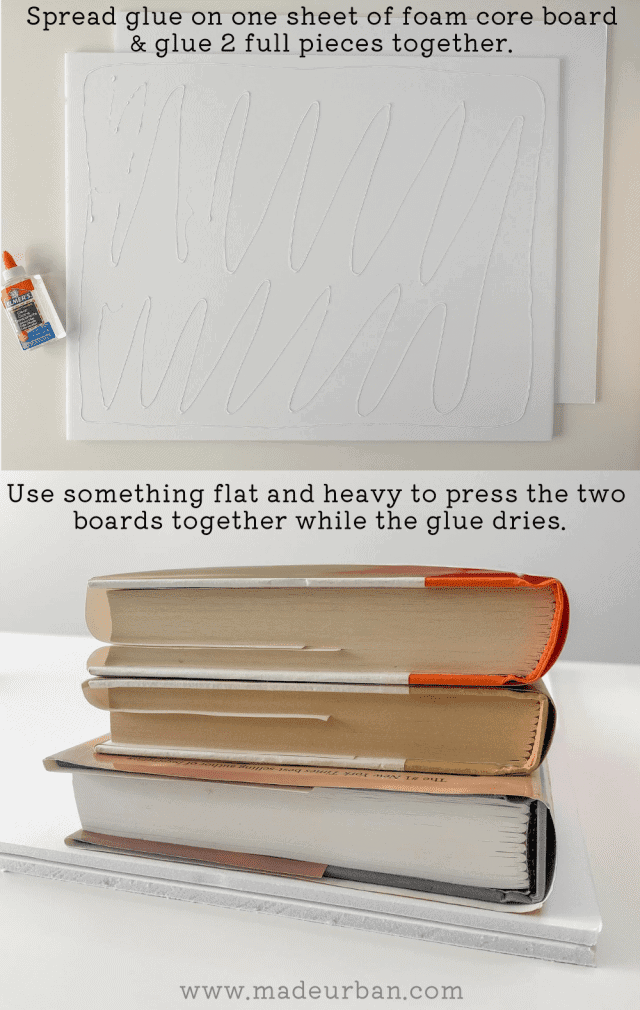
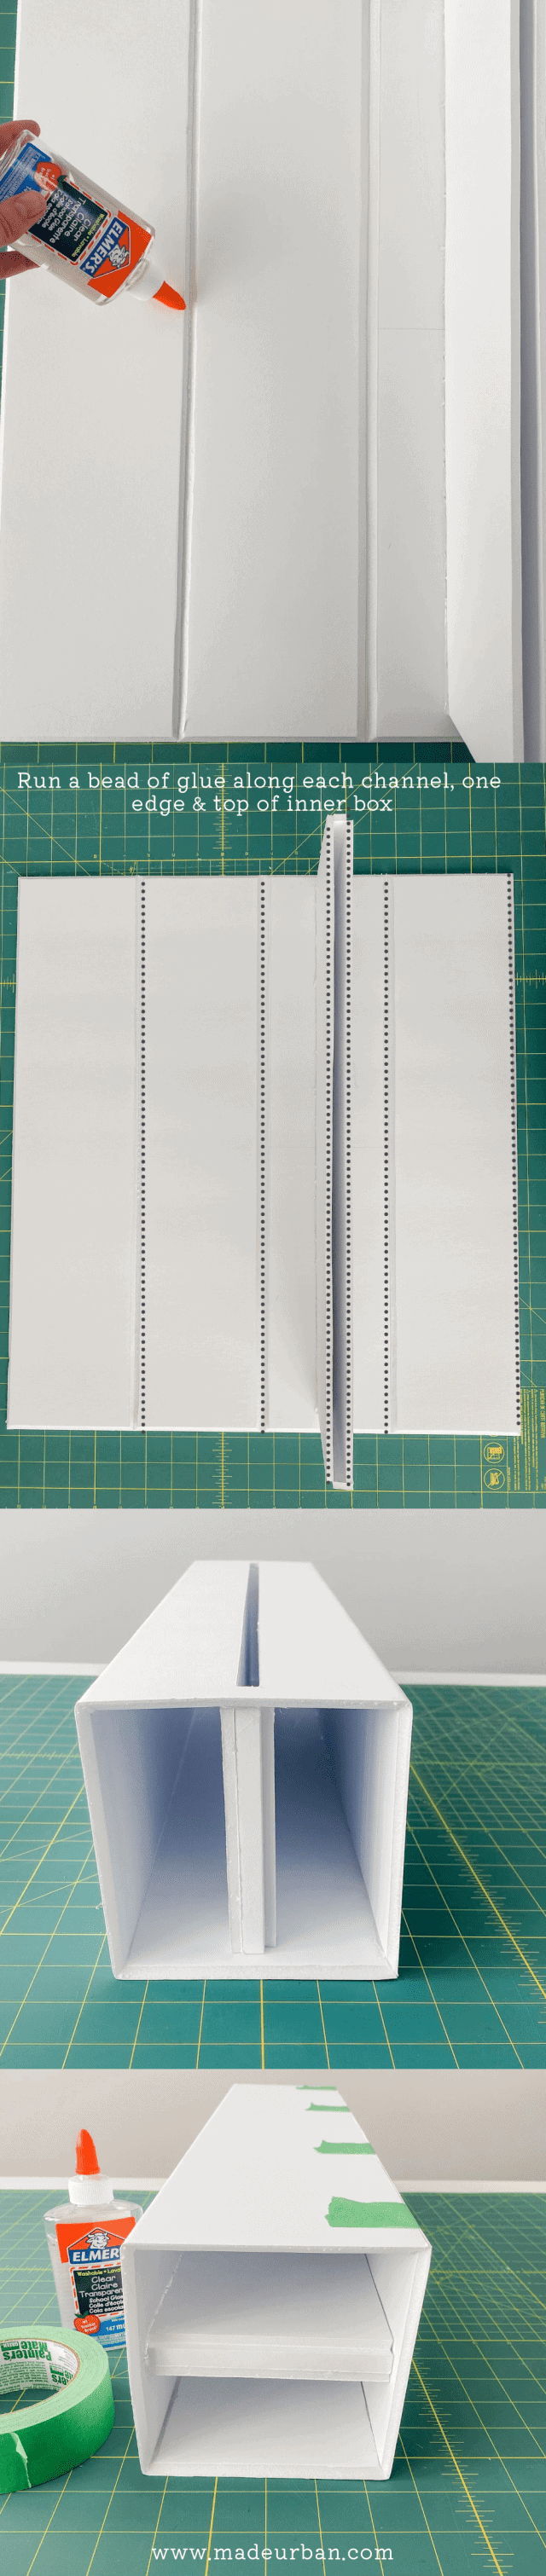
Step 1 – Glue 2 Pieces of foam core board together
I wanted the display piece to be sturdy and hold my dowels in place (without having to glue them). So I glued two pieces of foam core board together.
Be generous with your craft glue, especially around the edges.
You’ll be cutting a couple of inches off the width of the display piece, so keep that in mind when placing your glue.
You can use a piece of cardboard to spread the glue around.
Place the two sheets together, and use something heavy and flat to press the sheets together. I used several piles of books.
*Be mindful that foam core board dents fairly easily, so don’t use anything that will damage the sheet.
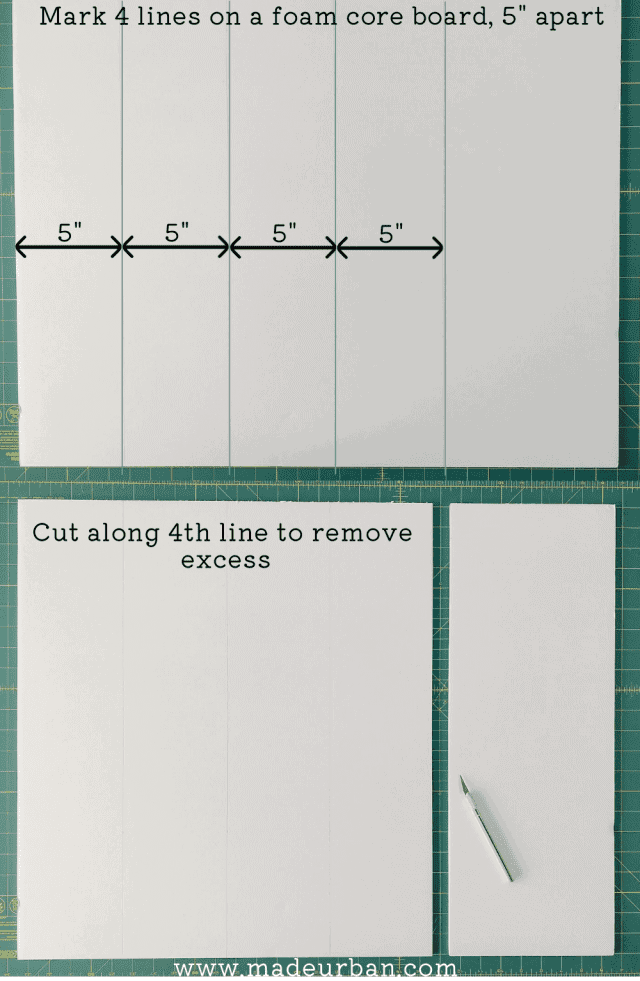
Step 2 – Cut outer box pieces
While the glue on your display panel is drying, we’ll work on the outer box.
Take a full sheet of foam core board and use your ruler and pencil to mark 4 lines, 5” apart, along the width of the foam core.
The piece will be 20” long by approximately 20” wide (or the width your foam core board comes in).
Cut off the excess length, by cutting along the 4th line.
You will also need to cut 2 – 5” x 5” pieces, which will be the end caps for your base.
TIP
If your display panel is taller, or you’re displaying heavier items than scrunchies, you may want to make the base of your fixture a little taller/bigger. You may mark lines 6” or 7” apart so your outer box is 6” x 6”.
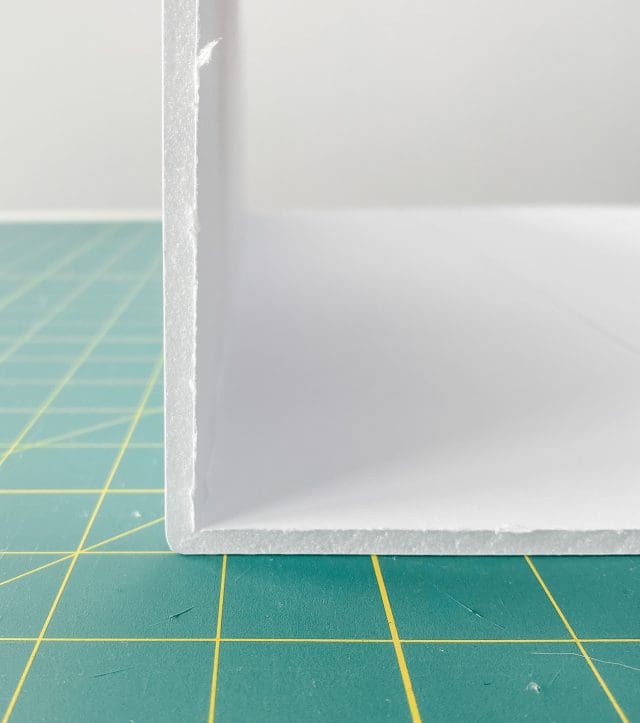
Step 3 – Score lines
Use your X-acto knife to score the other 3 lines.
A piece of foam core board has 3 layers:
- paper layer
- foam center
- paper layer
When scoring the foam core board, use a light hand and do a couple of passes to ensure you don’t cut through 3 layers.
You can then bend each section back so it snaps the foam, creating a scored edge.
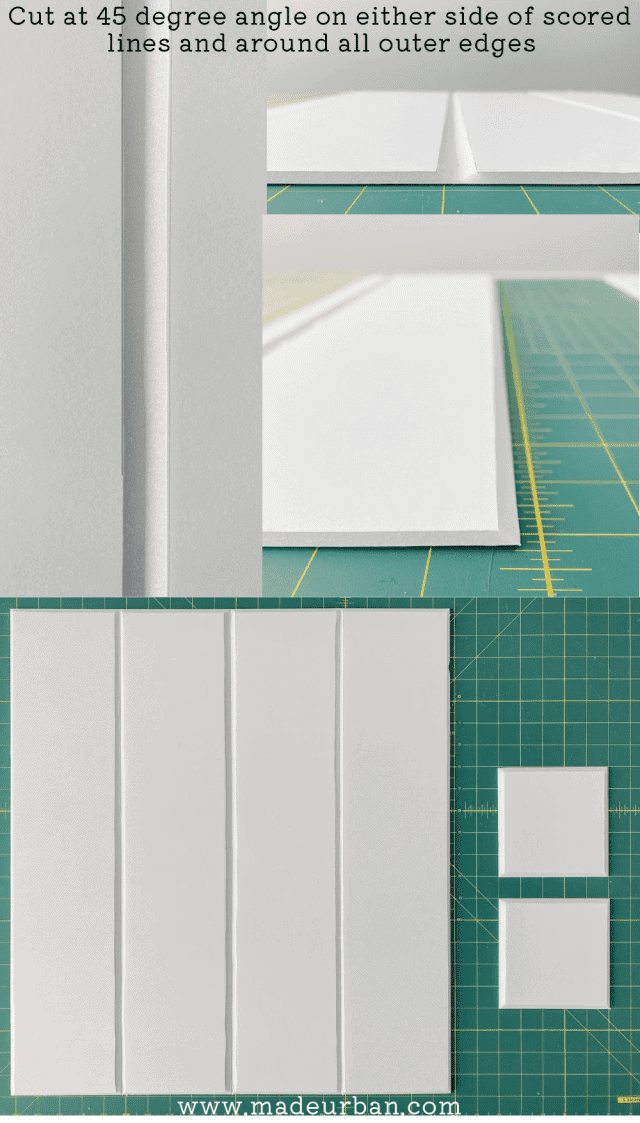
Step 4 – Cut 45-degree angles
Because we want the outside corners to be clean, we need to carve a channel along our score lines, putting our X-acto blade at a 45-degree angle.
This allows the pieces to fold in (as opposed to out, which exposes the foam centre) to create the box, as shown below:
You will need 45-degree angles cut into:
- either side of each scored line
- around all 4 edges of your outer box piece
- around all 4 edges of your 2 end caps
TIP
I strongly suggest practicing this step on a scrap piece of foam core to get the hang of the 45-degree angle, without going through the bottom layer of the foam core.
Draw two lines on either side of your scored line. From drawn line to drawn line, it should be just slightly wider than the thickness of your foam core board (e.g. my foam core board’s thickness is just slightly under 1/4″. So each line was approximately 1/8″ away from the scored line).
Next, I score the top paper layer along those two drawn lines.
I cut one side of the V-channel in two passes.
On the first pass, I place my blade at about a 30-degree angle, going into the line I just scored. This allows me to carve out a good chunk of the channel but avoid accidentally scoring the bottom layer of paper.
You can use a ruler to help guide your blade or just freehand it. I find the scored line does a good job of keeping my blade in place.
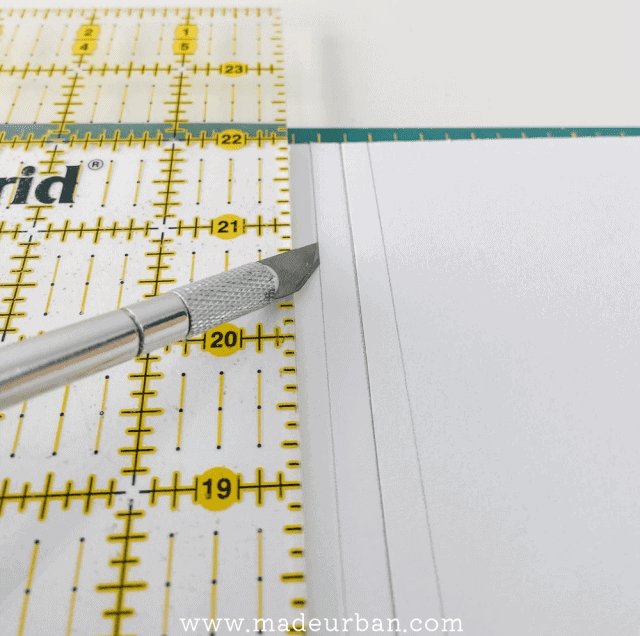
On the second pass, I place my blade at a 45-degree angle. Because I’ve removed some of the foam, I can better see where the tip of my blade is, being sure it almost touches the bottom paper layer, but does not go through it.
Repeat this step on the other side of your scored line so you’re left with a V-channel.
It’s okay if you don’t get the cleanest lines on these channels, as they will be hidden inside the box.
It’s also okay if it’s not an exact 45-degree angle. With each pass, you can remove a little more foam, until you have an angle that allows you to create a 90-degree corner.
Step 5 – Cut display panel to size
The display panel must fit within the outer box, so we need to remove a bit of width from the two pieces of foam core board glued together.
I took 3/4” off each side of my display piece. You may remove more or less to get the size you want for your display fixture.
Step 6 – Cut opening for display panel
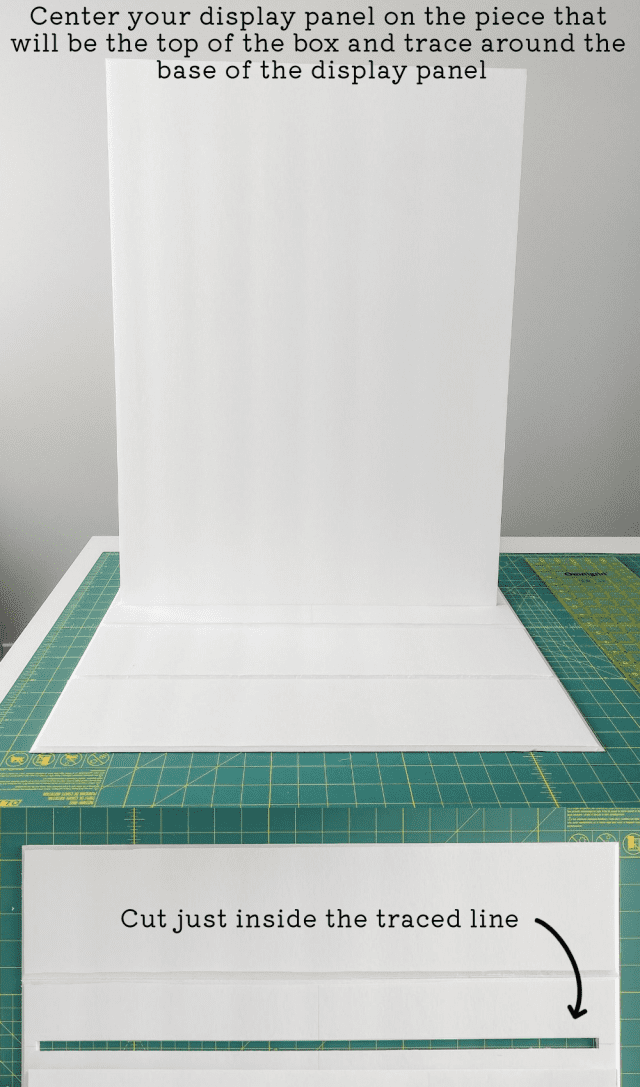
Find which panel of your outer box piece will be the top of your base (I use the second panel so that the seam of the box is at the back and the bottom).
Find the centre of that piece and stand your display panel on top.
Trace around your display panel, then cut just inside that line using your X-acto knife.
*You want this opening to hug your display panel tightly, so it stands straight up and down and doesn’t have room to wobble forward or backward.
Step 6 – Build inner box
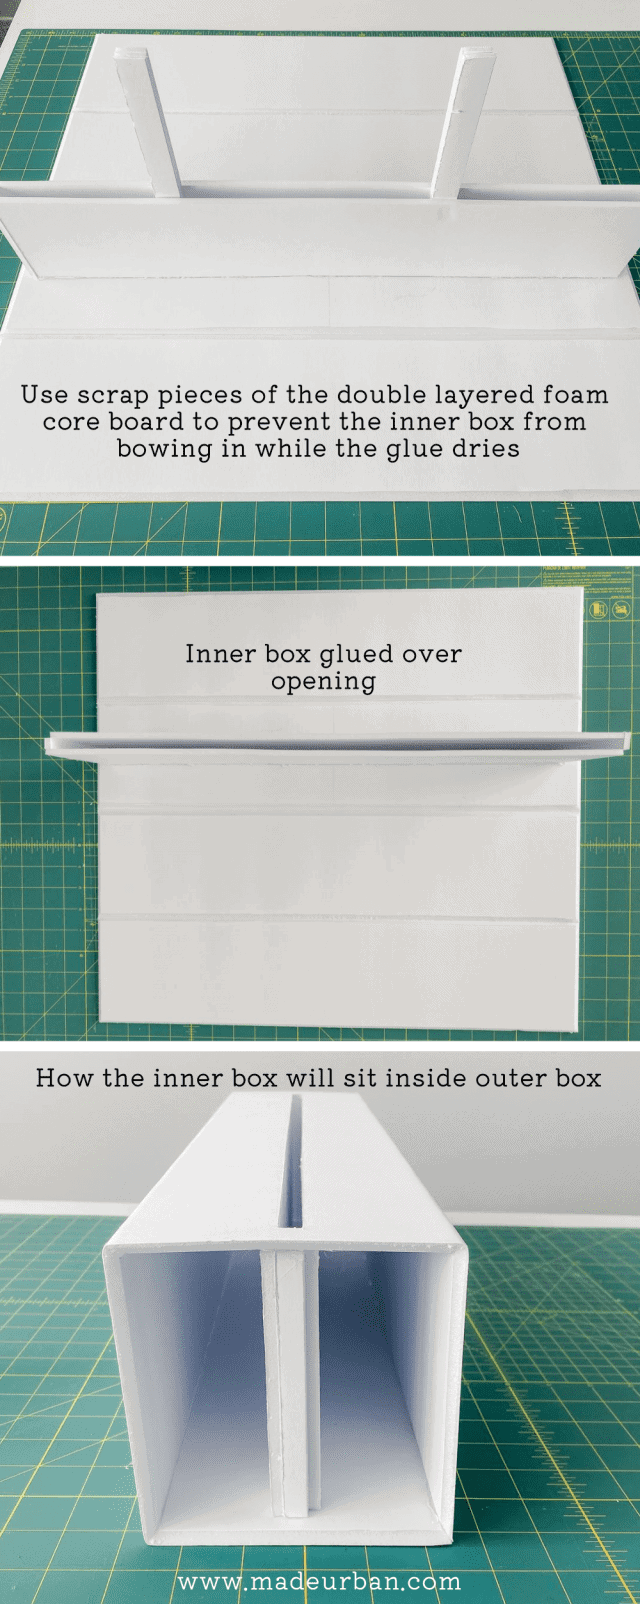
The inner box won’t be seen when your display stand is assembled, so you can build the base however you like (e.g. gluing 4 pieces together, scoring edges, etc.).
This inner box will keep the rice out of the way when you insert your display piece.
It will also hug your display panel and keep it from falling forward or backward.
This piece won’t be seen when your display stand is assembled. So you can simply glue 4 pieces together, or score and snap your pieces to create your corners.
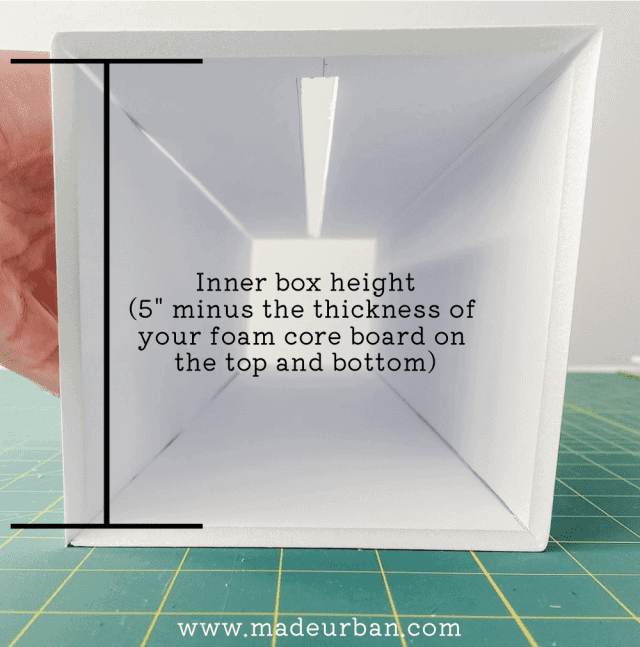
The height of the box should be 5” minus the thickness of your foam core board along the top and bottom. It should fit around the outside of the opening you just cut into the top of the outer box.
Step 7 – Glue inner box in place
Run a bead of glue along the top edge of your inner box and line it up with the opening you cut, making sure you’re gluing it to the wrong side of your outer box panel (so when you fold the pieces to create the outer box, the inner box is on the inside).
TIP
If your inner box bows in the middle (like mine does), use the scrap piece you cut off your display panel’s width to create spacers that flex your box out while the glue is drying.
Step 8 – Glue outer box together
Once the glue is dry and the inside box is securely attached to the outer box, you can glue the outer box together.
Be generous with your glue so your seams hold and rice isn’t able to fall out. But be careful with your glue placement. You don’t want it to squeeze out and show on the outside of your box.
Run beads of glue down each channel and on one of your ends.
Also run a bead of glue along the bottom of the inside box, so your inside box will be glued to the top and bottom of your outside box.
Fold the pieces in on themselves so you create a box.
Wipe up any glue immediately. If you put tape on top of glue that has squeezed out, it will tear the paper when you remove the painter’s tape.
If you’re using a glue gun and find some glue squeezes out, simply wait for the glue to cool and harden and then use an X-acto knife to carve off the excess glue.
Use painter’s tape to hold the box closed while the glue dries.
TIP
Be sure to be careful when removing the painter’s tape. It comes off fairly easily, however it can pull up some paper along cut edges.
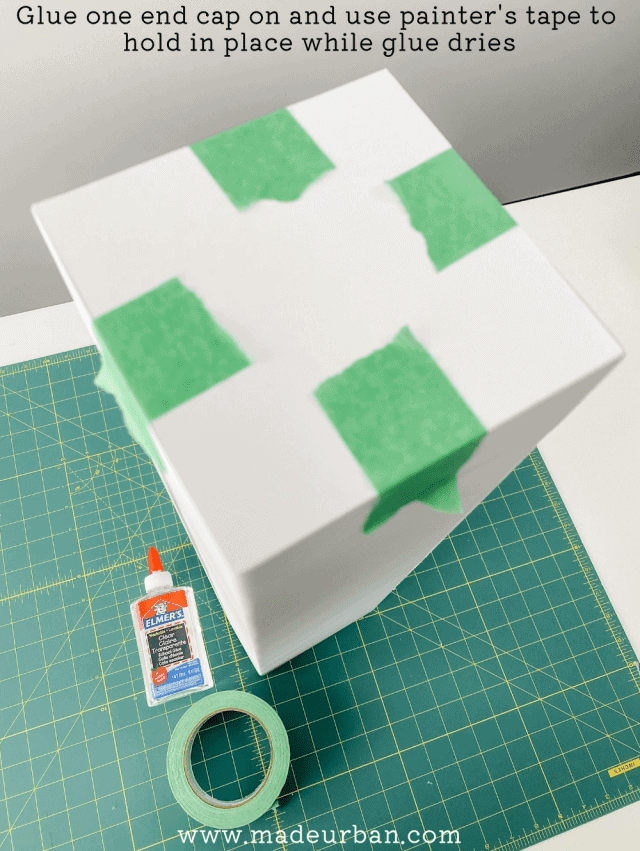
Step 9 – Glue one end cap on
We want to glue just one end cap on, so we partially close up the outer box and can pour rice in, on either side of the inside box.
Again, be generous with your glue to ensure rice won’t fall out of your base, and your seams will hold.
Run a bead of glue along the top edge of your box and press your end cap into place.
Use painter’s tape to hold the end cap securely in place while the glue dries.
TIP
You may not have a perfectly square box (and that’s okay). Dry fit the end cap to see which position gives you the cleanest fit.
Again, be careful when removing the painter’s tape after the glue has dried to ensure it doesn’t pull any paper up.
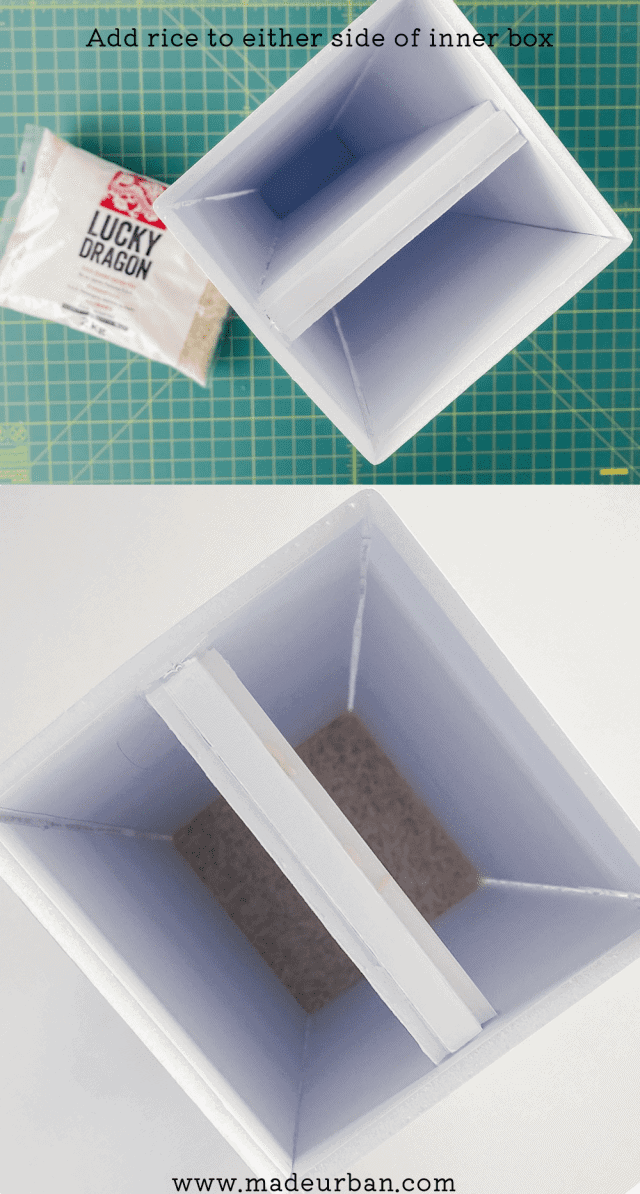
Step 10 – Add rice to base
Once your glue has fully dried to create your outer box and close one end, you can add your rice.
How much rice you add is up to you.
I found one 2kg bag gave me plenty of weight.
If you sell at outdoor events where you may be dealing with wind, you may want to use more rice so your base is heavier and more sturdy.
Don’t add too much weight or it will put stress on your glued joints and they could come undone.
Try to distribute the right evenly on either side of the inside box. If you don’t, the front or back of your base may have more weight, which may cause it to tip over or not sit straight.
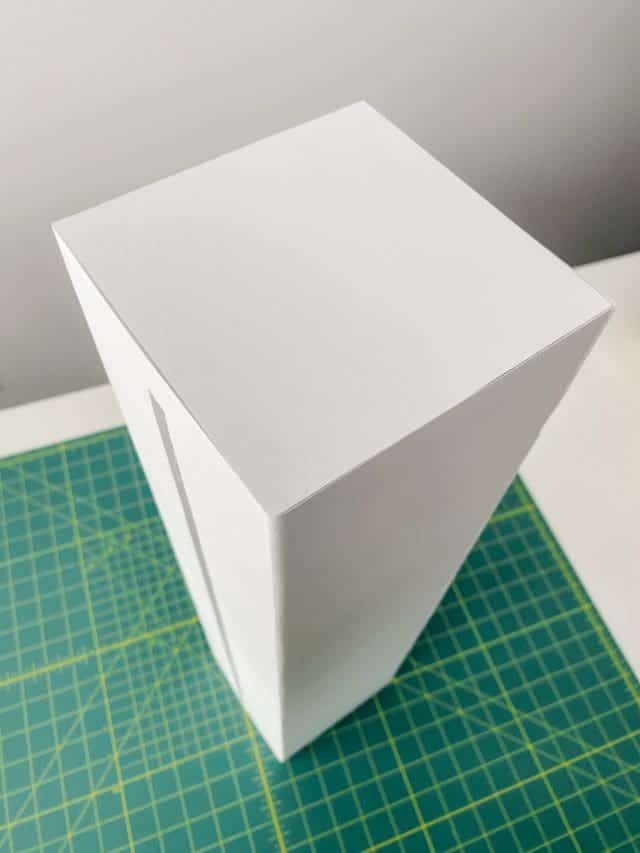
Step 11 – Glue on other end cap
Once you’re happy with the weight of your base and the placement of your rice, you can glue the other end cap on.
Be generous with your glue and run a bead along the edge, press the end cap into place and use painter’s tape to hold the end cap in place while the glue dries.
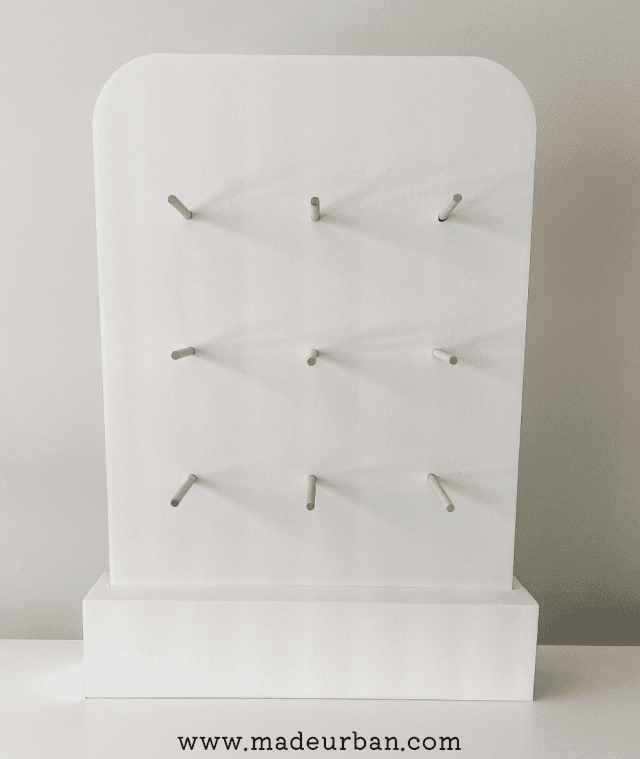
Step 12 – Add holes for dowels to display panel
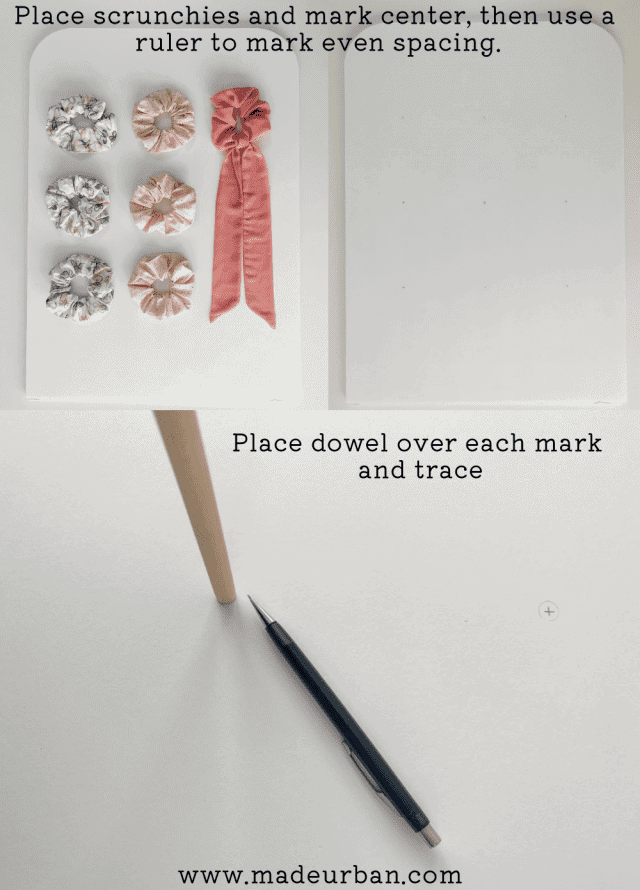
Take your display panel and position your scrunchies on it to get a general idea of spacing.
Use a pencil to lightly mark the centre of each scrunchie.
Then use the pencil marks as a rough guide but use a ruler to make sure the spacing is even.
Mark where you want to place the dowels with an X.
Place a dowel over each X and trace around the dowel.
Score the top layer of the foam core, slightly inside the traced circle. Remove the top paper layer.
Use the X-acto knife to cut an X in the centre of your circle, being sure to press the blade through all layers of the foam core board.
Then press your blade through all layers, going around the circumference of the circle. It’s easier to simply press the X-acto blade up and down as you go around the circle, rather than trying to slide the blade around the circle.
Flip the display panel over and you should see a rough outline of your circle on the back side of the panel, where the tip of the X-acto blade punched through.
Score around the circle to cut the paper.
Use your dowel to push the foam out of the hole.
Repeat this for the rest of the traced circles.

TIP
This step is tedious but take your time with it. I did try using a drill but it chewed up the paper and made the dowel hole bigger than I wanted.
You want the foam core board to tightly fit around your dowel, otherwise, the dowel will droop. So cut the hole slightly smaller to start. The dowel will press the paper and foam out of the way when you push the dowel through the hole, which will ensure a tight fit.
If you end up cutting one hole too big, you can use glue to build in the opening. Alternatively, you can glue your dowels into place. This makes the pegs more sturdy, however, it may make the display stand a little more difficult to transport.
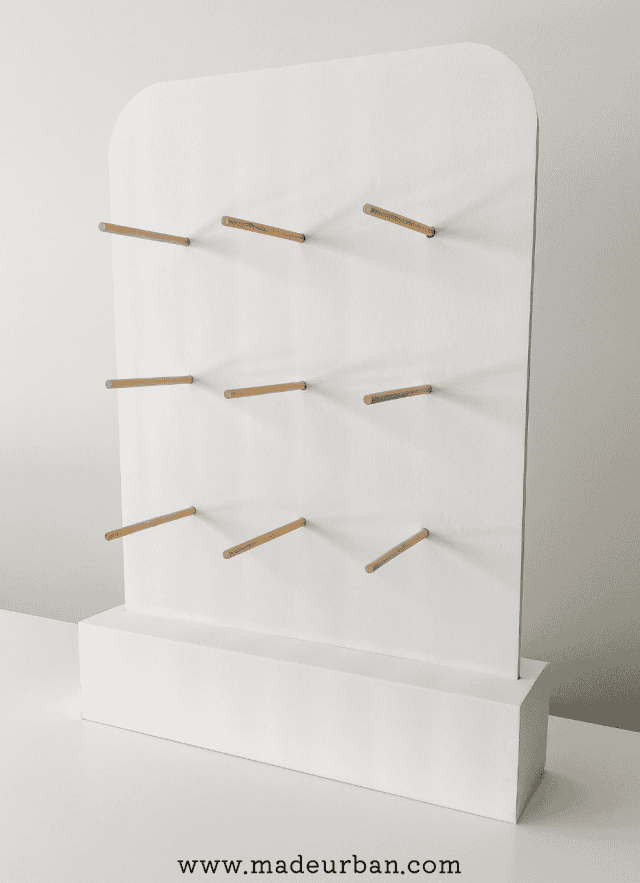
Step 13 – Cut dowels
Cut your dowels to the desired length. Mine are 6” long, which fits 3 or 4 scrunchies on each peg.
If you don’t have tools to cut your wooden dowels to the length you want, you can use a 12” long dowel and have half the dowel coming out the front of your display panel and half out the back.
This gives you space to keep overstock of your scrunchies.
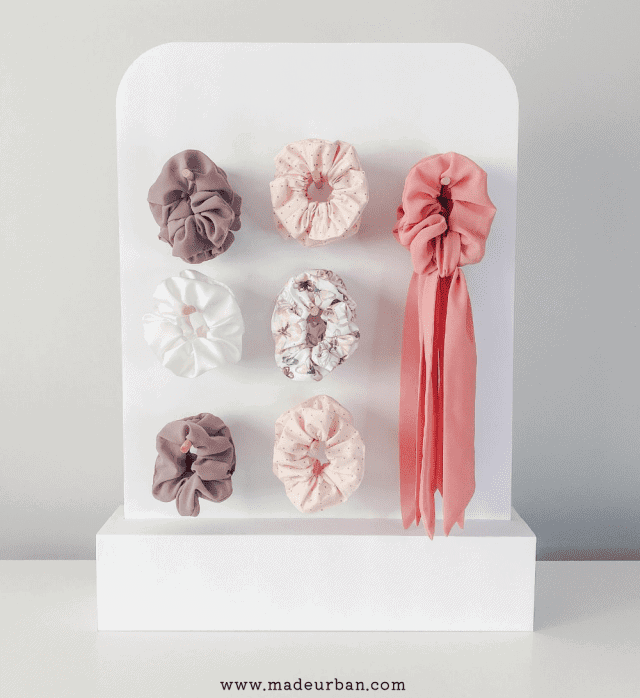
Step 14 – Assemble your display fixture
Now you have your finished base and your display panel.
Insert the display panel into the opening at the top of your base. It may be a tight fit, but that’s okay. Just slowly work the display panel in.
Fill with products and watch the sales come in! 🙂
Optional Steps
The following steps aren’t necessary, but they may help elevate your display or make a more sturdy fixture.
Glue dowels in place
I like the idea of being able to remove the dowels so I have a flat display panel that’s easy to transport and store.
However, I have found, inserting and removing the dowels has stretched the holes so they don’t fit as tightly into the display panel.
You may also find that the dowels don’t sit straight if you cut your holes a bit too big.
If this is the case, use glue to hold your dowels in place.
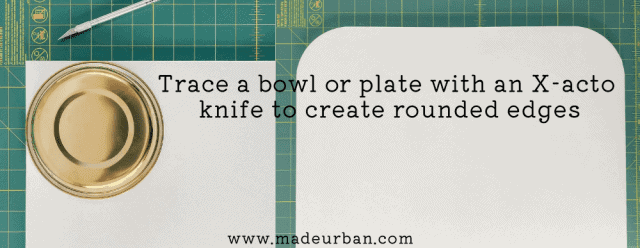
Shape your Display panel
I rounded the corners on the top of the display panel, because as I like the look of it. You can use a bowl or plate to create the curve you like.
If you would like to round the top of your display panel, line up a bowl/plate with your edges, lightly press down, and run your X-acto knife around the edge several times, until you’ve cut through all layers.
Paint or wrap your display
You can paint foam core any color you like to fit your display and/or brand.
You may also purchase peel and stick wallpaper (or drawer liner) and cover your panels with decorative paper.
This will add a little more protection to your foam core (it does dent easily so be careful during transport).
You may also choose to do this if your edges aren’t as clean as you like or if you have glue that squeezed through.
Add signage
Leave a bit of space at the top of the display panel to be able to add your logo or signage (e.g. “Scrunchies $10 each”).
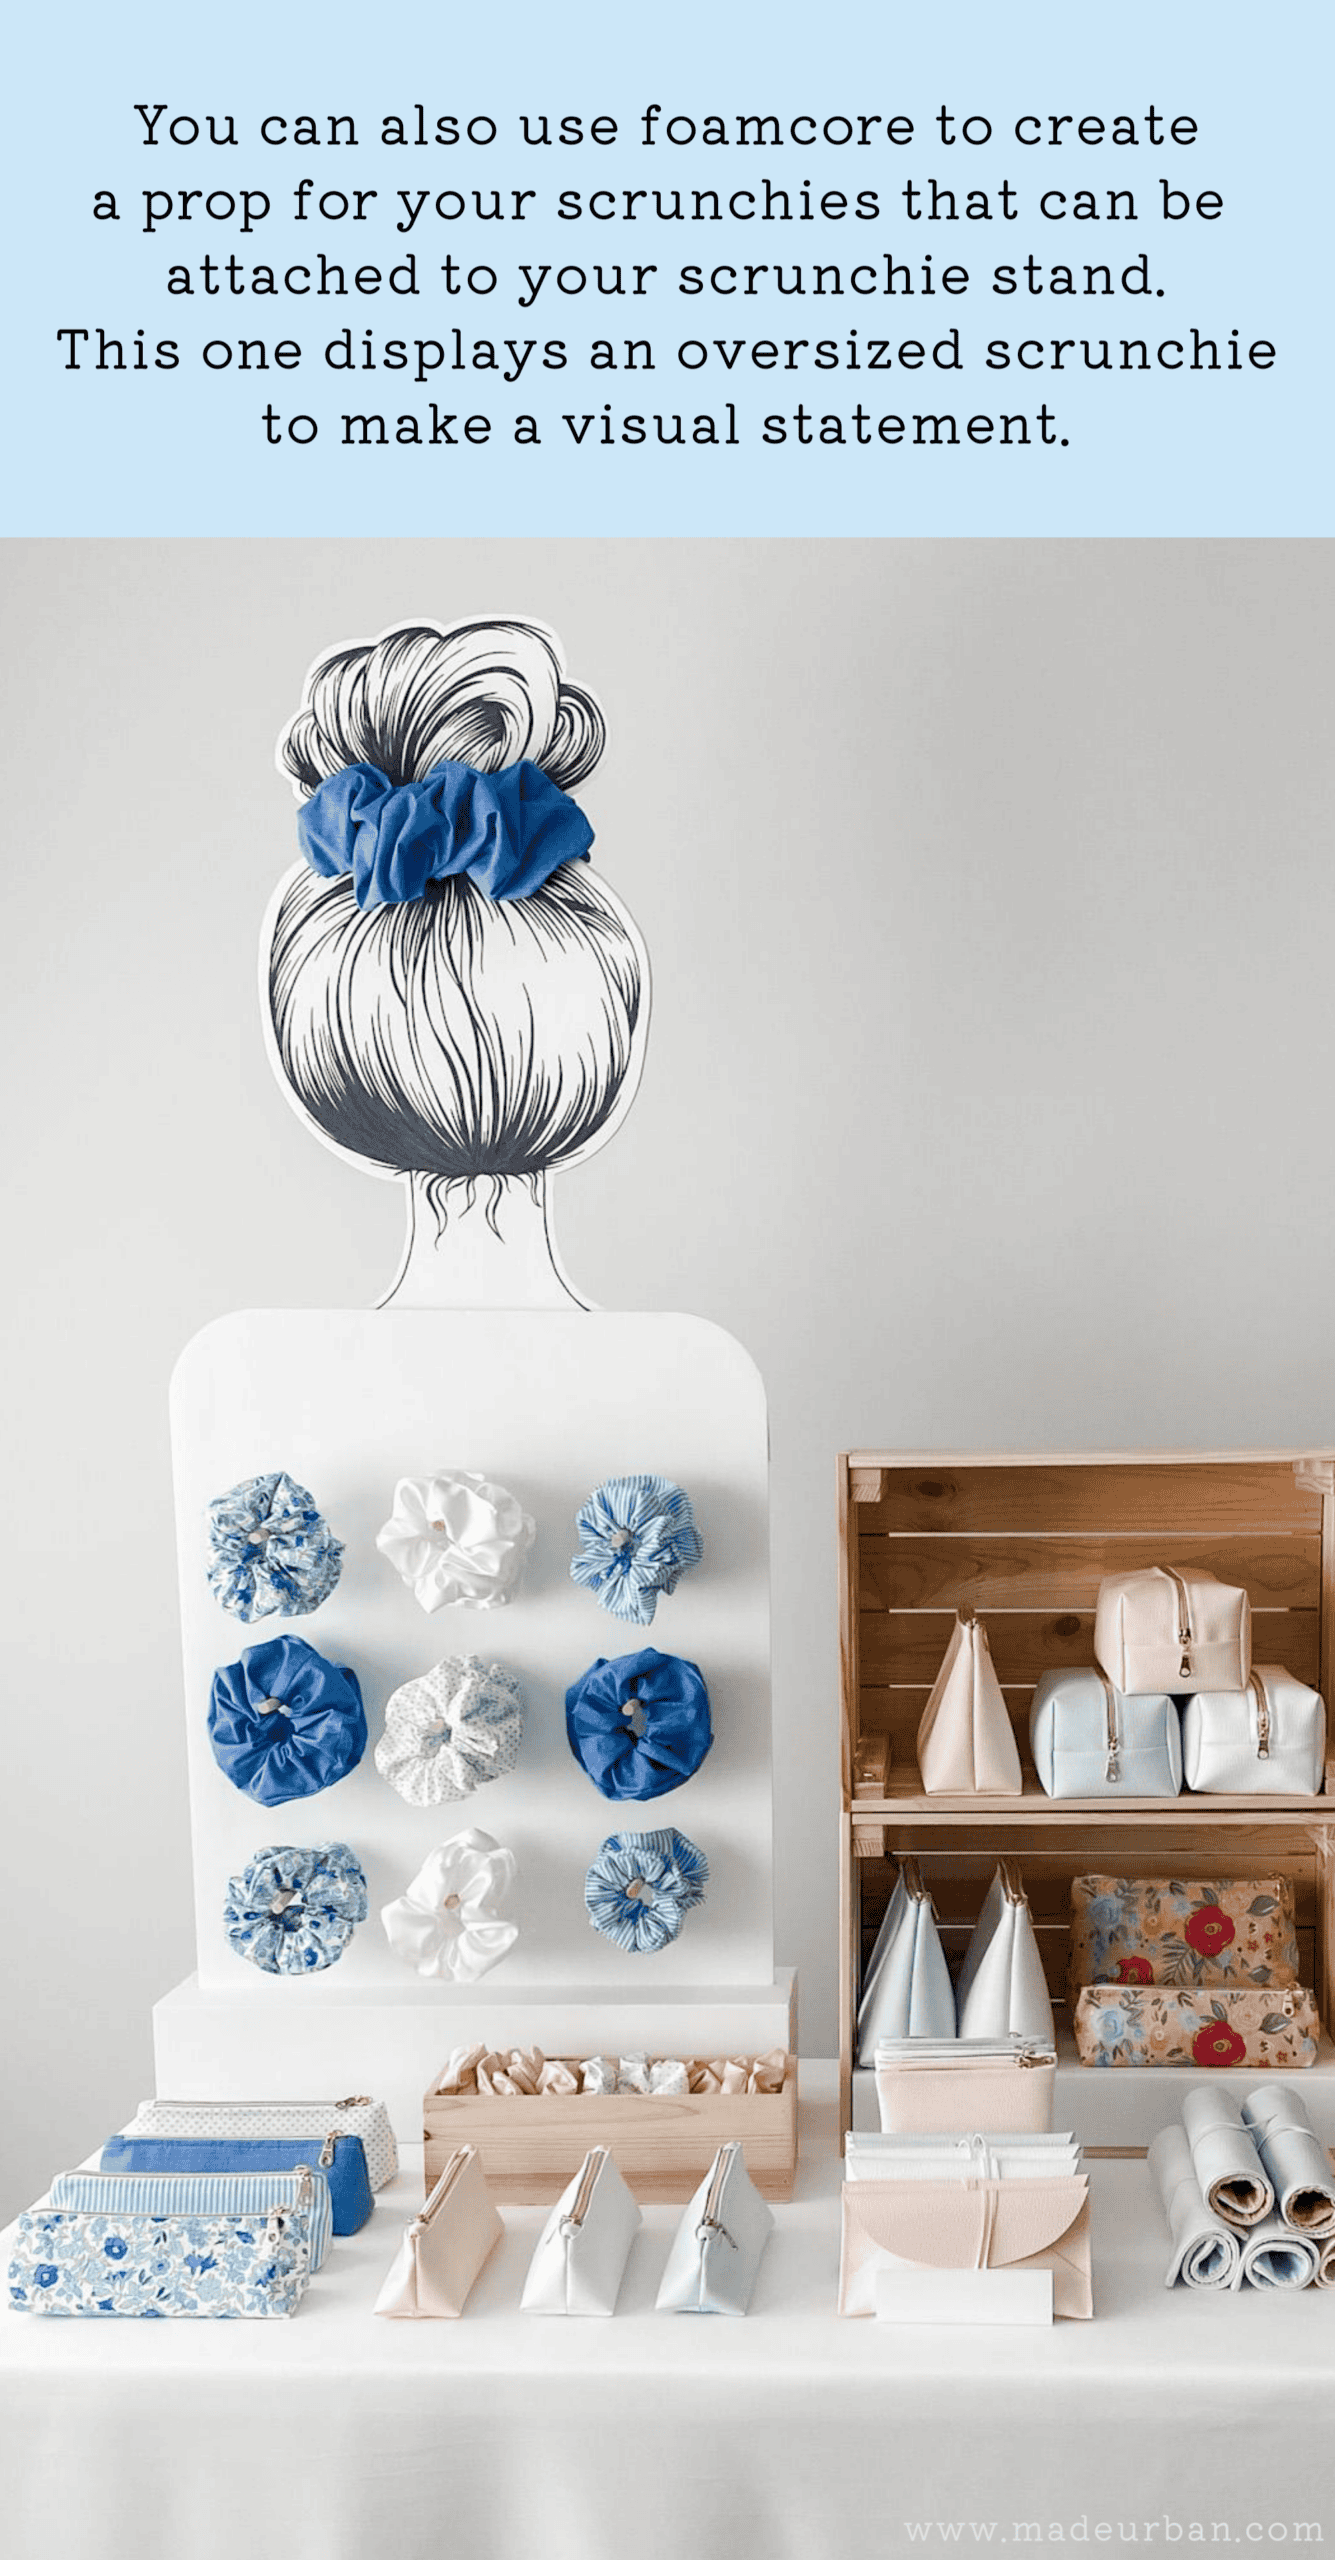
If you have extra foamcore, you can draw a head of hair and cut out the shape. It can be attached to the top of your scrunchie stand, or add supports so it stands on its own. I made mine oversized and made one extra large scrunchie to make a bold visual statement (scale is one way to make your booth stand out; this article explains). However, you can make a lifesize head to display a regular sized scrunchie.
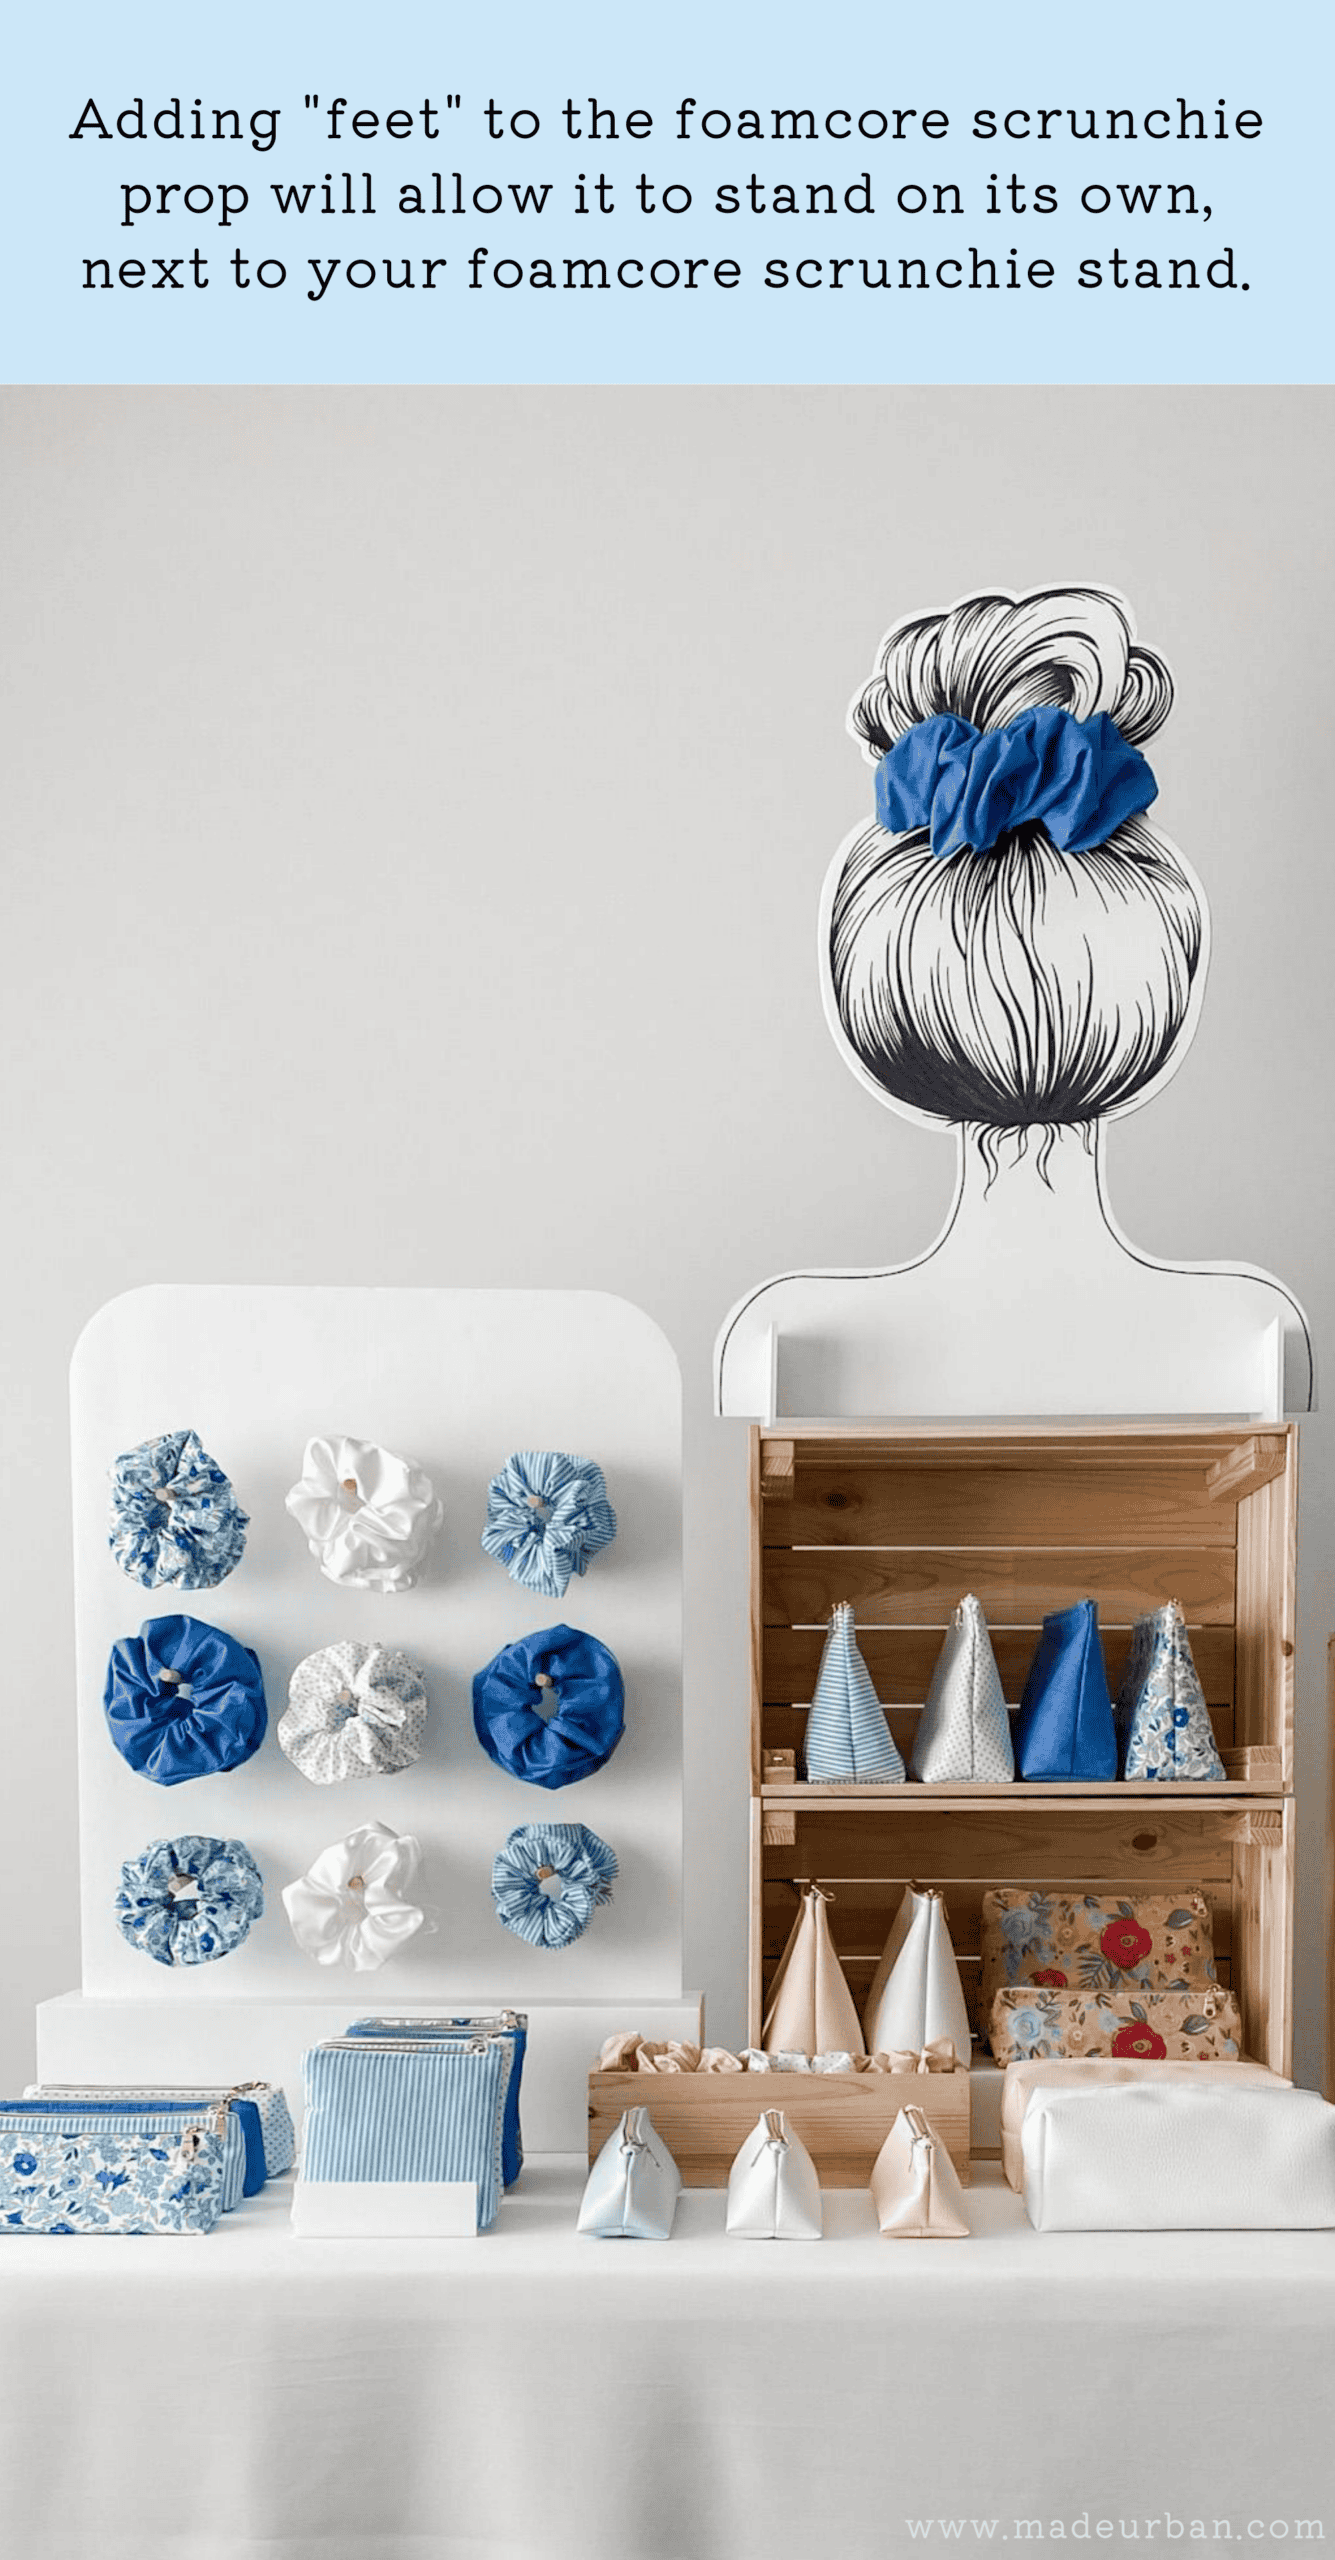
You can also add “feet” to the prop so it stands on its own.
You can use this fixture to display items other than scrunchies. Just adjust the size and spacing of your dowels.
I hope you found this DIY helpful!

Hey, I’m Erin 🙂 I write about small business and craft show techniques I’ve learned from being a small business owner for almost 2 decades, selling at dozens of craft shows, and earning a diploma in Visual Communication Design. I hope you find my advice helpful!
Is there a way to print out the head? I’m not very good at drawing. Thanks!
Hi Kim!
Not at the moment, but let me see if I can figure out how to create something you can print at home.
~Erin
I’m looking for the same thing.
no artistic talent
Erin, this is so genius!!! I did spend money for a little wood pegboard for purse charms and now I’m kicking myself! I wish I had seen this first. I’m thinking about what else I could make now. Your work is beautiful- love the scrunchie head lady!
Thanks Bettsi!! I love using foam core because it’s just so easy to work with and light to move and store. I’m testing ways to make it a little more durable though. I have found with use, the wooden pegs start to compress the foam, so they don’t sit as straight. I have a few more foam core projects on the horizon I’ll be sharing soon 🙂
~Erin