5 Odd Display Tricks I Always Use
When I was making Christmas dinner for the first time, I had a lot of questions for my mom.
I asked how much poultry seasoning she puts in the dressing and she said:
“I don’t know…until it smells like dressing”.
It’s an odd way to determine how much seasoning to use, but it works. If the dressing doesn’t smell like dressing, it needs more seasoning.
Some of the best cooking tips I’ve learned don’t come from a cookbook. They’re little tricks experienced cooks have shared with me.
The same is true for many display tricks I use; I didn’t learn them from a textbook.
They come from experience; whether that be mine, an instructor’s, or a mentor’s.
As I’ve been setting up displays to photograph and sharing my tips through articles (like this one and this one) I’ve realized there are unwritten, and maybe a little odd, tricks I use without realizing.
Here are 5 of them:
1) Squinting
When you think you’re done setting up your craft show display, stand back several feet, look at your display, and squint.
I don’t know the technical reason this works, but I find it blurs the lines and smaller details so it’s more apparent which parts of the display stand out.
These elements are less apparent when you’re standing right in front of your table, setting up.
When you view your display through an “unfocused lens”, you can make sure your display looks balanced and that eye-catching elements are “sprinkled” around your table or booth.


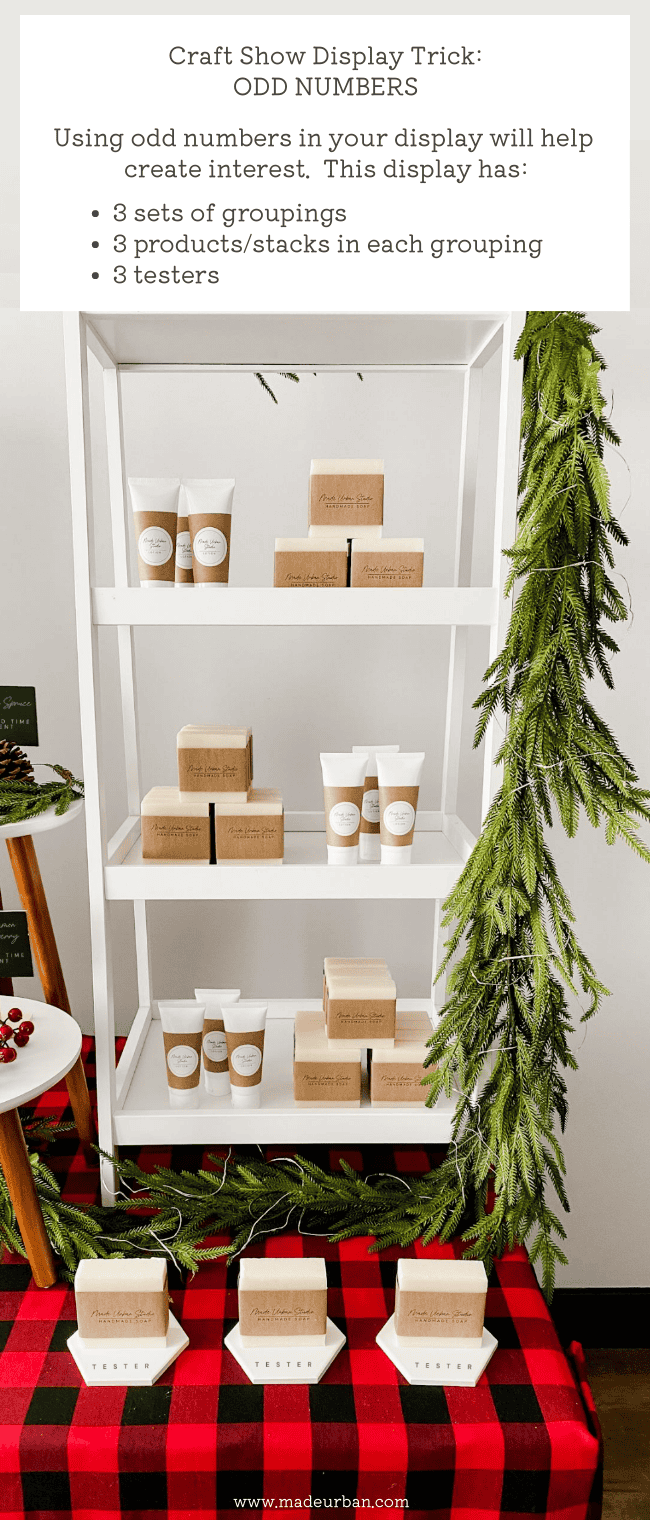
2) Odd numbers
Whether I’m merchandising a table in a retail store, setting up a craft show display, or decorating a space in my home, I try to work with odd numbers of items.
It’s a tip that’s actually in my Visual Merchandising & Design textbook from college: “odd numbers seem to work better than even”.
In a 300+ page textbook, that’s the only mention and explanation of using odd numbers in display. Yet it’s SUCH an important aspect of a visually pleasing display.
I believe an odd number of objects may help a display look a little more natural, less forced, and the asymmetry creates interest.
“Objects” to use odd numbers of may be:
- groupings of products
- props
- signs
- etc
For example, I would create 3 groupings of products on a table (rather than 2 or 4) or use 3 signs in my space.
“Odd numbers” can also be created by combining different objects that have a similar “visual weight”.
Meaning, 2 larger objects can be combined with 3 different larger objects to create an odd-numbered total.
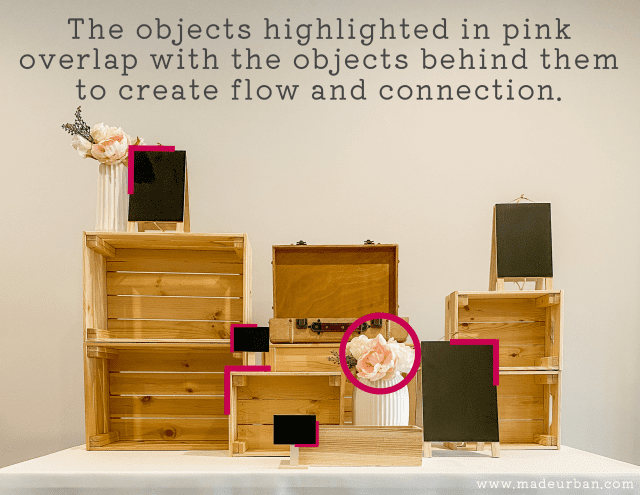
For example, the photo below only has 2 vases of flowers, but they work with the chalkboard signs to create an uneven number of objects.
Although they’re very different objects, the vases stand out due to their size and color, as do the black signs.

There really isn’t an exact science to creating interest with an odd number of objects or elements.
If there’s enough asymmetry in your display, an even number of objects can also work.
It comes down to introducing the “unexpected” into your display.
If things are too repetitive, the shopper will lose interest. Odd numbers can throw off their expectations.
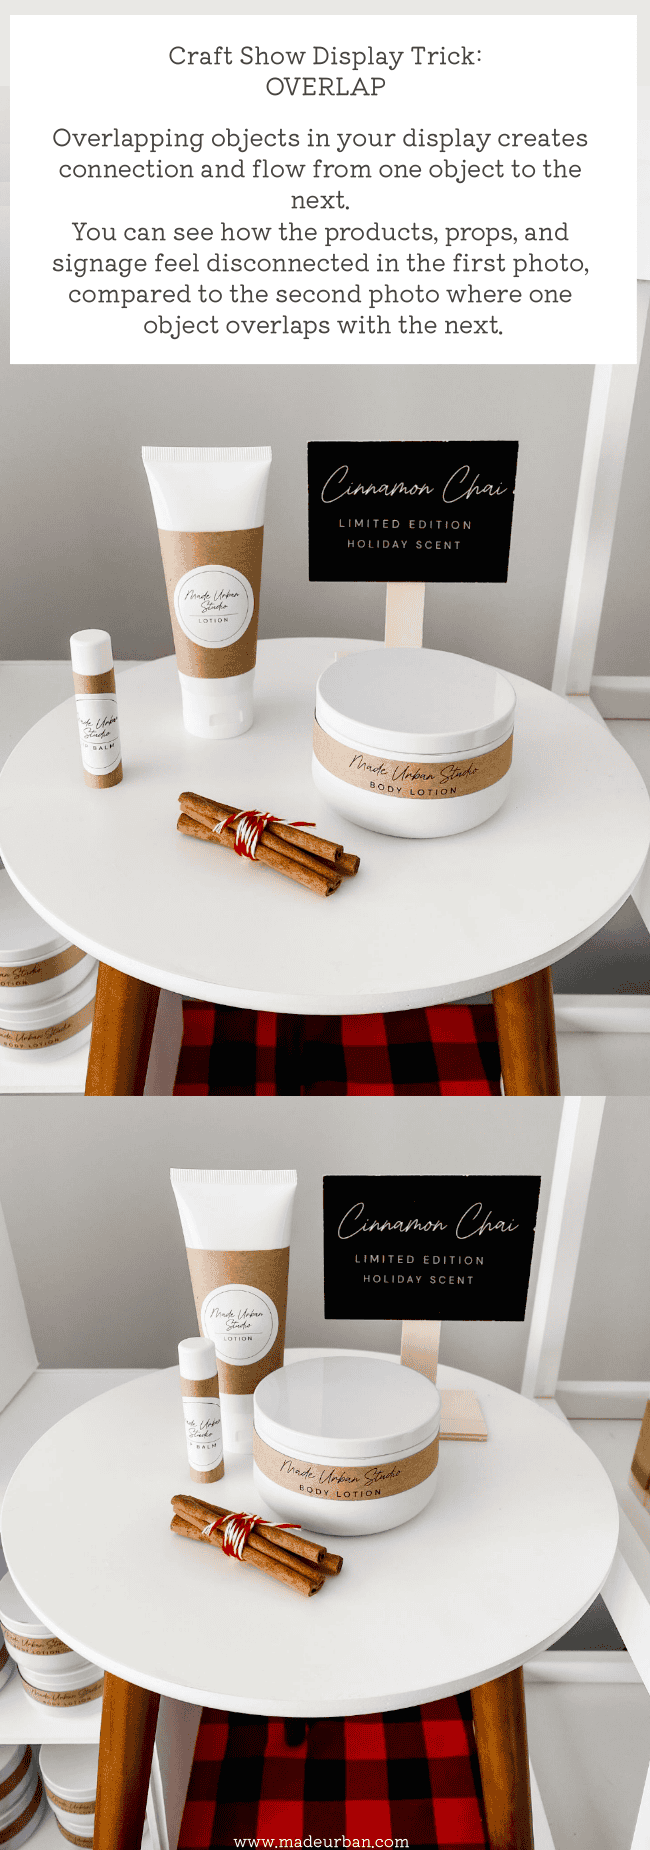
3) Overlapping
I think overlapping and staggering objects is a simple way of tying everything together and using line & composition (another important design technique).
When you slightly overlap one object with another, it creates a connection and the eye flows from one object to the next.
In the craft show setup below, notice how the crates, signs, and props slightly overlap. It creates a natural flow and connection.
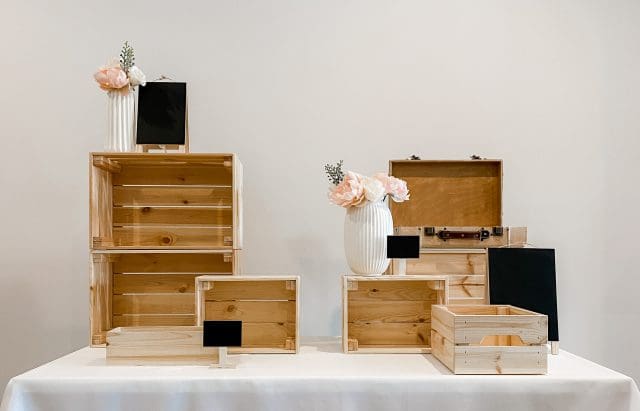
You can also avoid overlapping objects when you want to create separation.
For example, the setup below would allow me to display 2 different collections because there is that space between each grouping. However, within each grouping, there is overlap to create connection.
4) Intentional height variation
When there are varying heights in a display, it should look intentional.
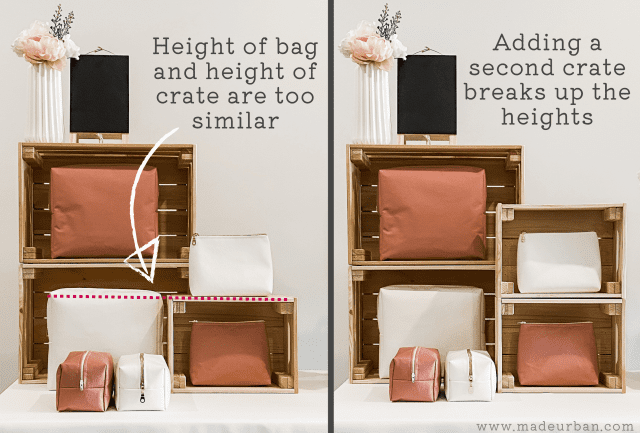
If two objects are different heights, but only by a small amount, it looks off.
For example, on the left, the top of the bag is a similar height to the top of the crate. To break up those heights, I would add another crate, as shown in the photo on the right.
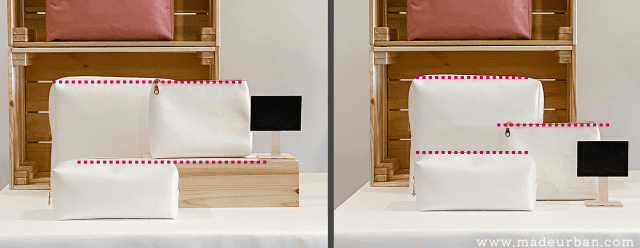
Below is another example. On the left, the top of the large bag is the same height as the medium bag. And the small bag in front is the same height as the wood riser.
On the right, the bags are arranged in a way so the heights are staggered.
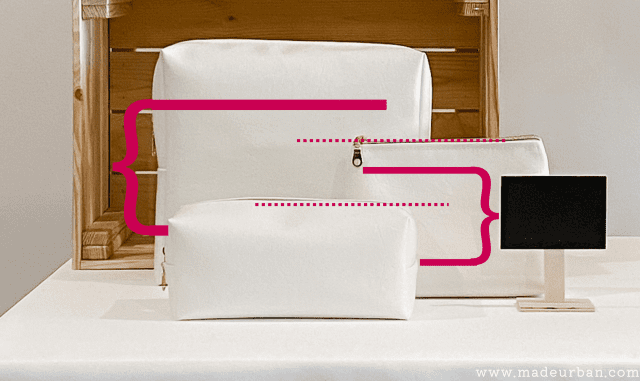
The unwritten rule I use is for one object to hit another object in the middle 1/3rd of it. That’s how the height variation looks intentional.
Again, this is just a rough guideline I follow. The main goal is for the variation in height to be obvious.
As you can see in the photo below, the top of the lowest bag hits the middle 1/3rd of the second bag. And the top of the second bag hits the middle 1/3rd of the third bag.
A display can look impactful when objects are at the same height, but typically for that to work, there should be a space between each object, so it looks like a repeating element, rather than one continuous element. Below is an example of that:
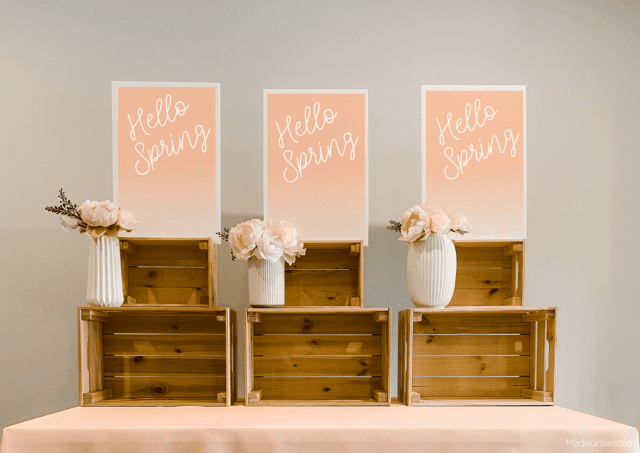
Learn more about using repetition in a craft show display here.
5) Relying on photos
I find it easier to spot areas of imbalance or items that look out of place when I’m looking at a photo.
I encourage you to test your display at home before your craft show. Use your dining room table or a countertop.
Get everything in place and then stand back and snap a photo. You may also want to take a photo from different angles.
The camera seems to pick up details the eyes miss.
Study that photo and see if anything stands out to you. You may notice that a product is getting lost in the space, an area is looking cluttered, or a fixture just needs to move a bit to the right.
Make the necessary adjustments and then take another photo. Repeat until you’re happy 🙂
Tiny adjustments
Whether I’m rearranging a room in my home or setting up a craft show display, the final result (which might look effortless) is the result of dozens of tiny adjustments.
I’ll swap items in, switch them around, shift objects to the left or right, etc., and spend a lot of time trying to get it just right.
This isn’t necessarily a trick, but rather a reminder to just keep playing with your display until you’re happy with it.
Let me know in the comments if you have questions! 🙂
~Erin

Hey, I’m Erin 🙂 I write about small business and craft show techniques I’ve learned from being a small business owner for almost 2 decades, selling at dozens of craft shows, and earning a diploma in Visual Communication Design. I hope you find my advice helpful!
Erin, what do you do if you have a variety of items. I decoupage candles, coasters, cutting boards, vases plus do florals, succulent planters and fairy gardens. Usually have 3 tables in a u shape and group like items together. If I have several different items with same pattern I display together. I use display racks for smaller items like the planters and small gnomes. I did the farmers market weekly for the summer/fall last year and feel I did well. I know I have a lot, we fill up both of our SUV’s and usually takes me an hour to set up, including tent and tables. I am going to venture into shows this year as I am retiring so concerned about set up.
Hi Kathi! At a market where you have 3 tables, I would treat each table as its own shop or like it’s a section in a department store. Then break your products into themes. For example, your candles, coasters, and cutting boards sound like they could work together to create a home goods section. Your vases and florals may be another section/table, and your succulent planters and fairy gardens another. Group products/create sections based on which products are likely to be purchased together (e.g. flowers and vases). If you only have an 8 foot table at a craft show, you may need to assess which products are your bestsellers and which ones you can leave at home. Or, display a limited number of products on your table and keep stock behind your table. Use the same idea and create 3 sections on your table. I hope that helps!
~Erin
Great ideas and most of them I already use. So true about taking a photo which I always do for any thing I’ve created that is going out to a client. I’m amazed at how much more you see through a photometry I have caught many mistakes by using this method.
Funny about the dressing. Same scenario…my Mother said add water til it looks right. And what the heck does that look like MOM!!!!!!????
Thanks for all your articles, emails etc!!!!! Very helpful!
Thanks for reading Cher! I guess some cooking tips are just harder to explain 😉 Hopefully you found an extra tip or two in the article!
Erin
Such useful information, as always!
Thank you so much Jen! Glad it was helpful 🙂
~Erin
Erin!,
I need help! I lost motivation! drive! my schedule at full-time job is really mess up my flow. following you before I build my business supplies and legal services. I got started more by reading
your blog.
What advice can you give me to structure and build my products for craft shows and online e-commerce?
Hey Jacquelyn,
I’m so sorry to hear that! But I’ve been there. My best advice to get back on track is to choose one project to focus on. Thinking about all the things you could do and chipping away at a bunch of little things often leads to overwhelm, spinning your tires, and feeling like you’re not getting anywhere. Instead, determine the most important step/project/task that must be done to move forward and focus on completing that.
In terms of building your products, that’s a bit harder to to offer suggestions without knowing where you’re at. However, the advice I would go back and give myself when first starting would be: Don’t try to do it all…focus 😉
-don’t try to sell to too many types of people
-don’t try to offer too many types of products
-don’t try to offer too many options
Start with one great product for a specific target market, and perhaps offer a few other products that pair well with that.
I hope that helps!
~Erin
Thanks! very much!
Erin, there are mostly odds, not evens, in nature. I am a pastry chef, and odds are the thing for decorating cakes, etc. Kim
Thanks for commenting Kim! I hadn’t heard that but that’s good insight as to why odds are more visually pleasing.
~Erin
Hi Erin, before I started my bag business I worked as a florist and we were always taught to work with odd numbers in the arrangements and bouquets, so it has been ingrained in me when I’m setting up my stall. So nice to have it confirmed as still a good idea. Some great suggestions here, thanks for all the advise. Rachel (UK)
Hi Rachel!
Yes, I think the odd numbers apply to all types of design, including flower arrangements. Glad you found my suggestions helpful 🙂
~Erin
Hi Erin , I love you knowledge, Thank you. I sell hand painted 18×18 dish towels each one is different. I have been hanging them like on a clothes line around my pop up. Which works but it’s the tables that look flat even with risers. Any ideas ?
Hi Donna,
You may find some display ideas in this article: https://www.madeurban.com/blog/10-ways-to-display-tote-bags-at-a-craft-show/ (folding them and wrapping with a paper sleeve then putting them into baskets may help to prop them up and allow customer to sift through your designs.
Unfortunately, when selling one-of-a-kind/no-two-items-are-alike, you can’t “display” every item. You can only display a few of your designs and then “stock” the rest for shoppers to sift through.
This article helps explain that concept: https://www.madeurban.com/blog/craft-show-display-5-minute-fix-display-vs-stock/
I hope that helps!
~Erin
Thank you for addressing new snd old techniques in a new way! So helpful! Knowing multiple layouts helps when you sell product and need to rearrange also. Thank you!
Thanks for reading Trish! So glad you found them helpful 🙂
~Erin
I agree about the photos. As a quilter one of the harder things is arranging the blocks for your layout. I take pics, back off and squint and have even gotten the step stool so I can look at it from above. This makes it easy to distribute the colors. However, things are not always what they seem so I always take a black/white photo or convert one to b/w. This way you can easily see the values of the colors to evenly distribute them. Things are not always what they seem and you may be surprised that when you thought your colors were balanced they actually may not be.
That’s a great idea MaryK! I love the idea of a black and white photo to show color values.
~Erin
I make crochet mosaic baskets. Very hard to display could I send a pic of what I did and would love your feed back. Also I have such a variety, which I do not display. However, would it be OK to make a sign that says ” Don’t see a color basket you like? Ask me to show you others I have with me.”
Hi Bonni,
I think adding a sign letting shoppers know you have more options is a good idea. Feel free to email me and I can point you in the right direction for your display 🙂
~Erin
I am a retired florist & was taught to use odd numbers of flowers in arrangements.
I still use that rule on my Lavender Craft Stall.
Yes! I’ve often heard the rule of 3 is related to flower arrangements too 🙂
~Erin
Hi, Erin,
I posted this earlier, but it doesn’t appear that it posted. If it did and I missed it, please forgive the repeat.
I do stand-up comedy, and we’re taught when learning to write a joke that to use the “Rule of 3s” will make your jokes more successful. The reason 3s work is because whether it is auditory or visual, the brain gets tired and begins to tune things out after 3 of anything. When writing a joke, we use lists to drive home the punch-line. The first item will be tame and believable. The second item will be a little more outrageous, but semi-believable, and the third one is full-on hyperbole and completely unbelievable, which is why the joke works.
3s and 5s are used all the time in decorating. I also teach math and physics, and the greek letter for Phi (fee) ɸ is used for something called the Golden Ratio (1.618). In photography, the best composition for photos will be to frame the subject in a way so that the main focal point will be in just 1/3 of the frame. Kings and royalty in medieval times would commission artists for paintings in the castle and demand that they use the dimensions of Phi in the painting, since they believed this ratio was divine.
So the idea of 3s goes back hundreds of years.
I hope this helps!
~~Carla
So interesting that the rule of 3 is even used in stand-up comedy. Thanks so much for sharing all the info about where the rule stems from. There’s definitely a lot more meaning behind it than just “it looks nice” 😉
Thanks for taking the time to share!
~Erin