Craft Show Display 5-Minute Fix – Add Negative Space
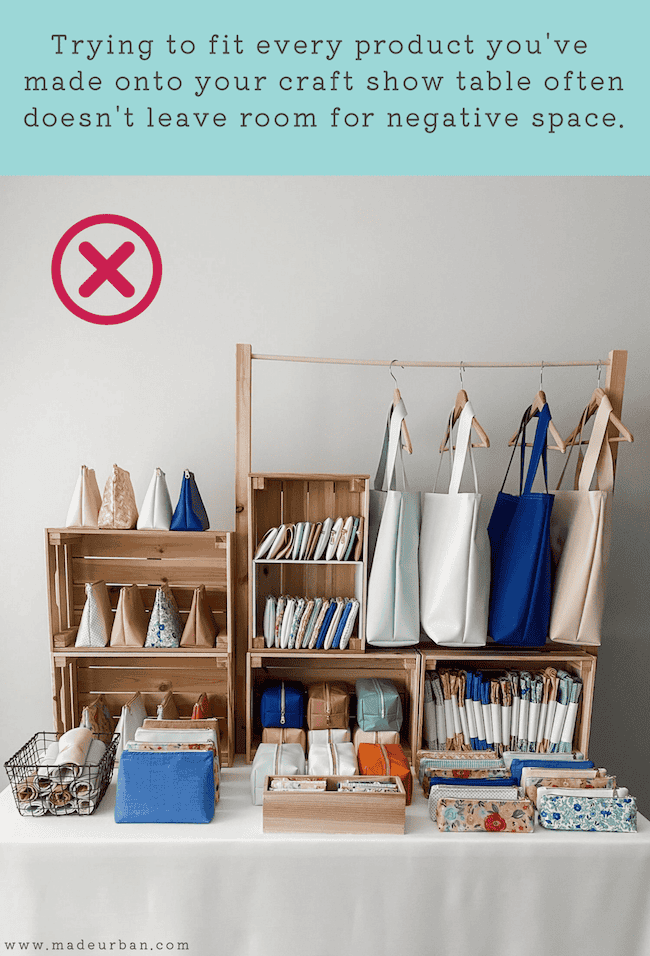
A common mistake craft show vendors make is trying to use every square inch of their space.
In an attempt to optimize sales, they fit as much product on their table as possible.
But doing so can have the opposite effect and actually harm sales (and your brand).
What is negative space?
Negative space is the blank space that surrounds an object.
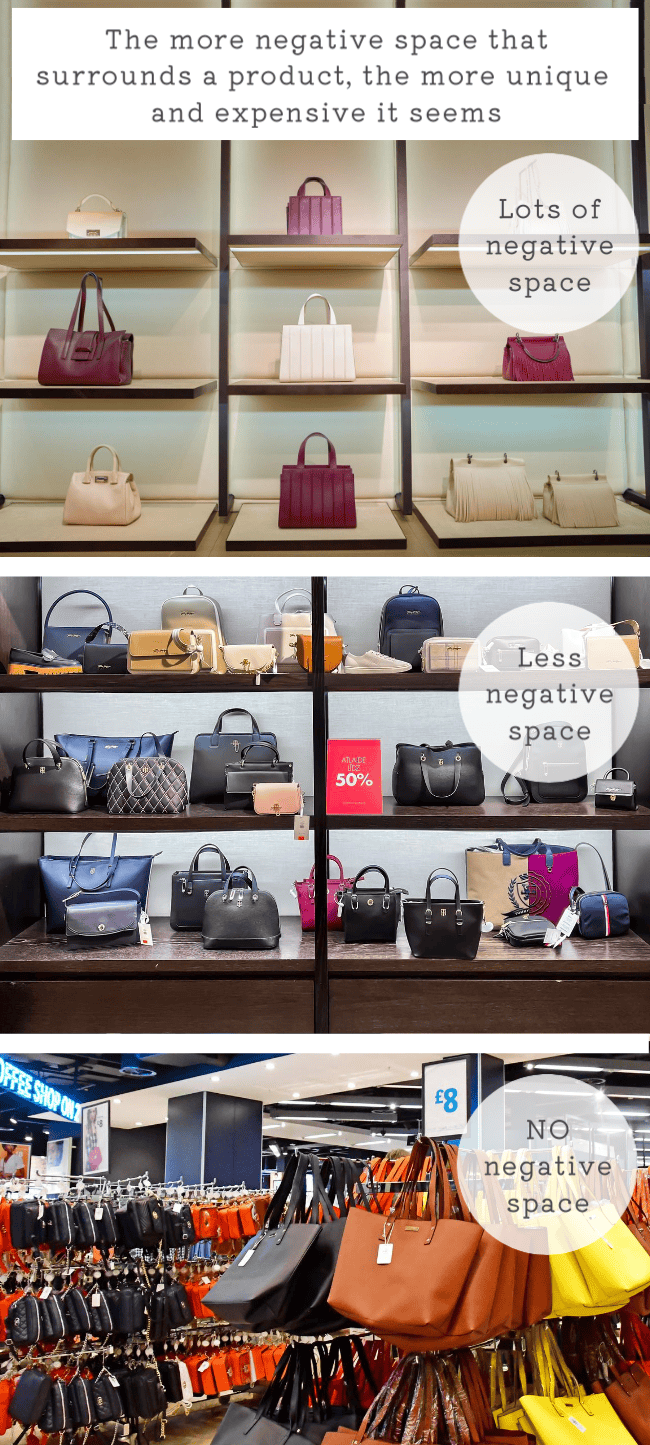
The more important (or expensive) an item, the more negative space should surround it.

Benefits of negative space in your craft show display
Here are just a few reasons you may want to add more negative space to your craft show display.
1) Makes your products and brand seem more valuable
If you compare an off-price store (e.g. Marshalls, Winners, TJ Maxx) versus a high-end boutique, you’ll notice the high-end boutique has a lot less product on their sales floor and a lot more negative space.
In general, the more negative space in a retail store, the more high-end the brand and products seem.
The more styles/product skus and the more inventory in each style merchandised, the less valuable the merchandise will seem.
2) Directs shopper attention
Objects that are surrounded by negative space act like a stop sign. They catch a shopper’s attention and get them to stop scanning and focus on the item.
You’re also telling shoppers what’s important by adding negative space around key items.
3) Creates shopping space (both mentally and physically)
When a craft show table is crammed full of stock, it makes it harder for people to shop. They may be timid to pick items up, out of fear they’ll knock something over or will have a hard time putting it back in the right spot.
An overstuffed craft show table is also visually noisy. It becomes a lot to take in and can feel overwhelming.
Adding negative space allows shoppers to slow down and take in one or two items at a time, and have room to move items around as they shop.
How to add negative space to a craft show display
Here are a few quick steps to effectively add negative space on your craft show table or in your craft show booth.
1) Choose key pieces
Chances are, you won’t be able to fit everything you’ve made for the event, on your table.
Not every product can be the star; you must choose your favourites.
Decide on the key pieces you’d like to highlight.
Ideally, you’ll choose key pieces based on sales stats; which items do you sell the most of?
If you don’t have sales stats to work with, start with the items you believe your target market will be most interested in.
These key pieces will stand out in your display and be surrounded by more negative space than your other products.
2) Remove stock
You may consider removing products that don’t sell well, don’t fit within your main product category, or don’t follow your color theme, brand, or story you want to tell.
Ideally, your craft show table should showcase one category of product.
For example, your craft show table may be selling, home decor items, OR bags, OR jewelry, but NOT all three.
So consider removing items that don’t fit within your main category of products.
If you’re still left with too much inventory, consider removing products that don’t fit within the story you want your table to tell. For example:
- A feminine story – remove products that don’t feel feminine in color, style, print, etc.
- A blue and white color story – remove products that aren’t blue or white.
- A calm story – remove products that don’t communicate “calm”.
You may also want to remove additional inventory you have in an item. This creates a scarcity effect.
Imagine you’re shopping in a store and you find a top you love, but you only see one left in your size. You’re going to feel more urgency to purchase that top now. If there are several tops left in your size, you’re more likely to “think about it” and come back later to buy.
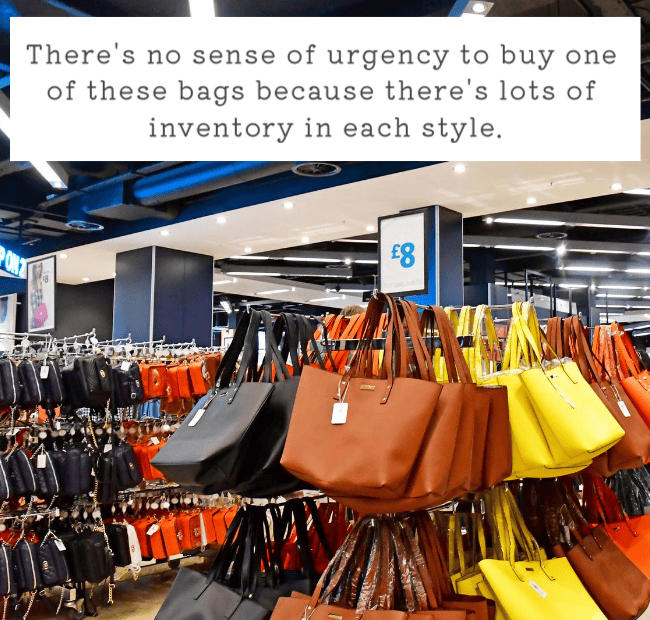
An item also seems less special and unique when it’s next to dozens just like it.
If you’ve made lots of inventory in an item, consider keeping the majority behind your craft show table.
As one sells, you can restock from behind your table.
3) Create compositions
Choose the products you want to highlight and place them in key areas of your display. You may add complimenting products, props, or signage to create compositions.
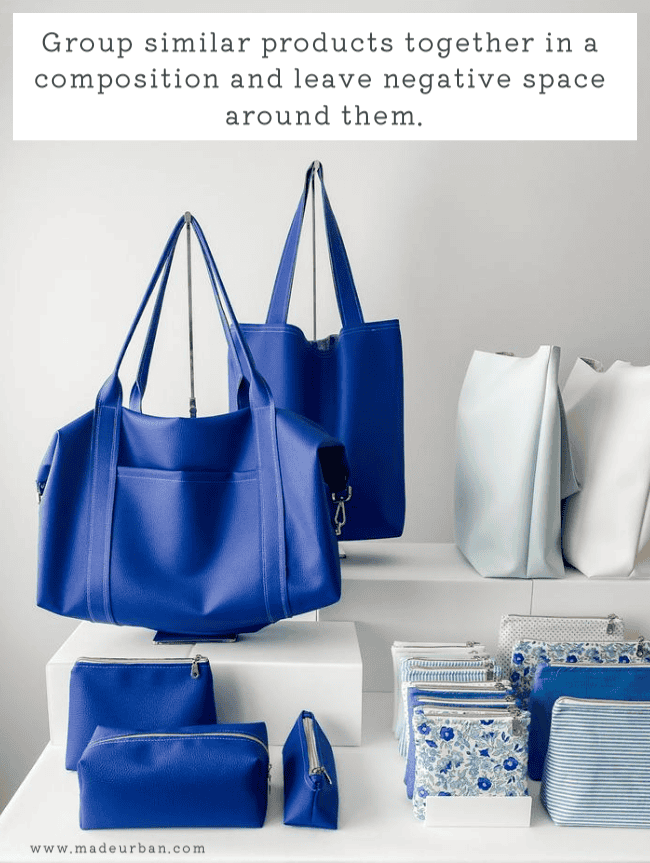
These product compositions will be where you want shoppers’ eyes to stop. They’ll have negative space around them.
You may have one product composition in your display, or your entire display may be made up of compositions; creating more negative space.
Remember the more negative space you have, the more high-end your products will seem.
Any questions about adding negative space to your craft show display? Ask away in the comment section!

Hey, I’m Erin 🙂 I write about small business and craft show techniques I’ve learned from being a small business owner for almost 2 decades, selling at dozens of craft shows, and earning a diploma in Visual Communication Design. I hope you find my advice helpful!
Love this, really great ideas for creative use of space at no additional cost. I think I’ll give this a try at my christmas market this year!
Great to hear Jen! Let me know how it goes at your Christmas market 🙂
~Erin
Wow never thought of space in such a positive manner. I have a market on Saturday so I’m going to give it a go.
Good luck at your upcoming market Jean! Let me know how it goes!
~Erin
Craft shows are so visually busy to begin with, I wanted my own booth to calm down a bit. Although improved, I have a lot to learn and will try again next show. Thank you for your advice, it makes so much sense, just hard to do!
This is so helpful, as are ALL of your articles! I have been using negative space to set off a few products but didn’t realize why I was doing it or what the effect was. I just thought it looked nicer. Now that I know the psychology behind it I will be more intentional about using negative space. Thanks so much!
I’m so glad you found it helpful Soraya! Thanks for reading and commenting 🙂 It’s funny how a lot of these techniques are second nature (especially to creatives and visual learners). Glad to hear you’re already on the right track!
~Erin
I’m really focusing on the negative space at my next show thanks to your ideas! Where did you find the shelf divider that you inserted in your vertical crate? I am using crates and grouping my pouches by fabric choices. Having this divider would really help keep the two fabrics separated and look as if they have their own crate display.
Thanks!
Hi Amy! I actually made it out of foam core so it could fit the crate’s dimensions perfectly. I plan to paint my crates white so it blends, but you could cover the foam core in wood-patterned peel and stick wallpaper too.
It’s really easy to make and you can find foam core at your local hobby store (e.g. Micheals, Hobby Lobby, maybe even the dollar store). I cut mitred channels so the foam core can fold in on itself and it creates a cleaner look (I explain these types of cuts in step 3 & 4 of this article: https://www.madeurban.com/blog/how-to-make-a-scrunchie-display-stand/)
I hope that helps!
~Erin
This is exactly what I was thinking- foam core and cut it like drywall without cutting all the way through. I also had the peel and stick wall paper to cover! Great minds . . . (without boasting!)
I want to add to the negative space idea: I set up my display at home before taking to the show and you are in my head with the odd pouches that I created as my sample pattern pieces. They are still of quality and could sell, but they just do not fit my theme and I don’t want a buyer to overlook the rest of my table because they spied the out-of-place items. I keep repeating “limited supply”. . . really enjoyed the pics and article advice!
Yes, exactly, just like drywall! Score and snap 😉 You can glue the folds/corners in place but I didn’t with mine because allowing it to unfold flat is ideal when it’s not in use.
Glad you enjoyed the article and photos! “Limiting supply” is a hard transition to make, but you can always test it by keeping the out-of-place items behind your table. That way they’re there if someone is looking for another option, or if you sell down on stock and need to refill.
Good luck at the event! Let me know how it goes 🙂
~Erin