Craft Show Display 5-Minute Fix: Color Groupings
Color, and how you use it, is the most important element of your craft show display.
Color can instantly catch a shopper’s attention, tell your target market your products are right for them, and help tell a story.
There are many ways to incorporate color.
This article’s quick fix focuses on color in product groupings.
You can improve your craft show display in 5 minutes by following the 4 steps below.
Important Note
Both ways of displaying products shown, work. This article shares a visual merchandising technique that can be used when there is a lot of color variation within a display and is simply a display option for you to explore.

Grouping Products by Color
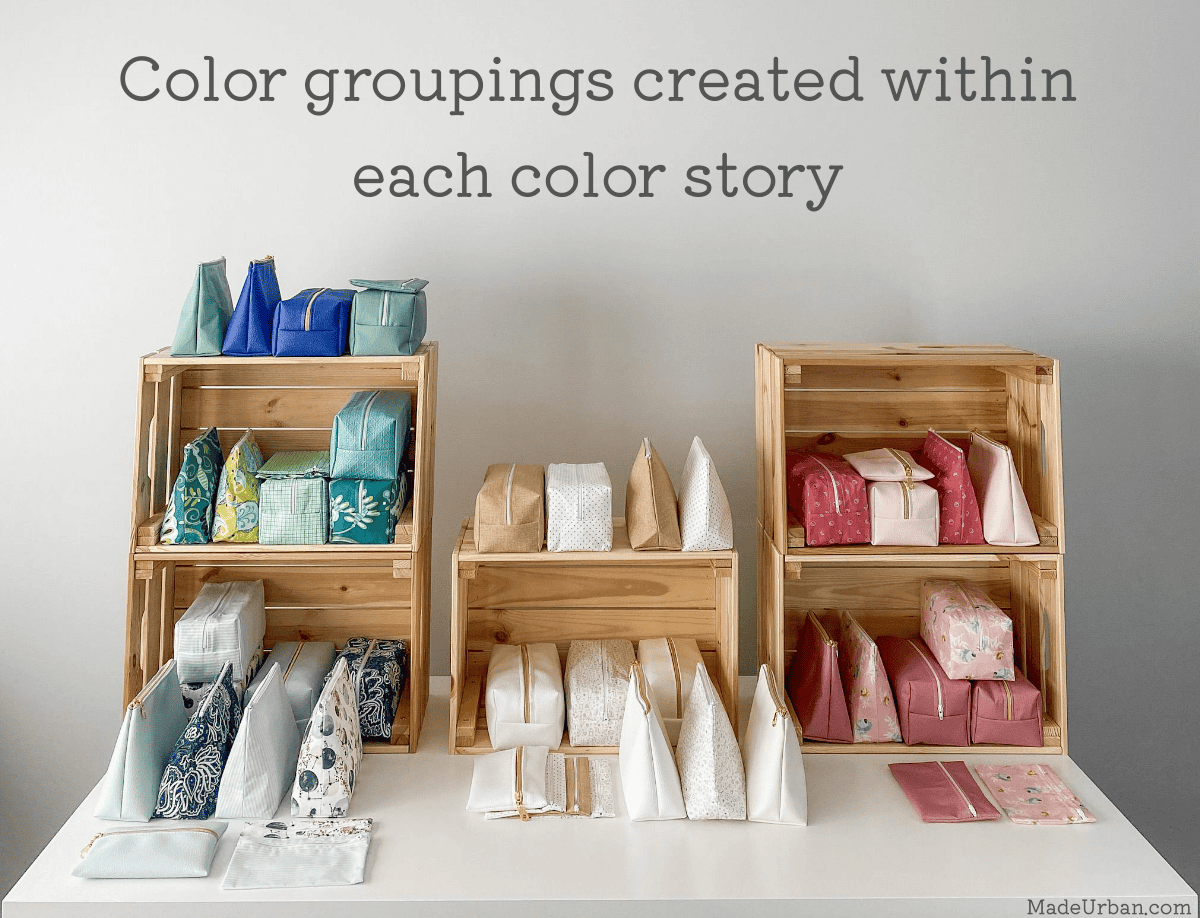
If you’ve already created stock for a craft show and are working with a variety of colours, you can quickly update your display by creating 1 – 5 product groupings that are based on color.
As mentioned at the end of this article, it’s best to keep color in mind when developing your products and product collections. However, these steps will help you work with the stock you have.
I’m working with stock that was NOT created with product collections/merchandising in mind to show how a display can be improved when working with what you have.
Step 1 – Find color stories
Start by finding color stories among your existing stock.
A “color story” is a collection of colors that work well together. The colors may even work together to tell a story.
For example:
>> Pinks may tell a “romance” story
>> Blues may tell a “beach” story
>> Pink, yellow, and green may tell a “Spring” story
When working with existing stock, you may have too much color variation to build “stories”. When creating stock for a craft show, consider the story you want to tell or the feeling you want to evoke through color, and choose product materials accordingly.
I have a lot of color variation among my existing products, so I’ll create:
- A blue & green color story
- A white and gold color story
- A pink color story
- A yellow & orange color story
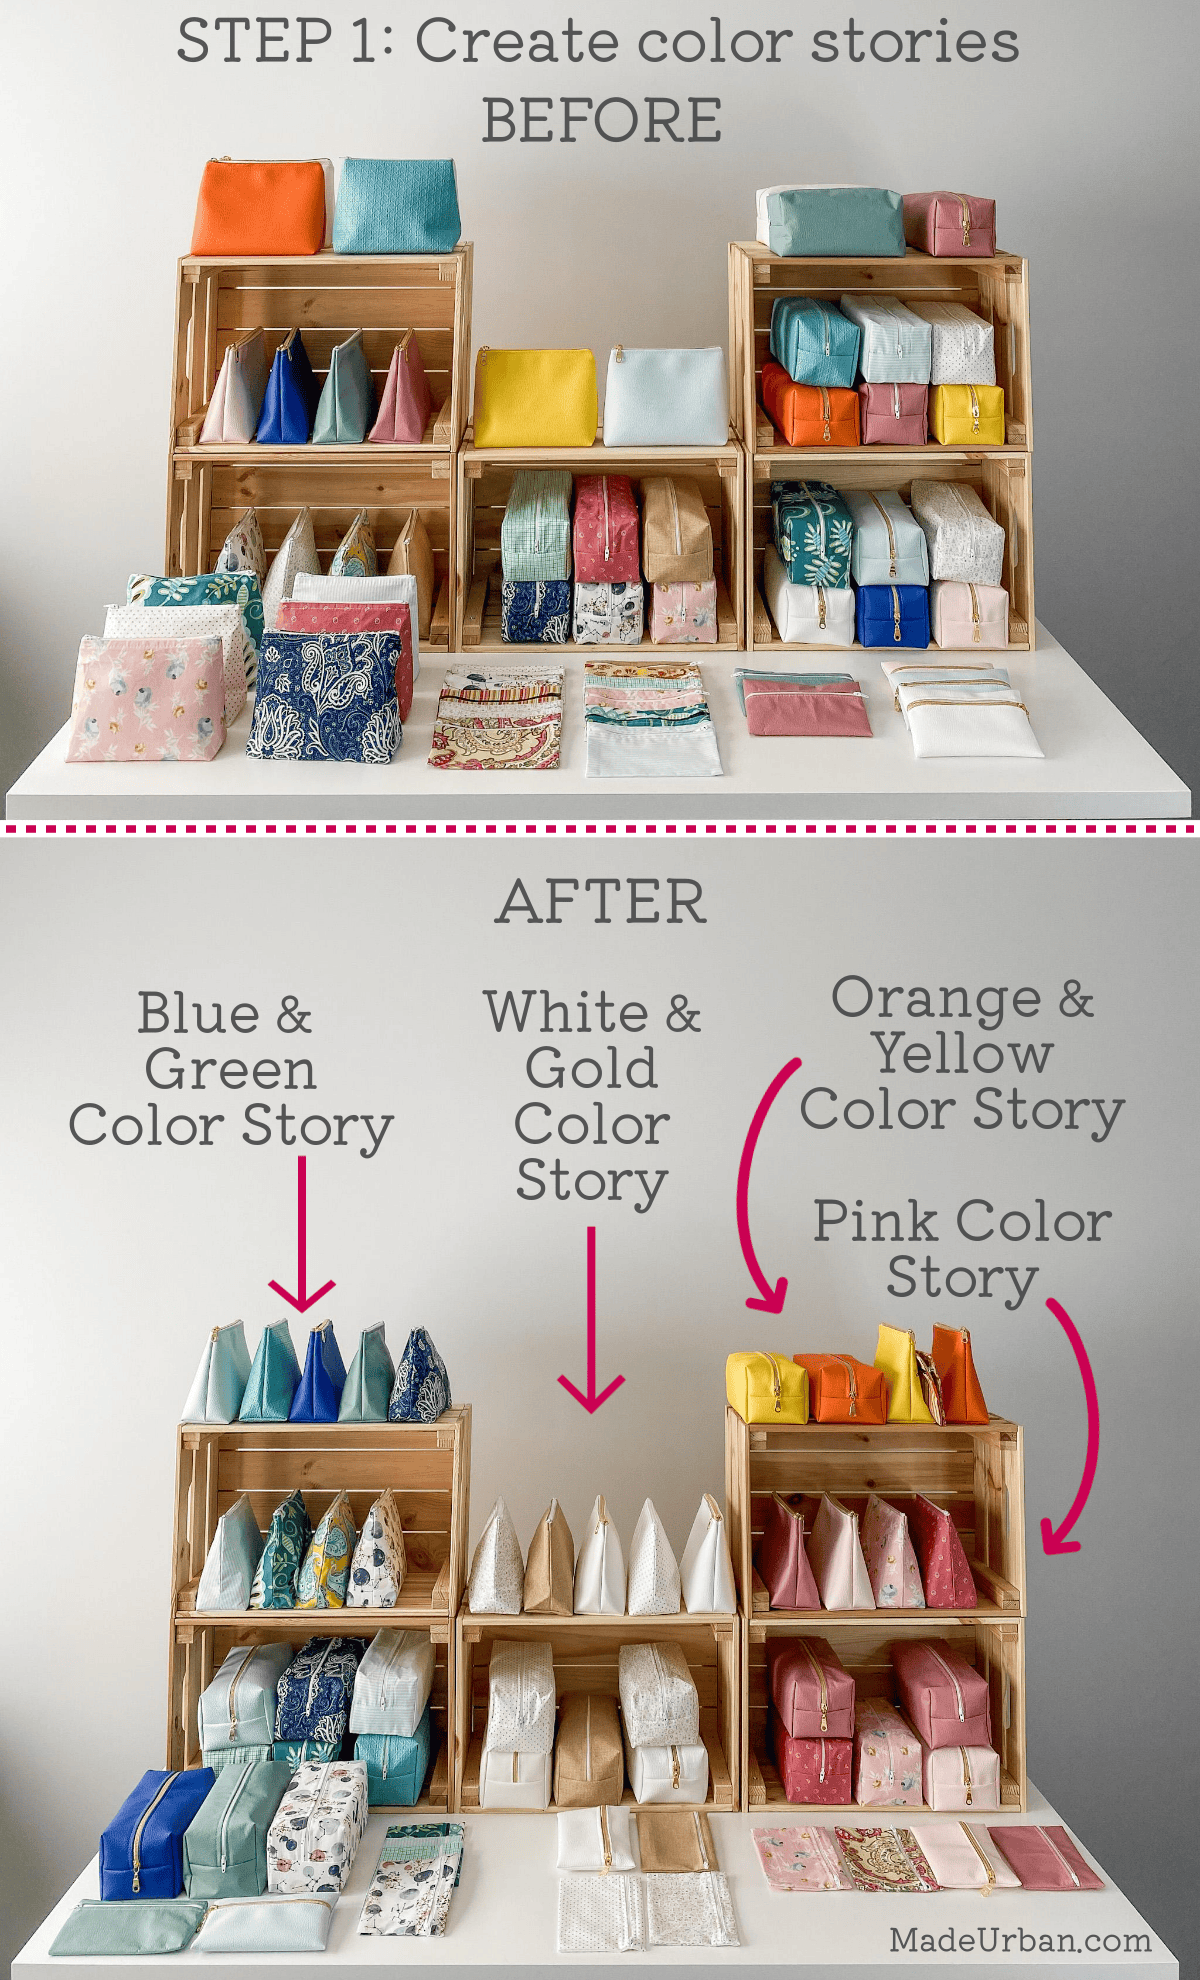
Your color stories should ideally only have 1 – 3 predominant colours.
A bigger collection and a bigger space to display it in may allow for up to 5 colors.
However, the fewer colors a grouping of products feature, the more impactful the grouping tends to be. There are exceptions to this rule, and in some cases, an abundance of color can also make a big impact (when used strategically).
Each color story may focus on one color or shades of a color: a pink color story with shades of pinks. Or, there may be multiple colours in a story: a pink, blue, and white color story.
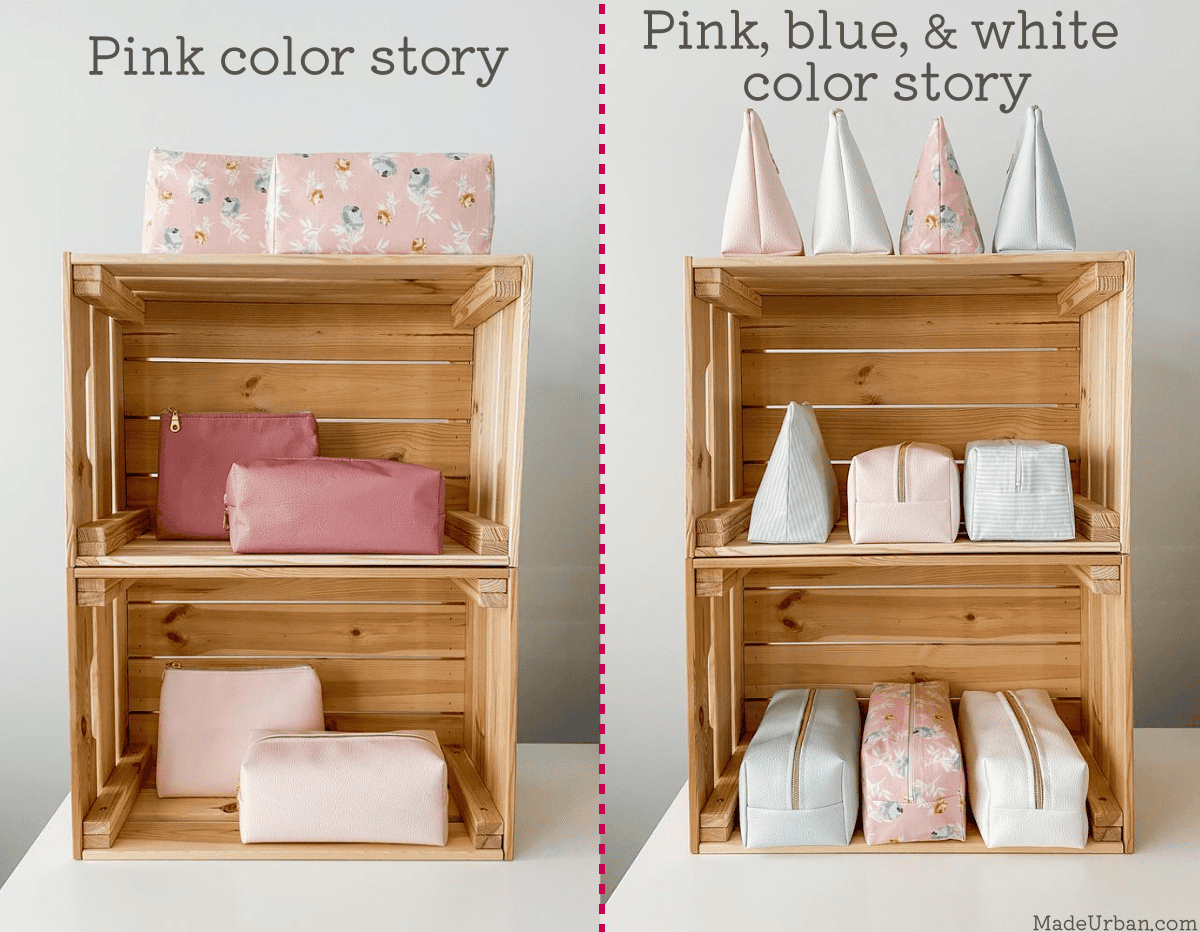
The more colours you add to a grouping, the less impact it will have.
A predominantly pink color grouping will be more visually impactful than a grouping with shades of pink, blue, white, yellow, and orange.

Tip:
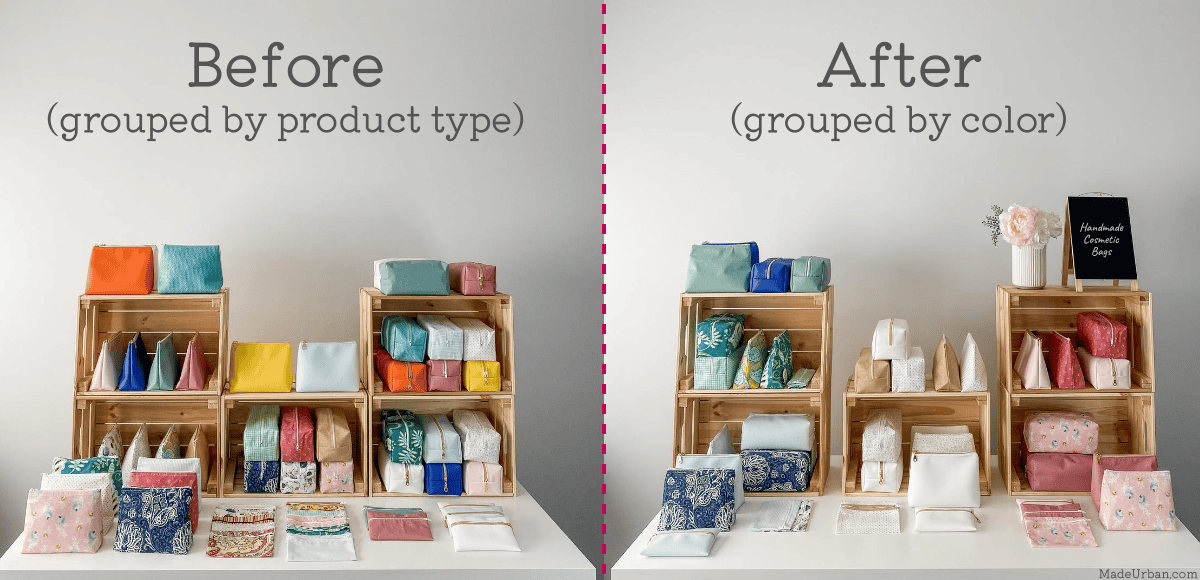
The products on a craft show table should all work together and follow a similar theme/target one shopping purpose (e.g. all bags, all home decor, all bridal/bachelorette party products). And generally, products that serve a similar purpose should be grouped within a display (e.g. home decor items in one grouping and bags in another grouping).
However, if you’re currently selling a wide variety of items, grouping products based on color rather than purpose will likely give you a more impactful display.
For example, if a display has bags, aprons, potholders, burp cloths, and bibs, typically you would group products by purpose. E.g.:
>> Group 1 = bags
>> Group 2 = aprons and potholder
>> Group 3 = burp cloths and bibs
However, if there are a wide variety of colors among the products, it will likely create a cleaner and more impactful-looking display if products are grouped by color. E.g.:
>> Group 1 = all blue bags, aprons, potholders, burp cloths, and bibs.
>> Group 2 = all pink bags, aprons, potholders, burp cloths, and bibs.
>> Group 3 = all yellow and orange bags, aprons, potholders, burp cloths, and bibs.
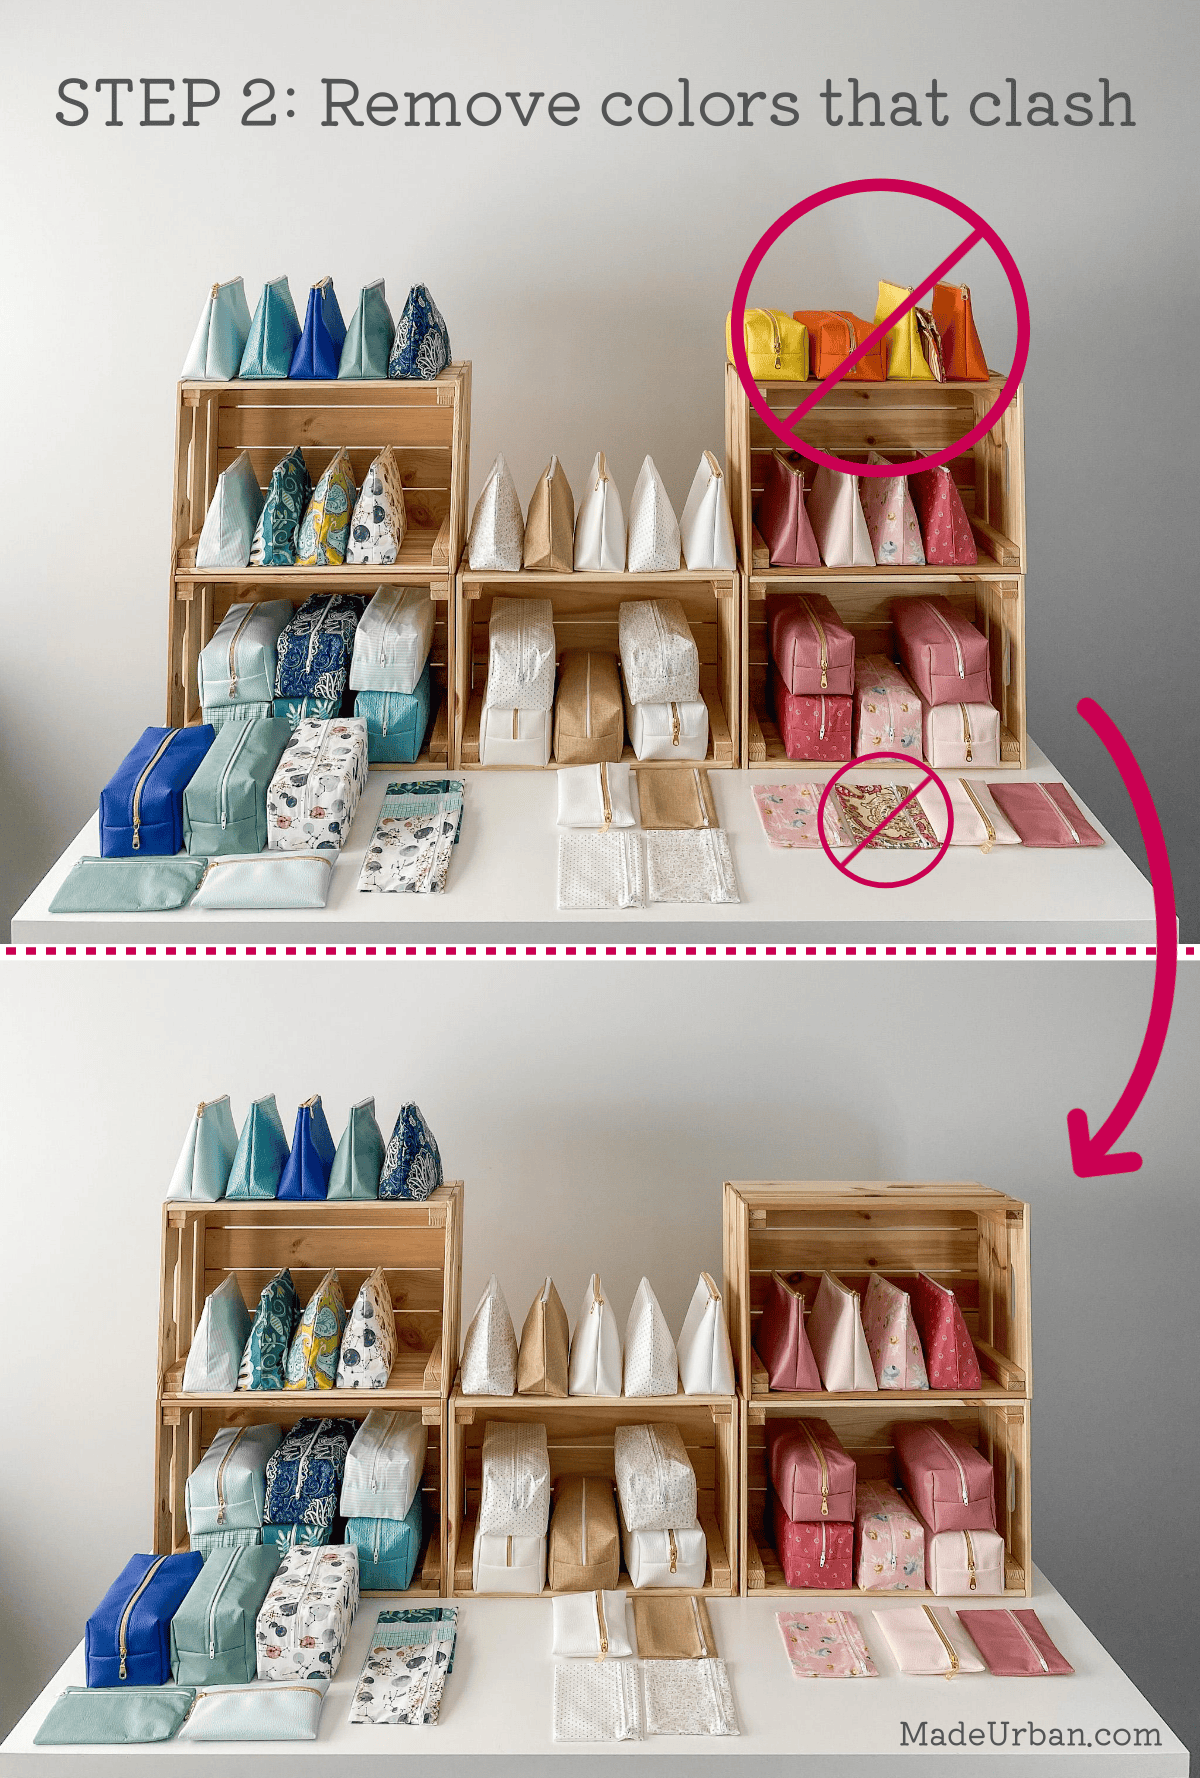
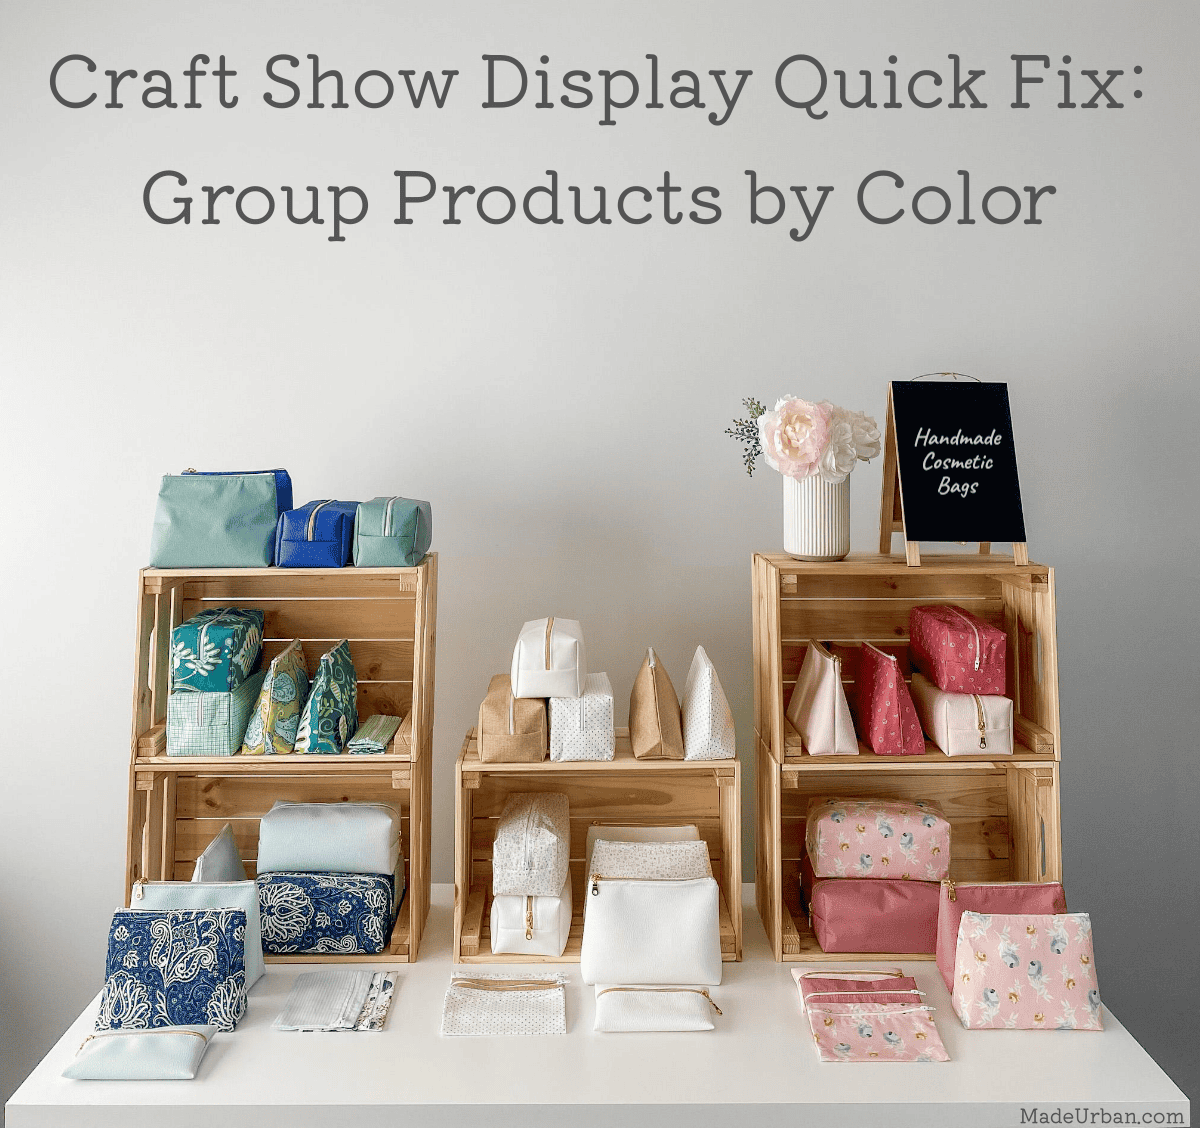
Step 2 – Eliminate/hide clashing colours
You don’t have to display everything. When it comes to creating a visually pleasing display OR displaying everything you’ve made, choose a visually pleasing display.
It’ll attract more buyers to your table and increase the perceived value of your products.
Remove products that don’t fit cleanly within a color grouping and keep them behind your table.
If a shopper is looking at an item you have other colors in, you can simply let them know you have more colors behind the table.
For example, the yellow and orange bags stick out like a sore thumb no matter how I group colors. So I would opt to remove them from my display and keep them behind my table.
I can also pull them out as my stock sells down. As I’m left with fewer products, I can re-work my color stories and perhaps find a way to work the orange and yellow in.
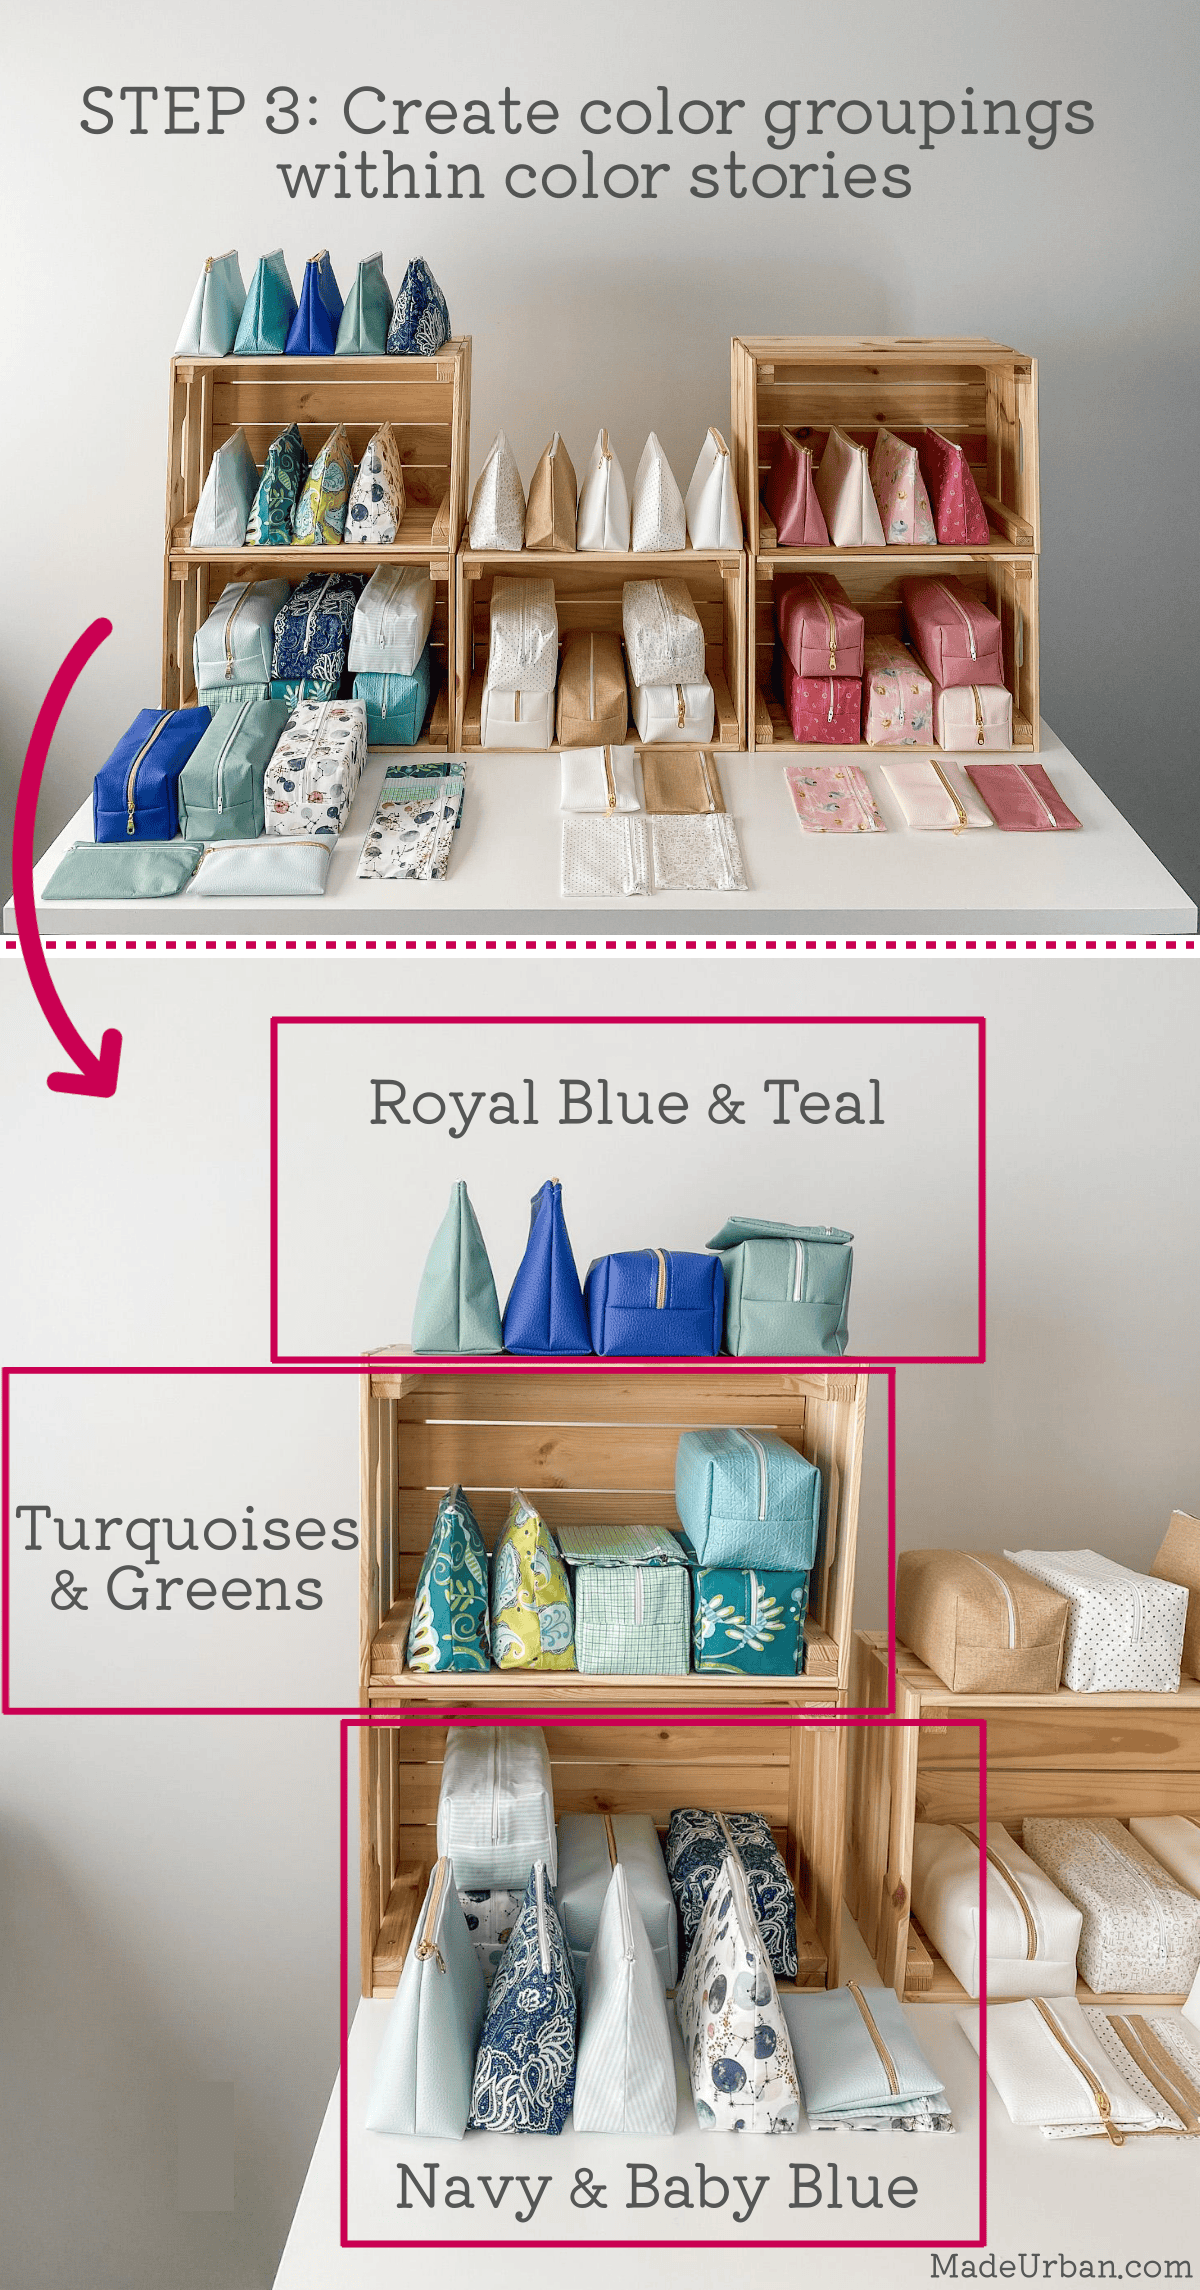
Step 3 – Create groupings within the color stories
If you have a lot of color variation, it’s likely that even within your color stories (e.g. blue and green) there are colours that don’t quite work next to each other.
You can refine your groupings further to create smaller color groupings within your larger color groupings.
For example, I’ve grouped all my blues and greens, but some of the blues clash with each other (warm versus cool).
So I’ll separate my blues based on warm versus cool tones, shades, or whichever colours look best together.
Step 4 – Create product compositions
Lastly, arrange your products into compositions (learn more about that here: How To Create Product Compositions in your Craft Show Display).
Show products from different angles and make sure items are easy to shop.
If you have the room, create some negative space between each color story so there is a visual break from one product grouping to the next.
Again, if any pieces aren’t blending, you can “hide” them behind another product or place them behind your table.
For example, my turquoise bags are clashing a bit, even within my bright green and blue color grouping. So I’ll remove those from my display and add them back in as stock sells down.
Alternatives
This article explains one way to effectively use color in your craft show display, but there are many others.
If your products use minimal color, it may be more impactful to group products by type/style/function/size/etc.
For example, if I offer my bags in solid colors, it may be more impactful to present them in a rainbow-like pattern, instead of creating 3 separate color stories.
Play around with different ways of using color to make a visual impact. Stand back several feet and take a photo. Then compare those photos to see which setup is more eye-catching.
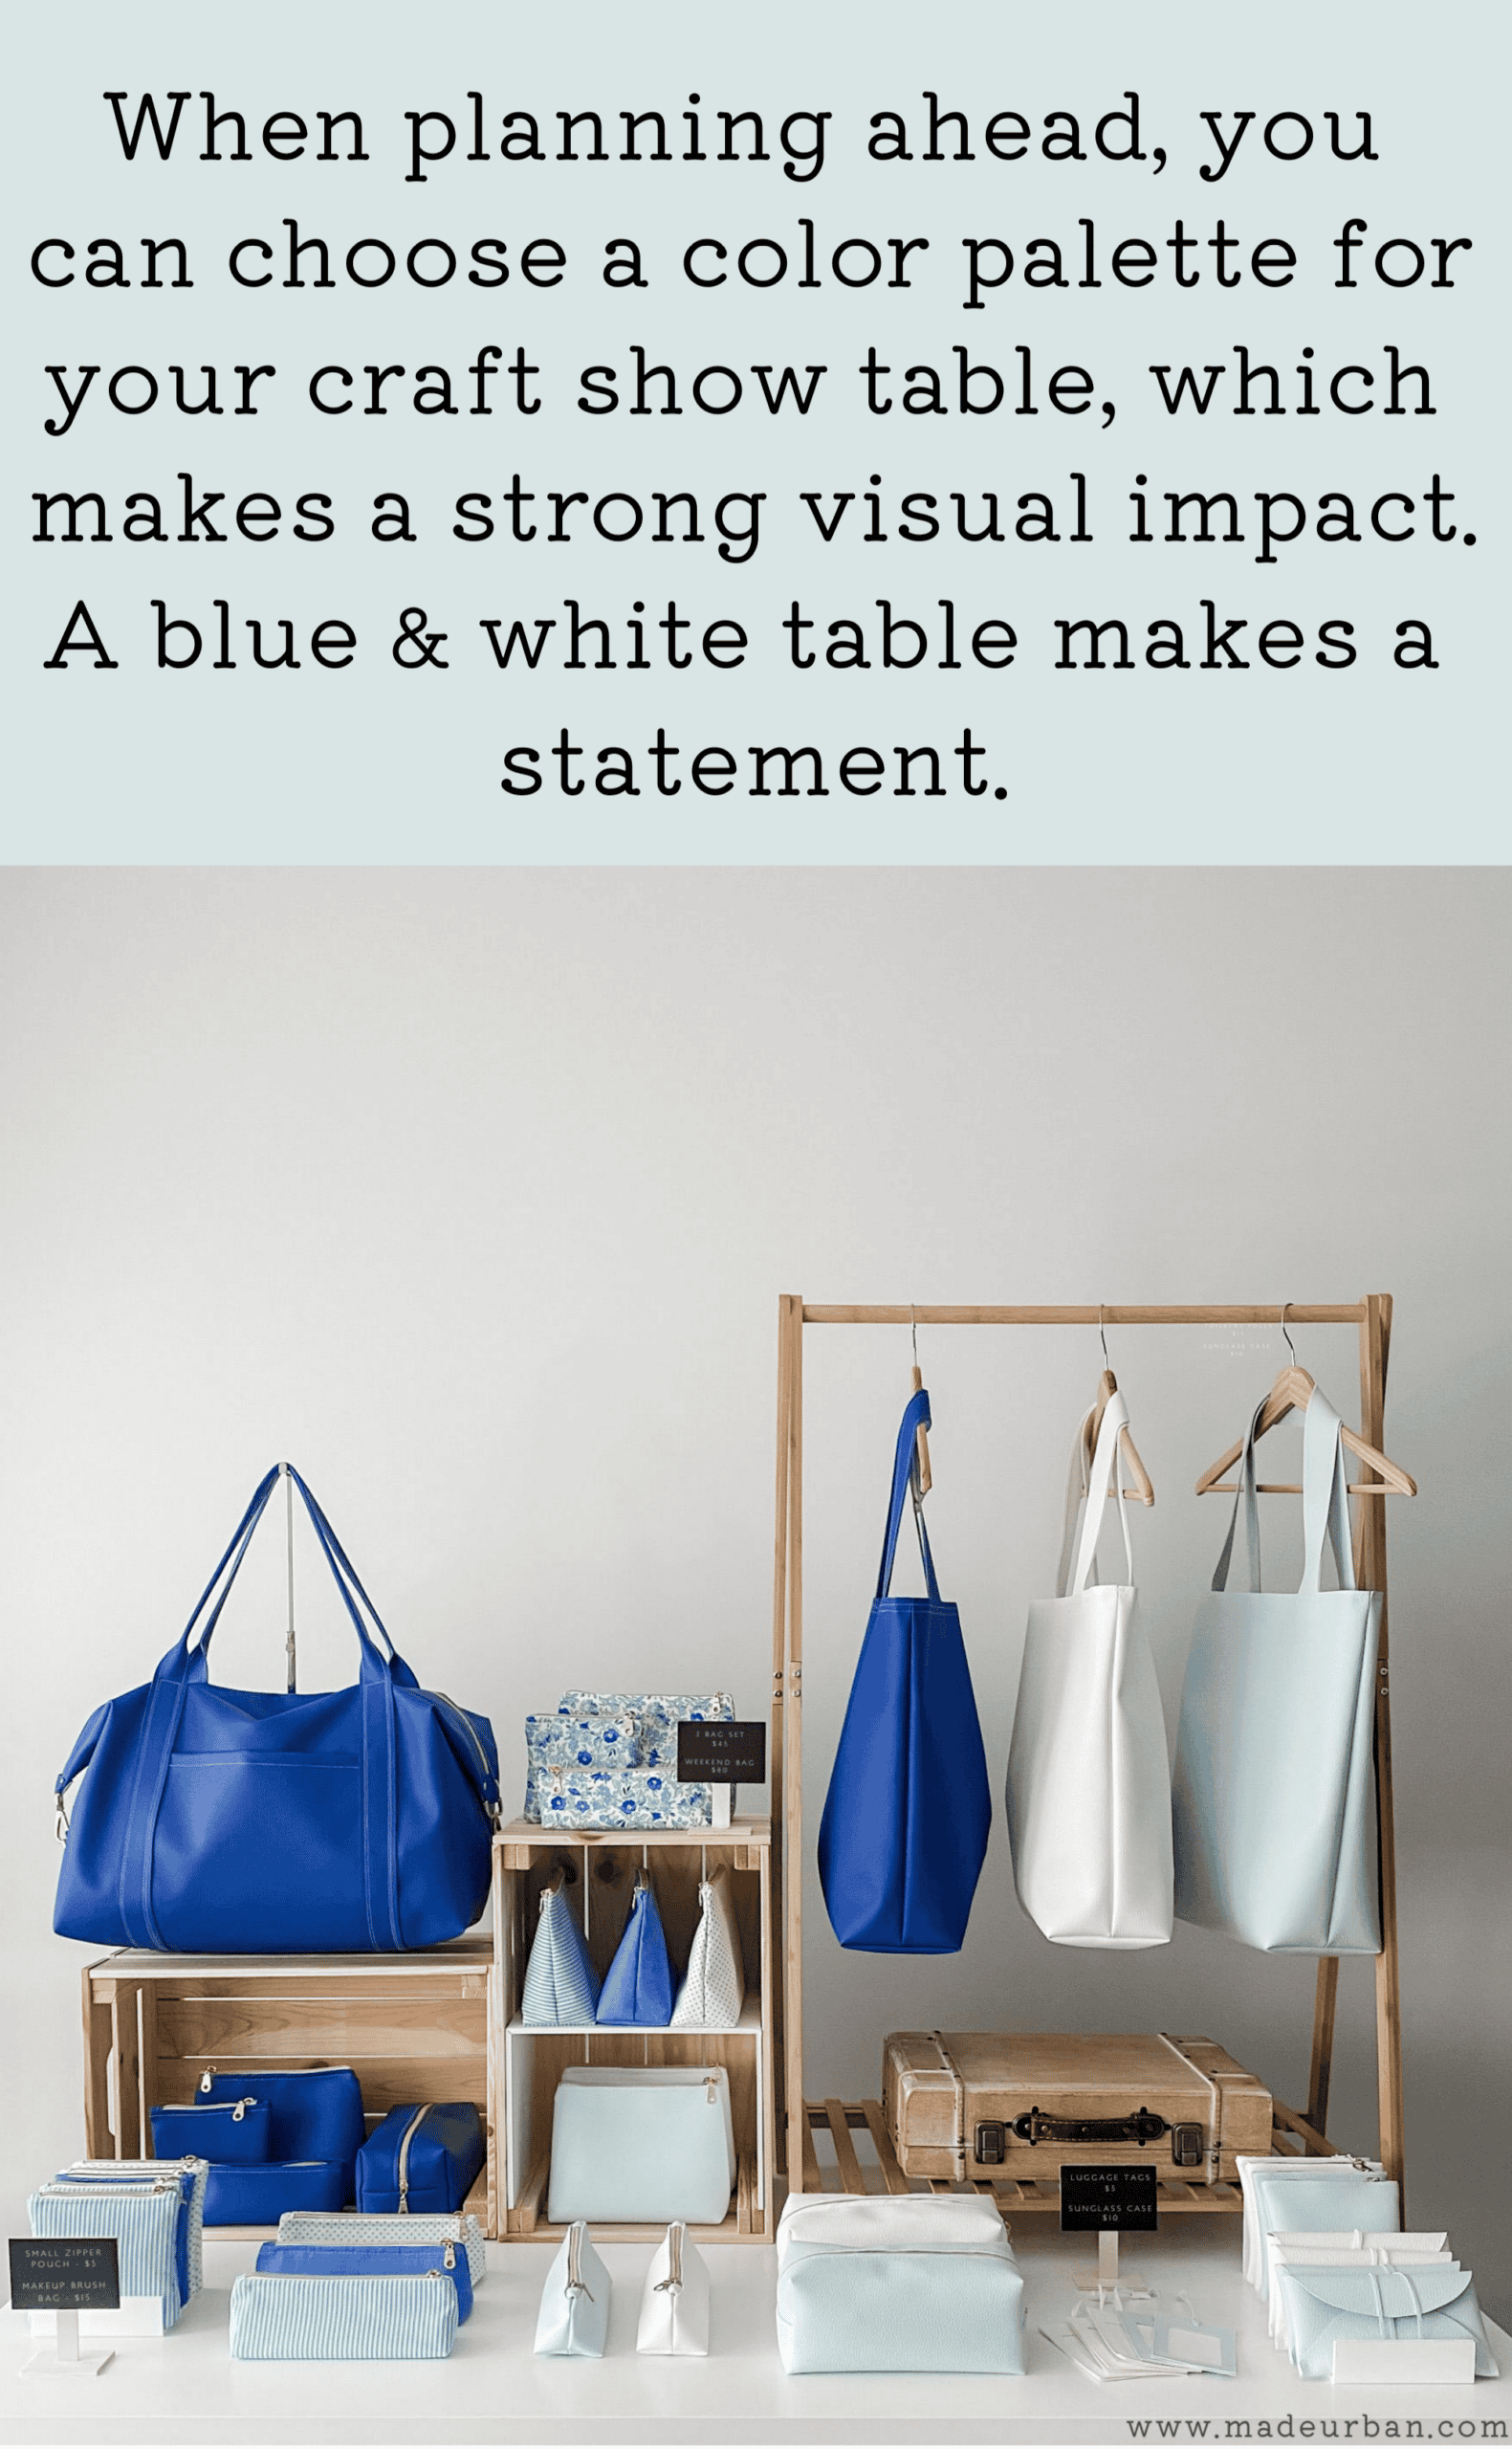
Planning ahead
Ideally, you’ll keep colour in mind when planning products for a craft show.
Build product collections that focus on 1 – 3 colours.
To determine how many collections to develop, consider the size of your products and how much space you typically have at a craft show.
If you make medium-sized items (e.g. bags) and typically have an 8-foot table at a craft show, you’ll likely only be able to fit 1 – 3 product collections.
On the other hand, a 10’ x 10’ booth may have room for up to 5 collections.
If you keep color in mind when designing products, it will make it much easier to create an impactful craft show display.
I hope this quick tip helps you improve your craft show display 🙂 Let me know in the comments if you have any questions!

Hey, I’m Erin 🙂 I write about small business and craft show techniques I’ve learned from being a small business owner for almost 2 decades, selling at dozens of craft shows, and earning a diploma in Visual Communication Design. I hope you find my advice helpful!
Really excellent article with excellent examples. The color grouping are very pleasing vs keeping the same type of bag together. And more relaxing feeling looking at the photos. Thank you for putting this together.
Hi Erin, I love reading your newsletter, there is always something I take away and can use on my own craft display. I started with an improved craft display after “5 Days to a Standout Display” what an improvement from my original flat table, no brand or colour cohesion display 3 months earlier, thank you. My question, can you show display options for only a 6 ft table, and option for a small display rack for a few wreaths, etc. that would be nestled behind a table. A lot of area craft shows, only give this much space.