How To Create Product Compositions in your Craft Show Display
Whether you’re creating a craft show display or photographing your products, product composition is important.
Composition helps:
- Create organization and structure
- Create a focal point (that tells shoppers to “look here!”)
- Lead the eye throughout your space so shoppers don’t miss important details
Without proper composition, a space can feel cluttered, disorganized, and uninspiring.
This article explains the steps I follow when grouping products together and creating compositions within a display.
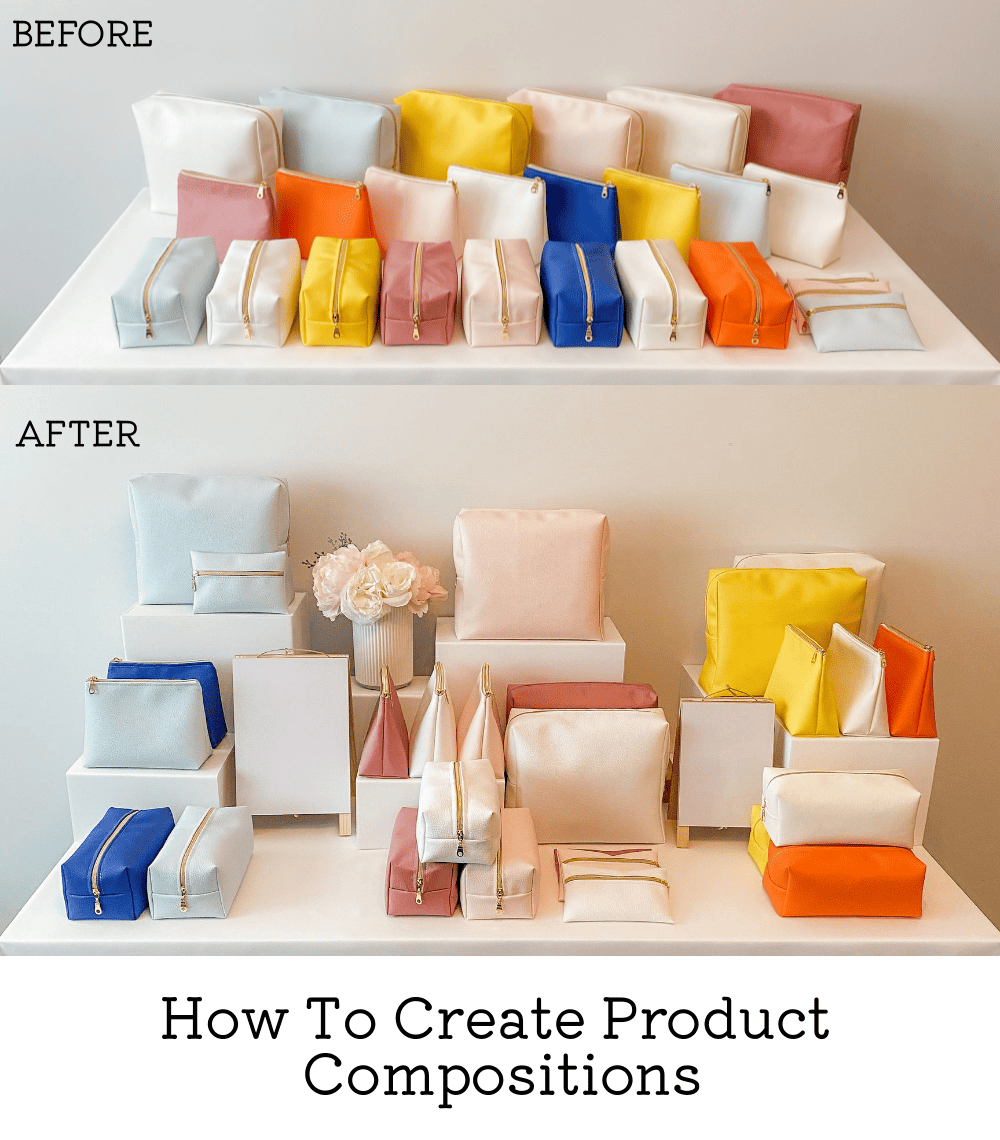
I’ll use this simple product selection to explain the steps I follow when creating product compositions.
Although you will likely have a bigger table and more product selection, the same steps still apply.
Step 1 – Create color groupings
Color is (almost) always the most important aspect of your craft show display.
Color (when used correctly) can immediately grab a shopper’s attention. It may even help tell a story, evoke a feeling, or create a mood.
Just look at the color groupings below. The pink and white collection has a very feminine feeling, the blue collection feels calm, and the yellow, orange, and white collection might tell a “Halloween story” in October (it looks like candy corn to me:)
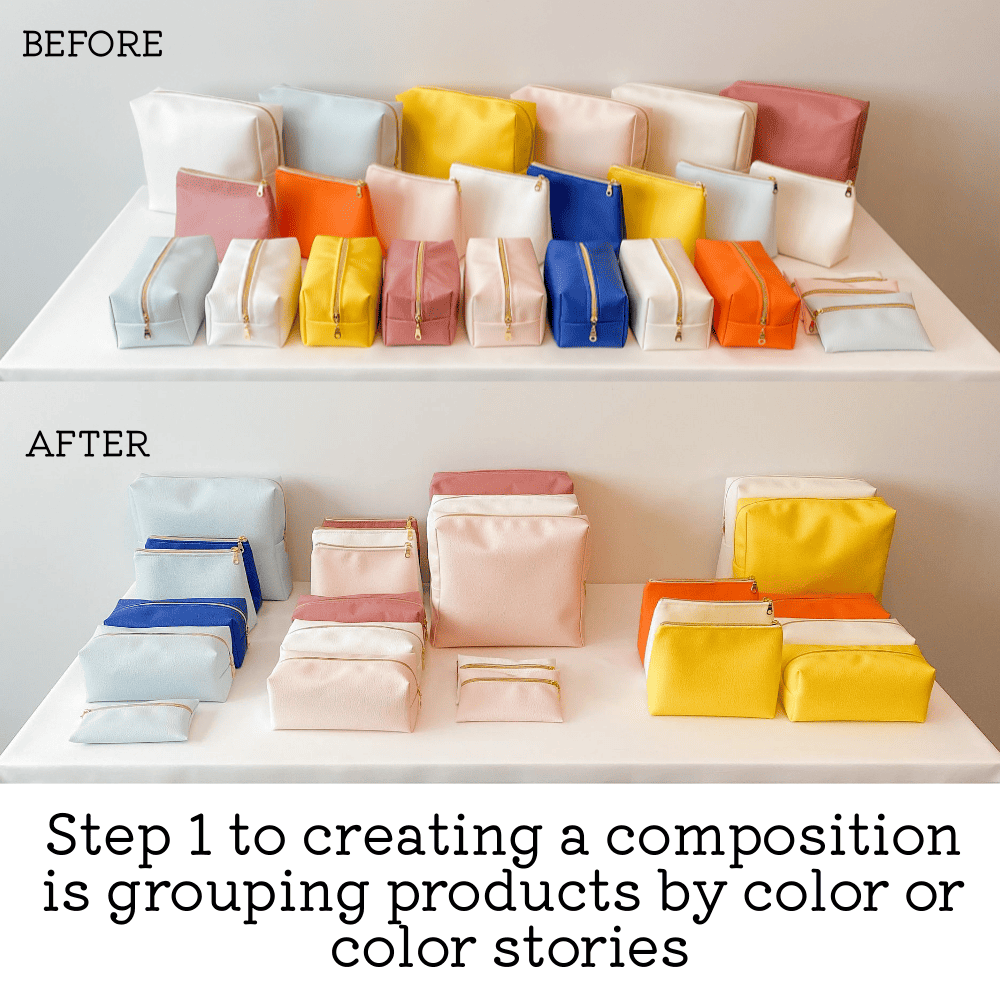
You can create color groupings with just one color in each grouping. But chances are, you’ll have more colors to work with. Try to stick to 3 – 5 colors within a collection.
Any more than 5 colors within a collection/grouping and it can start to look messy and make it harder to communicate a color story.
If you have too many colors to create tight groupings, edit out the colors that don’t work within a collection, and those can be used at the end of your table (in the “stock” area).
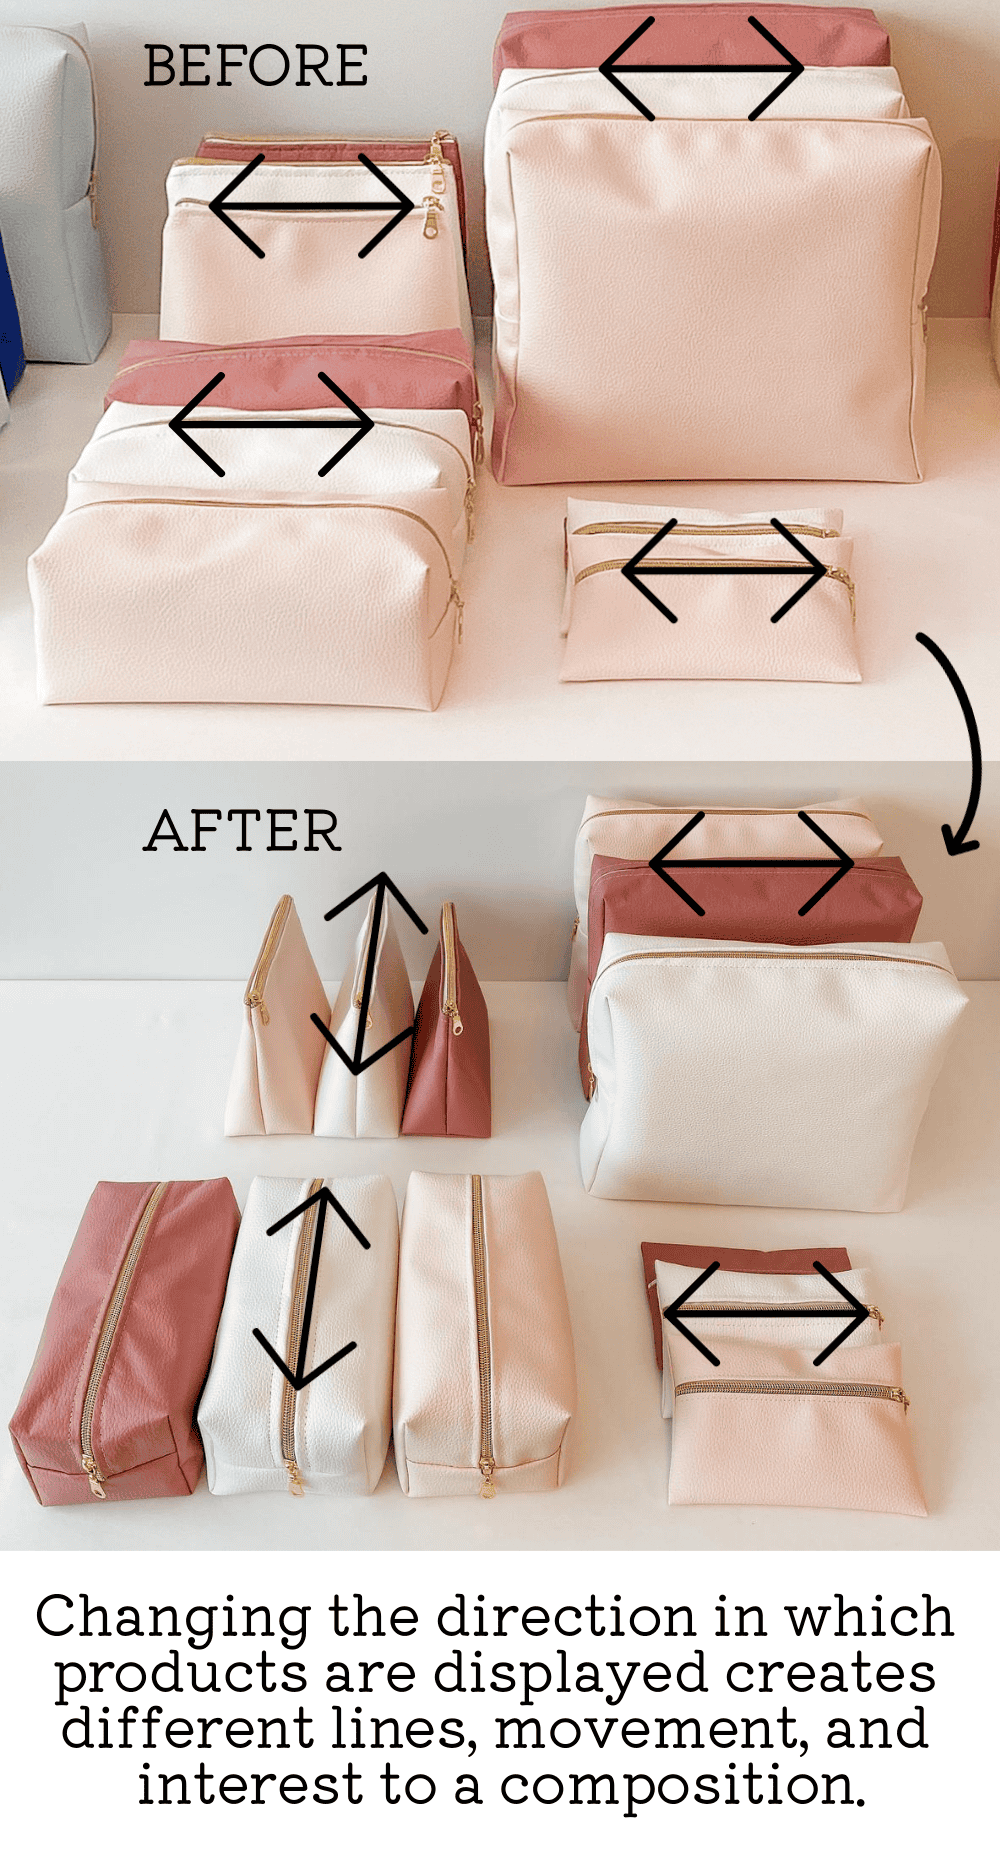
Step 2 – Create line variation
Instead of having every product facing forward (toward the front of the table), add some interest by showing products from different angles.
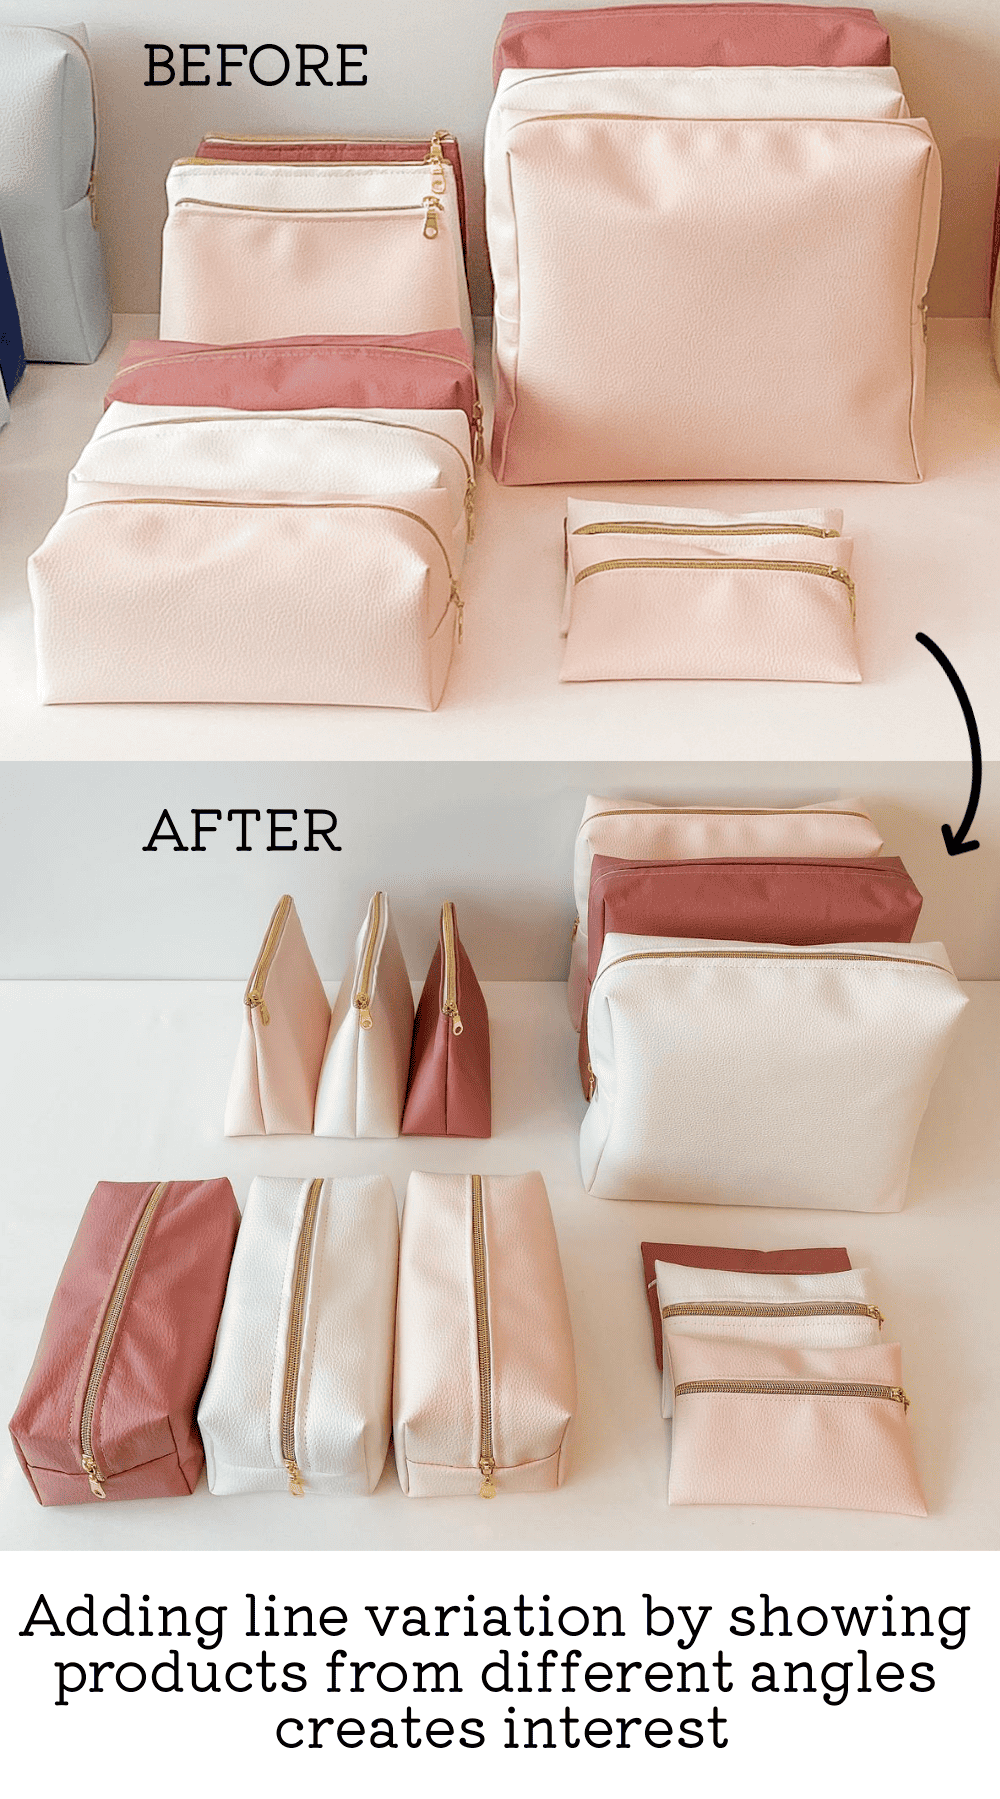
In a retail store, there is often variation in the way clothing is displayed. Some items are side-hung, others face forward, some items are folded on shelves, or displayed on a bust form, etc.
When it’s dozens of items displayed the same way (e.g. side hung) there isn’t as much interest. And when too many items are crammed into a space, it can lower the perceived value of the items.
On a craft show table, use your products to create different lines.
If you look at the example below, when all the products face forward, the dominant product lines/zippers all move left to right.
Rotating some products creates lines that go forward and backward/up and down and left to right within a composition.
This adds interest and helps direct the shopper’s eye from one piece to the next.
Step 3 – Height Variation
Set up your products so you have the tallest in the back and shortest in the front.
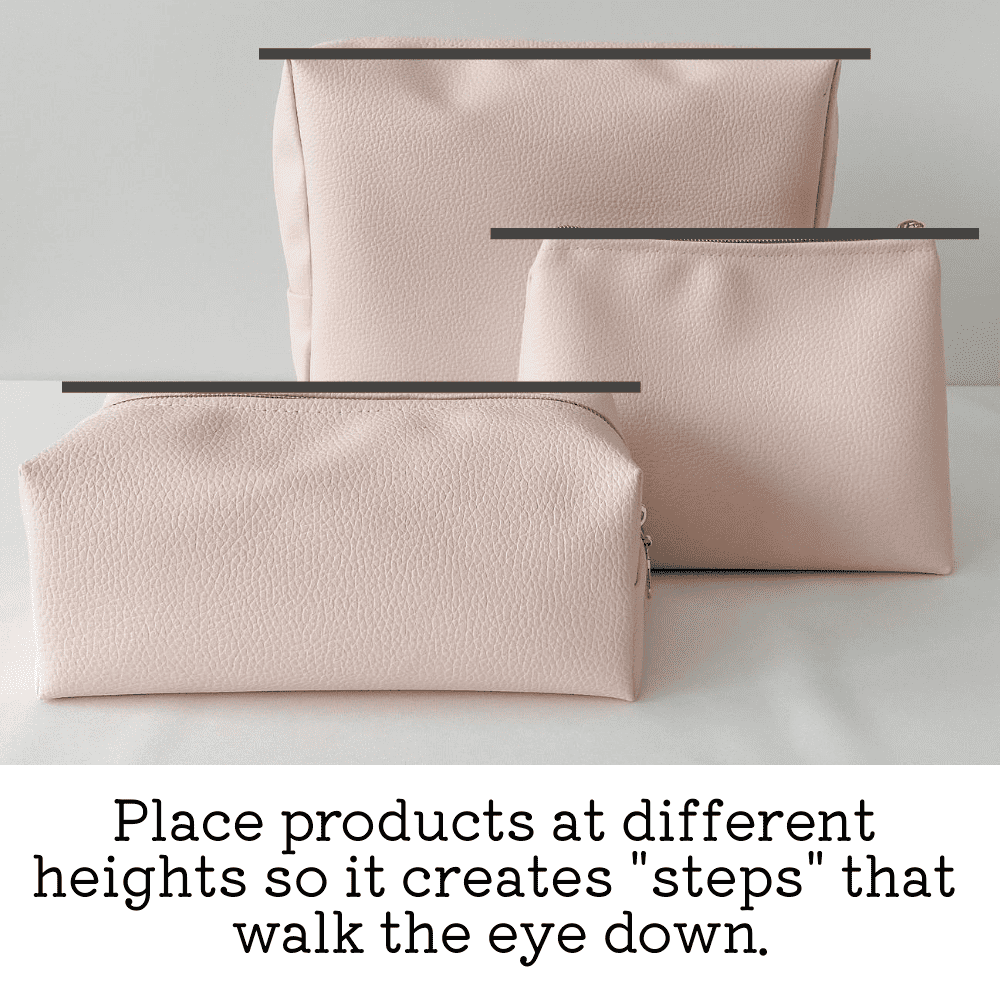
The tallest item in your space will typically catch a shopper’s attention first. Then when each product steps down in a display, it leads the eye from one product to the next.
It also looks more visually pleasing when you have dominant lines on different levels.
Use display fixtures to create different heights within a composition and to get your products closer to eye level (which is where they’re more likely to catch a shopper’s attention).
You may also stack products to add height variation (as long as it keeps your products shoppable).

Step 4 – Overlap
Items within a composition should overlap with each other to create a connection from one piece (or grouping) to another.
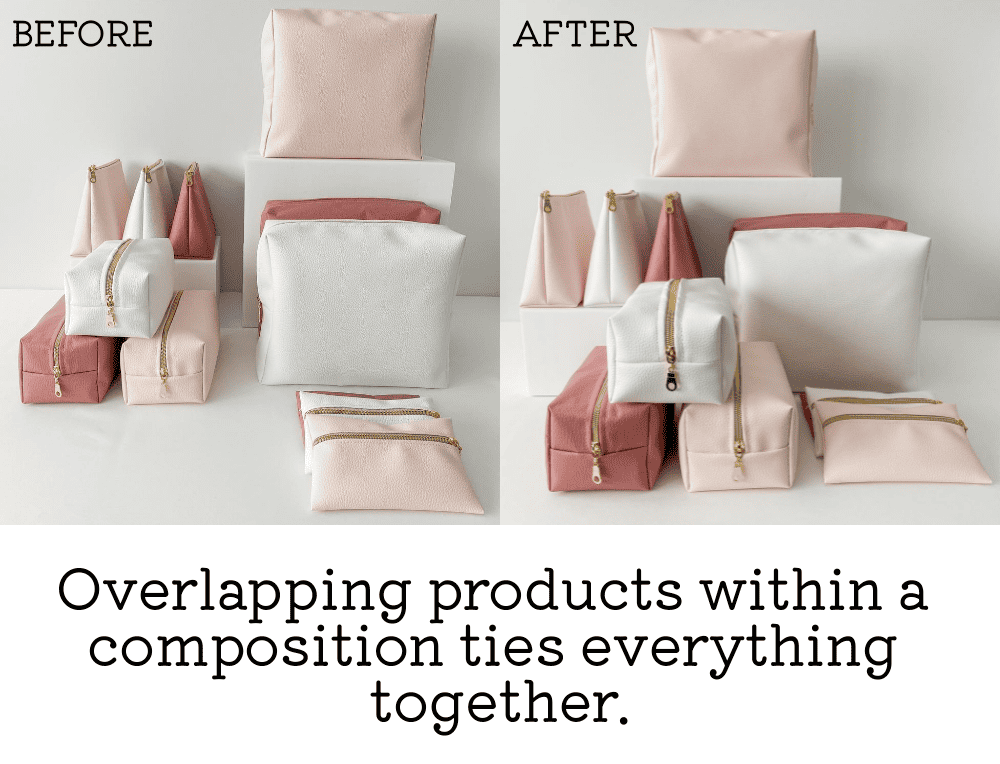
You want your pieces to remain shoppable and easy for people to grab (meaning, one item shouldn’t block another), but try to make sure each product, fixture, or prop slightly overlaps with the next.
You should be able to draw a continuous line from the top product to the bottom.
If there is too much space between products/fixtures/props, it breaks the flow of the composition.
With overlap, one element leads to eye to the next element.
Step 5 – Product Linking
Ensure that each product within a composition shares a connection in terms of how consumers use them.
That connection might be:
- A theme – e.g. all products in a composition are kitchen themed
- A purpose – e.g. all products in a composition are for bath time. Or, all the jewelry within a composition are for special occasion attire. Or, all knitted goods within a composition are for winter wear.
- A style – e.g. all jewelry in a composition follows a geometric design.
In the example below, you can see how adding a pair of mittens to a composition of cosmetic bags doesn’t make sense. In a typical circumstance, a person would never be wearing mittens while applying makeup, packing shampoo, etc.
On the other hand, adding scrunchies to the composition does make sense because someone might use a scrunchie to tie their hair back while applying makeup.
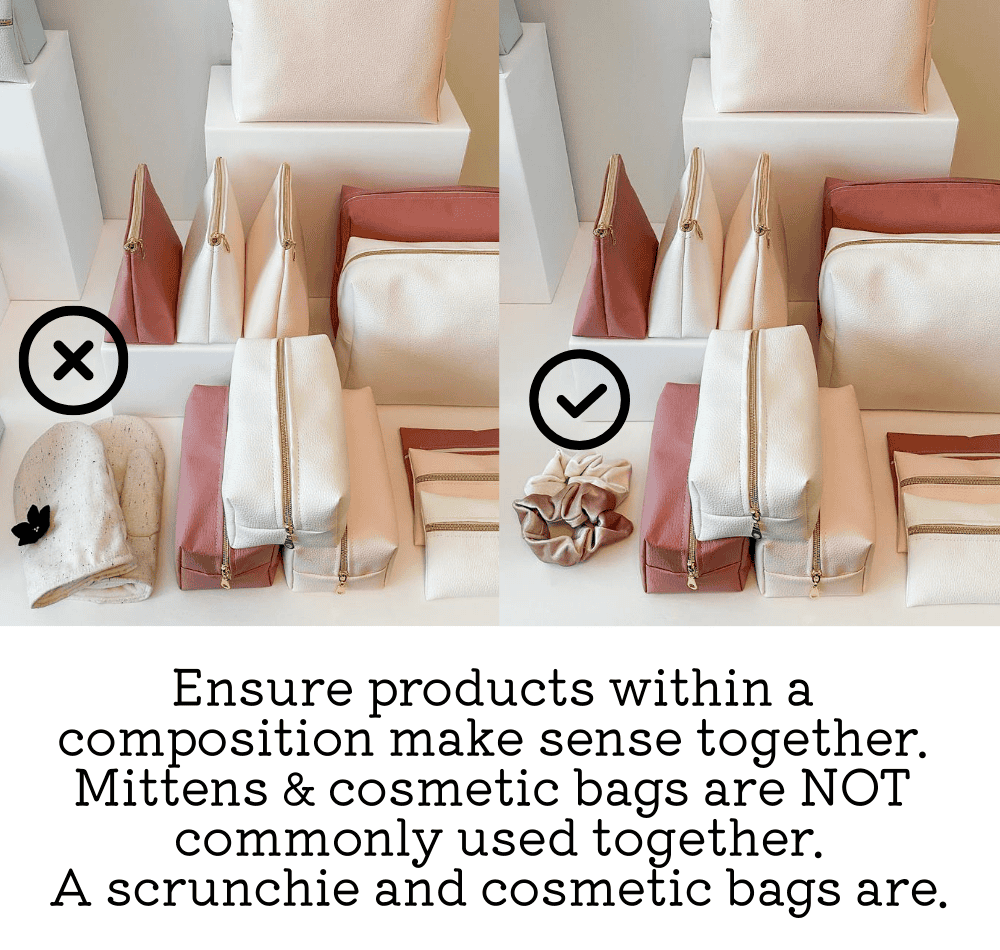
To decide whether an item belongs in a composition or not, think about your customers when they’re using your products. What other items are they using? What type of items are they surrounded by? These are items that will likely work together in a composition.
When you group items based on which ones are commonly used together, you’re more likely to sell more to each customer.
You may be interested in other ways to get each customer to buy more: 5 Strategies to Increase Units Per Transaction
Additional Tips
Here are a few other things to consider when creating your compositions.
Odd numbers
I’m not sure of the reason behind this rule, but whether it was my photography class or my visual presentation courses, using odd numbers was always encouraged.
I find odd numbers to be more visually pleasing, and it may be that it adds more interest than even numbers.
On a craft show table, I would create 3 compositions rather than 4. Within a composition I may try to have an odd number of dominant elements.
You can “fake” an odd number by grouping smaller items together.
For example, if I’m selling jewelry and I have a pair of earrings, a necklace, a ring, and a bracelet, I would group the earrings and ring closer together so they almost appear as one item.
Then I have an odd number of dominant elements in my composition:
- Earrings & ring
- Necklace
- Bracelet
Size of a composition
You can create a composition with just one of each product, or you can group multiple items together for each element of your composition.
For example, you may create a composition using just 1 necklace, 1 pair of earrings, and 1 bracelet.
Or, you may use 10 necklaces, 10 earrings, and 10 bracelets. You would group all the necklaces together so they read as one element, then all the earrings together, and all the bracelets together.
You can also have 3 different groupings of necklaces within a composition, with each grouping containing 10+ necklaces.
I find, the fewer items you feature in a composition, the more precious/special/high-end the items appear/are perceived.
You won’t always have the room to do this on a craft show table, but if you have a special collection of products (that are perhaps more expensive) you can have one composition that features just one of each product.
Have a display area and a stock area
The photo examples obviously use a limited number of items. Most vendors have more stock and variety. In which case, I would follow the same steps and simply set aside any items that don’t fit within a composition.
For example, let’s say I had other products (e.g. mittens) and colors of bags that didn’t work within my color stories or compositions. I would create the compositions as I have done, but instead of the yellow/orange/white composition, I would use that space for a “stock area”.
The stock area is less about showcasing different pieces, and more about housing as much stock as possible. Shoppers need to sort through these pieces as every item can’t be visible at a glance.
This article shares an example of a “stock area” on a small craft fair table: 6 Simple Ways to Improve a Craft Show Display
I hope this makes creating compositions easier. Please let me know in the comments if you have any questions!

Hey, I’m Erin 🙂 I write about small business and craft show techniques I’ve learned from being a small business owner for almost 2 decades, selling at dozens of craft shows, and earning a diploma in Visual Communication Design. I hope you find my advice helpful!
Hi, I’m Lisa. I have started a business selling handmade purses. I have a craft fair on September 30th and I would really like to know how to set up my products so I can be successful. I have been in other craft fairs and have only walked away with one or two dollars, I really don’t want this type of situation to happen again. Could you please give me some advice on how to set the craft table up so I would be able to make some sales, or sell everything which would be totally awesome. I would really appreciate your help.
Hi Lisa,
Good luck at your craft fair! My blog is full of advice for setting up your booth and you may also be interested in my free 5 day email challenge: https://www.madeurban.com/5-days-to-a-standout-craft-show-display/
~Erin
I had the craft fair yesterday and I did better than any of the past craft shows I have been in. The only problem is I don’t know how to price my products. people want stuff at yard sale prices. They don’t seem to realize the time and the love a crafter puts into their products. To a crafter there is no price on the item they make because it’s priceless to them. There’s all the other expenses involved also, gas, wear and tear on your vehicle, etc. Could you please let me know how to price my products I would be so grateful. What I made yesterday wasn’t nearly what I list it for on Etsy so I felt I took a huge loss. I have another show on the 28th but would like to get a mid October one as well, and one the middle of November. Any suggestions would really help.
Hi Lisa,
The type of event and how you present your products will definitely impact how shoppers perceive them. You’ll always get that shopper who expects flea market prices for your handmade goods, but you’ll get fewer of them when you participate in events that target a specific type of shopper and you can attract shoppers who are willing to pay top dollar (or repel bargain shoppers) through your display elements.
I have an article here on how to price you handmade products: https://www.madeurban.com/blog/how-to-price-a-handmade-product/
~Erin
Hi I’ve been reading your emails for the past few years and I have been inspired to finally get my business going. I have a mobile coffee cart and I have just started getting more events at various events/pop-ups. I would love to bring in used books sticker’s possibly. I’m trying to figure out how to display these without looking to cluttered
Hi Shaunte,
Congrats on starting your business! Hopefully the tips in this article help you set up your booth. When working with smaller items, I find it’s best to group/bundle several small items together to create the illusion of one element. So instead of spreading say 10 stickers out in your display, bundle them together and use that grouping as one element in your composition.
~Erin
Hello Erin, it’s Tim from Phoenix, AZ. Home Business Xpressions/Handmade Decor. I went to my 1st Pre-fall Swap Meet this past Saturday. I used one of your ideas that you gave me to try. I used risers to raise up my handcrafted creations in the back of my banquet tables. What I used was my containers that I use to hold my smaller crafts in to take back home. I then used matching table clothes to cover up the containers. WOW, did that make a BIG difference! After júst now reading this article, I have some more GREAT ideas that I will use in my next set up. Your other ideas I will be using in the near future as I’m saving up for newer Booth equipment. I will send you some pictures on your other email address if you want , you can Repost them to your members. Thanks again, Tim
Hey Tim,
I’m so happy you saw an improvement in your display after implementing that tip. And I’m glad this article sparked some new ideas 🙂 Keep up the amazing work!
~Erin
Great recommendations, Erin! Such simple tweaks to a display make such a significant impact. Thank you for providing meaningful advice!
Thank you Jennifer! I agree, it often doesn’t take much to make a big difference.
Thanks for reading and commenting 🙂
~Erin
This is a great article, thank you Erin!