Free Craft Show Checklist (& Preparation Steps)

This article will help you prepare for a craft show and to provide you with printable checklists full of steps to take to prepare for a craft show, as well as craft show supplies you’ll want to have in your craft show booth.


The free craft show checklist download includes:

  • A craft show checklist with steps you must take before a craft show to prepare for it.
  • A craft show checklist with the supplies you must bring to each craft show.


Printable Craft Show Checklist PDF

You can download your free printable craft fair checklist by signing up for my newsletter below:


Craft Fair Preparation Checklist

The following checklist will help you prepare for a craft show as it outlines the steps to take leading up to the event.

Craft Show Preparation Checklist


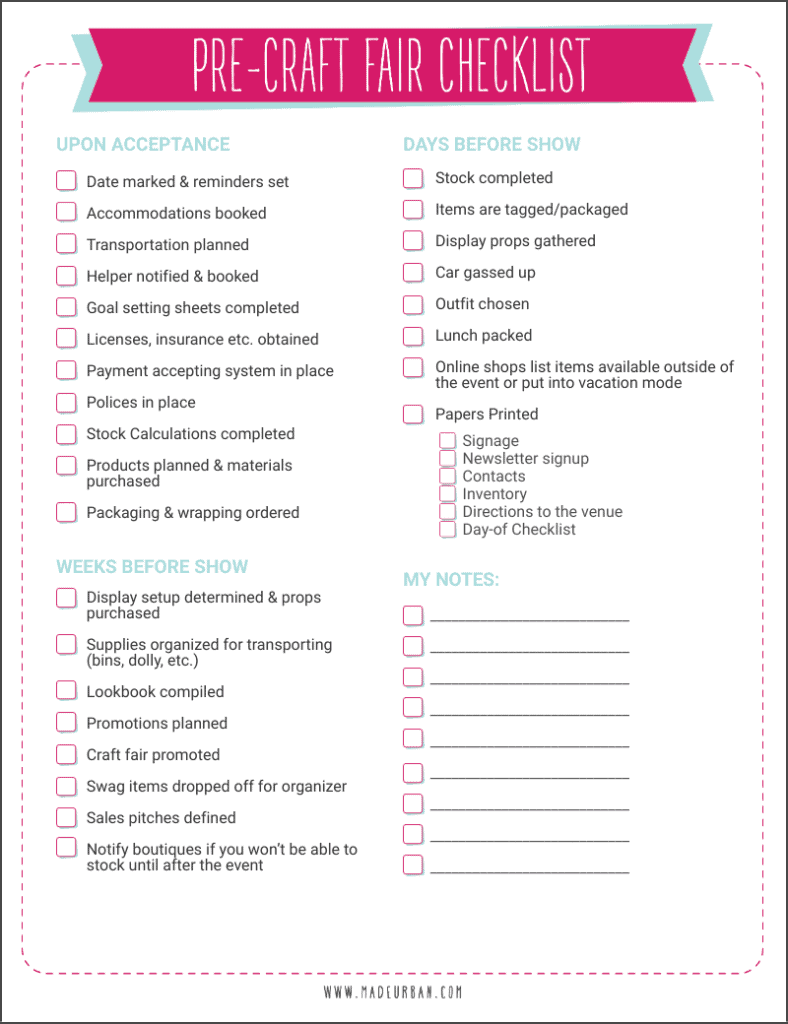
UPON ACCEPTANCE TO A CRAFT SHOW:


WEEKS BEFORE THE CRAFT SHOW:

  • Display set up determined & props purchased (this will help you plan your display)
  • Supplies organized for transporting products (e.g. bins, dollies, etc.)
  • Lookbook created and printed (here’s how to create one…great if you hope to connect with store owners)
  • Promotions planned (e.g. will you offer a discount for people buying multiples?)
  • Craft fair promoted (you need to do your part to market the craft show and get your people to the event…it helps you sell more)
  • Swag items dropped off to organizer (consider if it’s worth it to contribute to swag bags and, if so, put something meaningful in them)
  • Sales pitches defined (i.e. knowing which selling features to point out, based on what your customers care about)
  • Notify boutiques if you won’t be able to restock them until after the craft show


DAY(S) BEFORE THE CRAFT SHOW:

  • Finish making stock
  • Stock is tagged & packaged
  • Display props gathered
  • Car gassed up
  • Outfit chosen (here’s what you should wear to a craft fair)
  • Lunch packed
  • Update your Etsy shop to remove items you’ll be selling at the craft show (or put shop in vacation mode until after the craft fair)
  • Papers printed


Craft Show Checklist

The following checklist includes items a craft show vendor may want to pack to have everything they may need while in their craft show booth.

Craft Show Checklist


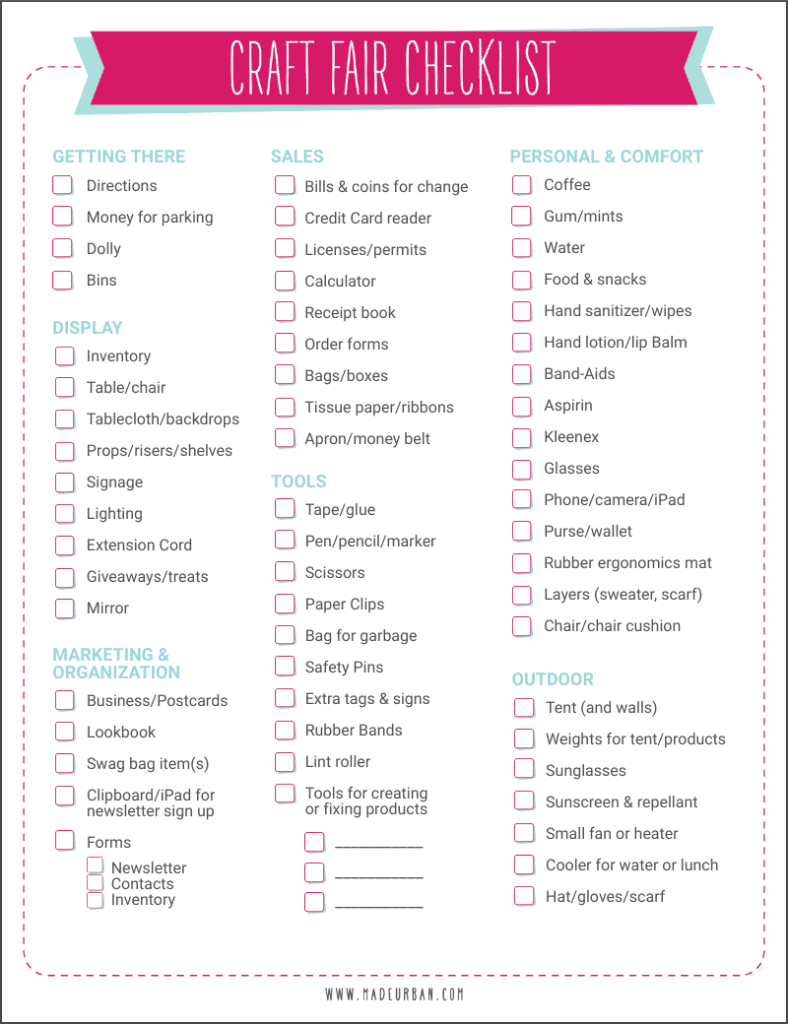
FOR GETTING TO THE CRAFT SHOW:

  • Directions to the event
  • Money for parking
  • Bins to pack product in
  • Dolly for moving product from your cat to your craft show booth


FOR YOUR CRAFT SHOW DISPLAY:

  • Inventory
  • Table / chair (if not provided by the craft fair organizer)
  • Tablecloth / backdrop
  • Props / risers / shelves
  • Signage
  • Lighting
  • Extension cord
  • Giveaway items / treats
  • Mirror (if craft show shoppers will be trying your items on)


FOR MARKETING AT THE CRAFT SHOW & ORGANIZATION:


FOR MAKING SALES AT THE CRAFT SHOW:

  • Bills and coins for making change
  • Credit card reader
  • Required licenses & permits (more on that here)
  • Calculator
  • Receipt book
  • Order forms (in case shoppers place a custom order)
  • Bags / boxes
  • Tissue paper / ribbons
  • Apron / money belt


TOOLS YOU MAY NEED AT A CRAFT FAIR:

  • Tape / glue
  • Pen / pencil / marker
  • Scissors
  • Paper clips
  • Bag for garbage
  • Safety pins
  • Extra tags & signs
  • Rubber bands
  • Lint roller
  • Tools for creating or fixing products


PERSONAL SUPPLIES YOU MAY NEED AT A CRAFT SHOW:

  • Coffee
  • Gum / mints
  • Water
  • Food & snacks
  • Hand sanitizer / wipes
  • Hand lotion / lip balm
  • Band-Aids
  • Asprin
  • Kleenex
  • Glasses
  • Phone / tablet / charger
  • Camera
  • Purse / wallet
  • Erganomic mat (for more comfort when standing all day)
  • Layers (e.g. sweater, scarf)
  • Chair cushion


SUPPLIES FOR AN OUTDOOR CRAFT SHOW:

  • Tent (and tent walls)
  • Weights for tent (and ones to hold products down on windy day)
  • Sunglasses
  • Sunscreen / bug repellant
  • Small fan or heater
  • Cooler for water or lunch
  • Hat / gloves / scarf


Preparing For A Craft Show

Take it from someone who was always up late the night before an event; the sooner you start preparing and getting organized, the better.


All the little things add up and even if I had completed my sewing the day before, I usually didn’t get to bed until after midnight because I was packing display fixtures and props, tagging items, printing off signage, etc.


Let’s make all those late nights of mine have some meaning, shall we? I’m hoping you can learn from my mistakes and make use of my craft show preparation suggestions.


Both craft show checklist are from my start-to-finish guide: MAKE MORE MONEY AT CRAFT FAIRS


You can download the pre-craft fair checklist and the craft fair checklist for free, by signing up for my newsletter.


Inside MAKE MORE MONEY AT CRAFT FAIRS, you’ll find more helpful worksheets, printable spreadsheets and more craft fair checklists, including:

  • Selecting the Right Craft Fairs Checklist
  • Craft Fair Application Checklist
  • Pre-Craft Fair Checklist
  • Cohesive Craft Fair Display Checklist
  • Craft Fair Checklist
  • Post-Craft Fair Checklist


They’re quick and easy bullet point guides to ensure you’re not missing anything.

MAKE MORE MONEY AT CRAFT FAIRS


You can check out the full ebook here.


Now, let’s look a little closer at the steps required to prepare for a craft fair.


STEP 1 – CRAFT SHOW PREPARATION UPON BEING ACCEPTED

As soon as you get that email stating you’ve been accepted and right after you have a happy dance and maybe a mini freak out wondering how you’ll get everything done, check the following tasks off your list:


MARK THE DATE OF THE EVENT & SET REMINDERS

Obviously, you don’t want to forget which weekend the event is or double-book yourself at two craft fairs, so enter the date(s) of the event into your calendar.


Next, ensure you stay on track.


If possible, complete stock production a few days to a week before the event so you have time to complete all the tasks that fall under “Days before the event”, found near the end of this post and on the craft show preparation checklist.


Have a look over those tasks now, determine how many days you’ll require to complete them, and mark that date on the calendar. For example, if you need 5 days, count 5 days before the event and mark that day as “stock complete”.


Then, set reminders between the current date and the stock completion date for tasks that must be completed under “UPON BEING ACCEPTED” and “WEEKS BEFORE THE EVENT”.


DETERMINE HOW MUCH STOCK TO MAKE

A complete set of formulas and calculations can be found in the full ebook MAKE MORE MONEY AT CRAFT FAIRS. They’ll walk you through exactly how to determine stock levels for each craft show, based on your goals, the event, your average sales per hour, and many more variables.


Let’s say you’ve determined you must make around 100 items and you have 30 days before you need to have your stock completed. You may set some general benchmarks to hit for each week and mark them in your calendar. For example:

  • 30 products made by week 1
  • 60 products made by week 2
  • 84 products made by week 3


GET EVERYTHING BOOKED & PLANNED

Travel & stay

If the event is out of town, book your accommodations and plan your transportation.


Helpers

If you need a helper, notify them and if they’re available, ask them to book the time off.


Set your goals

It’s so important to set goals as you prepare for each craft show to treat it like a business. Once you set your goal, start putting elements in place that will help you reach it and factor it into how much stock must be made.


Chapter 2 of MAKE MORE MONEY AT CRAFT FAIRS is dedicated to goal setting and making sure you set realistic goals for craft fairs that will stick.


Licenses, permits, insurance, etc.

Check your local laws as well as find out what’s covered by the organizer. For example, some events will have their own insurance, which you’ll be covered under while others require you to have your own insurance.


LAWS FOR SELLING HANDMADE will help you better understand how to properly and legally set up your craft business and has easy to follow steps.


Payment collection

How are you going to collect money? Cash keeps things simple, but keep in mind, a lot of people don’t carry cash these days and not every venue has an ATM. It could cost you a few sales if you don’t accept credit cards.


Policies

Think about any policies you should have in place to protect your handmade business and profits. Are you going to accept returns if someone gets halfway through the venue and decides they want a refund so they can buy from someone else? Will you accept custom orders or will that take up too much of your time? What if a vendor asks to do a trade? These are much easier to answer (and answer confidently) when you’ve thought about them and defined your rules.


PURCHASE MATERIALS

You’ll, of course, need to purchase enough materials to make the number of handmade products you’ve calculated. If you order supplies online, be sure you get on that right away so production isn’t put on hold because of shipping delays.


Place an order for packaging supplies. Think about:


How your packaging can increase sales is covered in the FREE chapter of my ebook. You can download it for free here. It also includes a bunch of examples when it comes to packaging your handmade products and wrapping them for a sale. You want your brand to be carried throughout the shopping experience, right down to the shopping bag you hand them.


STEP 2 – CRAFT SHOW PREPARATION WEEKS BEFORE

Aside from preparing stock in the weeks leading up to the craft show, also consider the following.


YOUR CRAFT SHOW DISPLAY

Do you need to purchase or prepare any display fixtures or props? Tablecloth, risers, decorative elements, etc. If anything needs to be painted or stained (such as wooden risers) be sure you leave enough time to dry before packing day.


You’ll want to, at the very least, sketch your display setup, and ideally, set up your full display at home to get a feel for it. If you’ve done several events, you may get away with skipping this step. But if you’re altering your craft show display at all or this is your first event, a mock setup will help you see how each element looks and functions.


You’ll also get a feel for how much stock you’ll actually be able to display (don’t overdo it, you don’t want your space to look cramped).


Consider the proper layout of a craft show table and the story you want your display to tell.


If you don’t have a clue of where to start with your display and how to build one that encourages sales, or, if you want to improve your display, join the FREE 5-day email challenge: 5 DAYS TO A STANDOUT DISPLAY.


Determine how you’ll transport your handmade products and display elements. Purchase any bins or containers or see if there are items at home to use. Laundry baskets and suitcases can be helpful.


PREPARE FOR SALES

Do you need a lookbook?

If there’s not enough room to display all your handmade products, or you offer custom work, or you’re hoping to meet some shop owners and secure some wholesale orders, consider creating a lookbook. Here are the simple steps to do so.


You may also be interested in HOW TO ATTRACT WHOLESALE ORDERS AT A CRAFT SHOW.


To make retail connections at the event, have lookbooks printed with all the details store owners need to place an order. Check out this article for info on putting together a professional lookbook and to see an example of one.


Invite your followers

Make the most of your existing customers and fans. They’ve already proven they love your handmade products so be sure to let them know about your event and give them a reason to visit you (covered in the next point).


Plan your promotions

Give people who are familiar with your brand, a reason to come visit you. Make sure you’re still profiting but consider running a special promotion for the first ______ shoppers to stop by, a discount for Facebook fans that mention a particular post, or send out coupons to your newsletter subscribers (here’s how to get a newsletter started in 10 minutes…trust me…your craft business needs one). You may even mail a flyer to your best customers offering them a “VIP deal” (which you can get creative with; maybe they get a free gift with purchase, a discount, or the ability to shop your products online before the event and have them set aside).


You may want to organize a giveaway or draw for people who stop in your booth or sign up for your newsletter. Or you could give out samples of your handmade product to draw more shoppers in.


Think about what type of promotion to run (if any) and determine what needs to be done to execute it.


Prepare your craft show sales pitches

Don’t just wing it, think about what shoppers should know about your handmade products, what you do differently from other vendors selling similar products, and the features shoppers truly care about.


Need a little help in the sales department? It was my least favorite part of craft shows but I did find ways to make it more natural and share info shoppers actually cared about.


Not putting effort into making sales is leaving a lot of money on the craft show table.


MAKE MORE MONEY AT CRAFT FAIRS has tons of tips to step up your selling game and worksheets to guide you through what to say to shoppers.


ADDITIONAL STOCK

Preoare craft show swag bag items

If you’re contributing to swag bags, make sure you strategically plan what to contribute. Throwing your business card in likely won’t have an effect on sales. Think about what you would love to receive and what would make you head over to a table.


This article will help you come up with a swag bag item shoppers actually want to receive.


Prepare your online store

Consider what you need to do when it comes to managing the stock you sell online. You don’t want that one-of-a-kind handmade item to be listed on your website and for sale at the event. What happens if that one item sells to two people?


To keep sales rolling in through your website while you’re at the craft show, adjust how much stock you make so you can have a (semi) full online store and a full craft show table.


If the craft show affects your online sales; such as replies, shipping times, etc. plan for how you’ll communicate that to your online shoppers. A message at checkout or placing your shop in vacation mode will take away the stress of having to check website sales during the event.


Notify retail stores

If you supply your handmade products to retailers on a consignment agreement, notify them if there will be any changes to your ability to fill orders.


It’s not a good idea to pull inventory from consignment stores to take it to your craft show. You’ve agreed to supply them with the stock so it would be unfair to take it away last minute.


What you could do is check with them and see if there’s any stock they’d like you to pick up (if it’s been in there for several weeks).


Otherwise, simply let them know if you’re unable to restock them for a few weeks due to craft show preparation.


STEP 3 – CRAFT SHOW PREPARATION DAY(S) BEFORE

As mentioned, it’s helpful to have all your stock completed at least a few days before the event. This will give you enough time to check off the tasks below and maybe you’ll even have time to relax the night before the event! (that was usually a pipe dream for me;)


Here are some preparation tasks you may need to complete in the final days before an event:

  • Finish details for your product; tagging, packaging, documenting inventory, etc.
  • Prepare wrapping supplies; printing stickers, stamping shopping bags, pre-cutting ribbon, etc.
  • Gather and prepare props; washing and ironing tablecloth, packing risers and stands into crates, etc.
  • Pack your car; if you have a secure garage, do this the day/night before the event
  • Plan and prepare your outfit for the event and make sure it’s washed and ready to go
  • Prepare your lunch and snacks
  • Update your online stores; remove any stock you’ll be selling at the craft show or put your shop in vacation mode
  • Make sure you have the address and directions to the venue and your car is gassed up


Find more checklists in MAKE MORE MONEY AT CRAFT FAIRS including:

  • Selecting Events Checklist
  • Craft Fair Application Checklist
  • Cohesive Display Checklist
  • Pre-Craft Fair Checklist
  • Craft Fair Checklist
  • Post-Craft Fair Checklist
  • Plus 6 printables to keep you organized for tasks like collecting emails at an event, tracking inventory, tracking craft shows you’ve applied to, want to apply to, have been accepted to, etc.


You may also be interested in: How to Host a Successful Craft Show


Download the Preparation Craft Show Checklist for FREE by signing up for my newsletter below.


Finally understand why your hard work isn't resulting in more sales

Join over 18,000 others and sign up for the
Made Urban newsletter


Powered by ConvertKit
Previous Post
Next Post

One Comment

  1. Kacy Chambers says:

    This is such a good checklist. Thank you so much for posting this!!

Leave a Reply

Your email address will not be published. Required fields are marked *