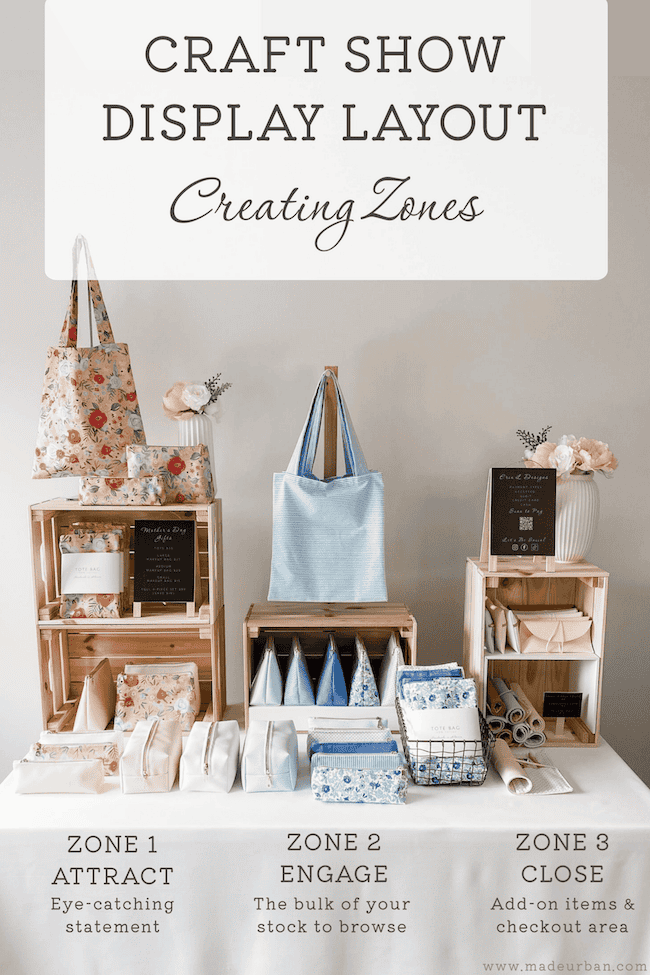
Craft Show Table Layout Tips
When creating a craft show display that stands out, you must consider the layout. Once you get your craft show table layout perfected, setup will be a breeze. It will then be a matter of rotating products into each section to coordinate with the season, demographics of the event, or the theme of the event.
Your craft fair table should be treated like a mini retail store and keep your customer’s shopping habits in mind.
First, think about the way you shop.
When you enter a store, you may check out what’s being promoted in the front, then you may browse through the rest of the store’s selection, try some items on or ask sales associates questions. Finally, you’ll head to the cash desk if you’ve found something you want, or head out if you didn’t.
Retailers keep this shopping behaviour and flow in mind when setting up their stores.
Here’s an example of how a retail store might be set up based on that behaviour.
- The window display and front table showcase items that will draw you into the store
- Table, hanging (e.g. t-stands or rolling racks), and wall displays will encourage you to shop the outer loop of the store
- Fitting rooms draw you to the back and often shoes, purses, scarves, etc. will be displayed close to the fitting room so you can easily complete your outfit as you try it on.
- Jewelry and smaller items are often displayed near the cash desk, which is positioned close to the end of a shopping loop. Jewelry placed in this section ensures the cashier can keep an eye on shoppers when they’re around the smaller, easy to steal items, and it’s easy for customers to shop for jewelry while they’re waiting to pay.
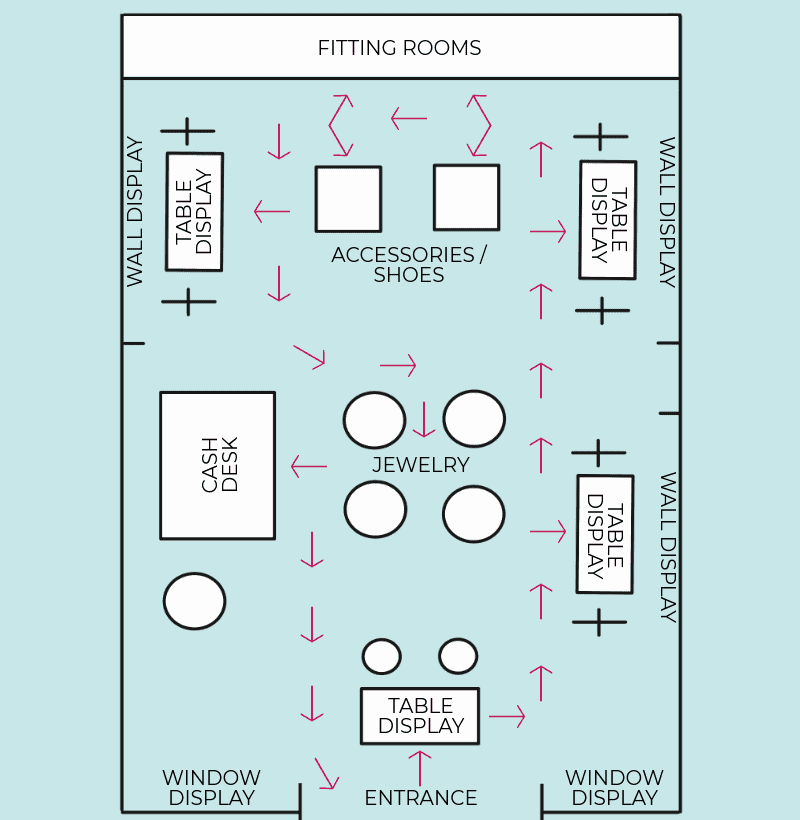
Retailers don’t put fitting rooms or cash desks at the front, display accessories before the shopper has a chance to pick an outfit, or have associates ready to pitch to you the second you walk through the door.
Although you’re working with a much smaller space when setting up your craft show table, your layout should still keep the shopping experience and typical behaviours in mind.
Let’s take a look at how you can create an impactful layout at your next craft show.
Craft Show Display Zones
I like to think of a craft show table as having sections or zones, each with a specific purpose.
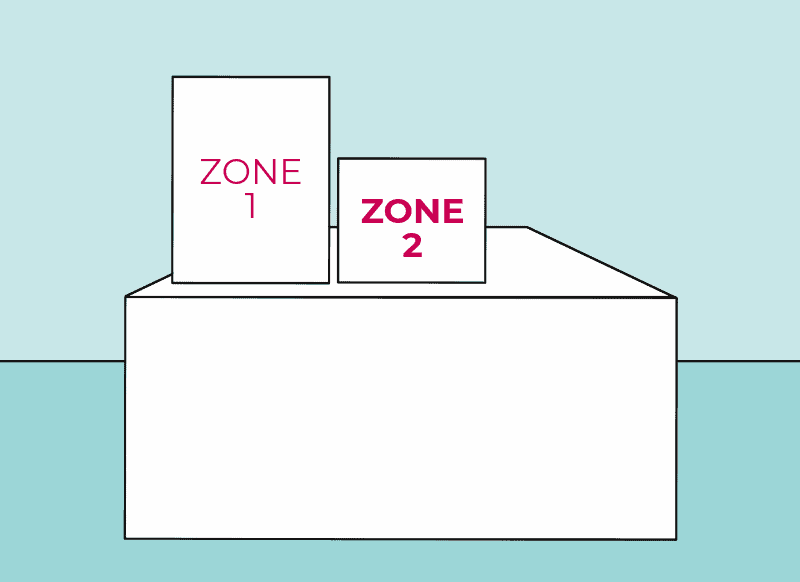
ZONE 1 – ATTRACT
Imagine walking through the mall, on your way to your favorite store. You don’t have intentions of stopping anywhere else so you’re walking a bit quicker, bee-lining it to your destination.
Stores along the way do have a chance to get you to stop…if their window display or zone 1 catches your attention.
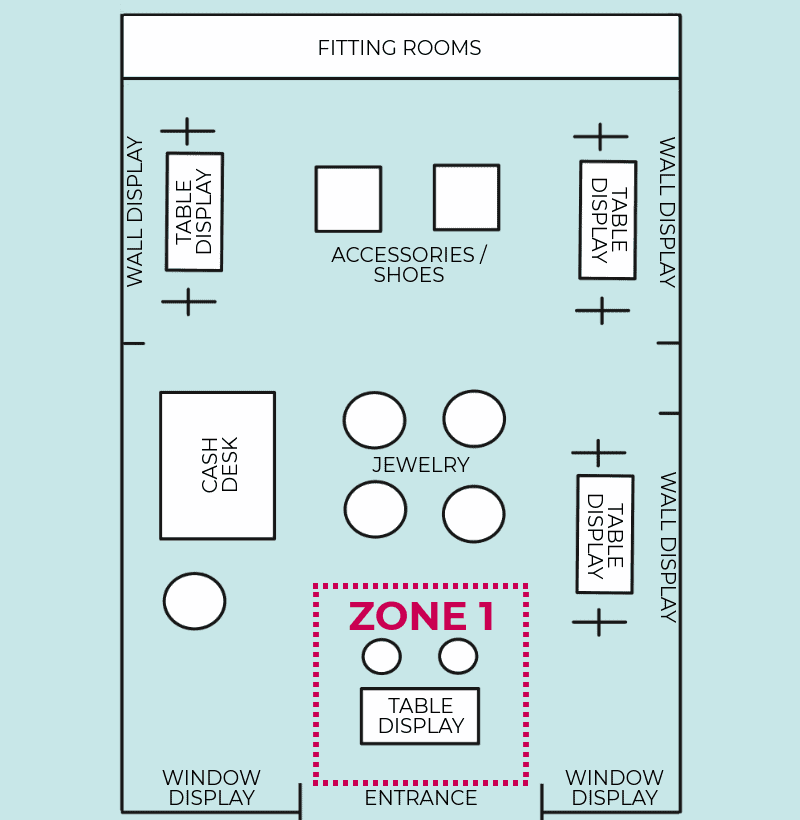
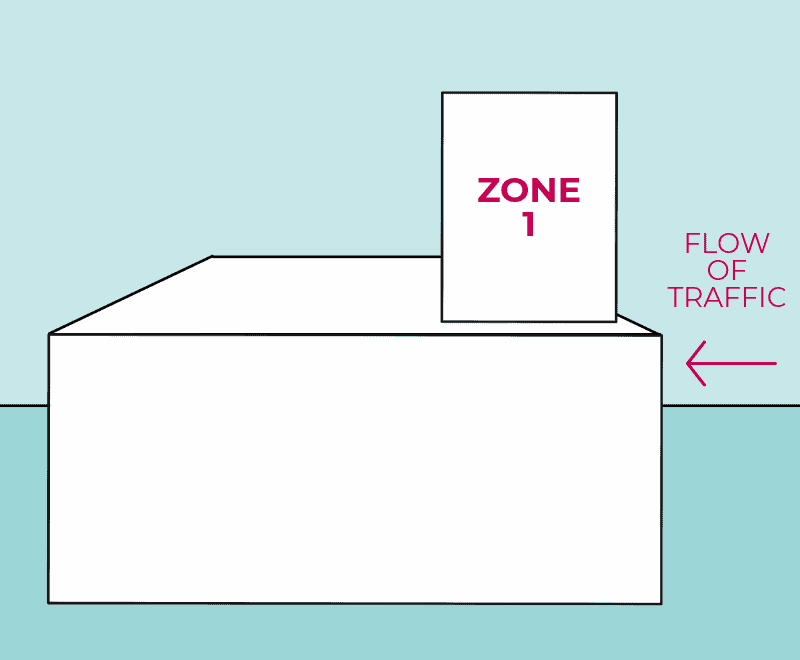
Zone 1 in a retail store is the first product display inside the store.
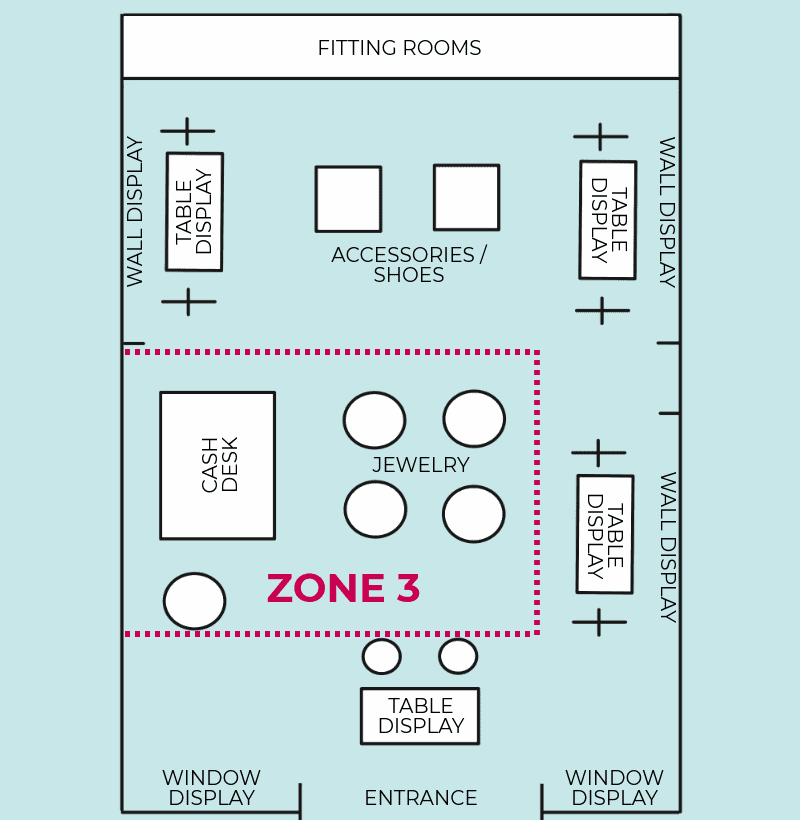
In the example store layout, the section highlighted below would be considered zone 1:
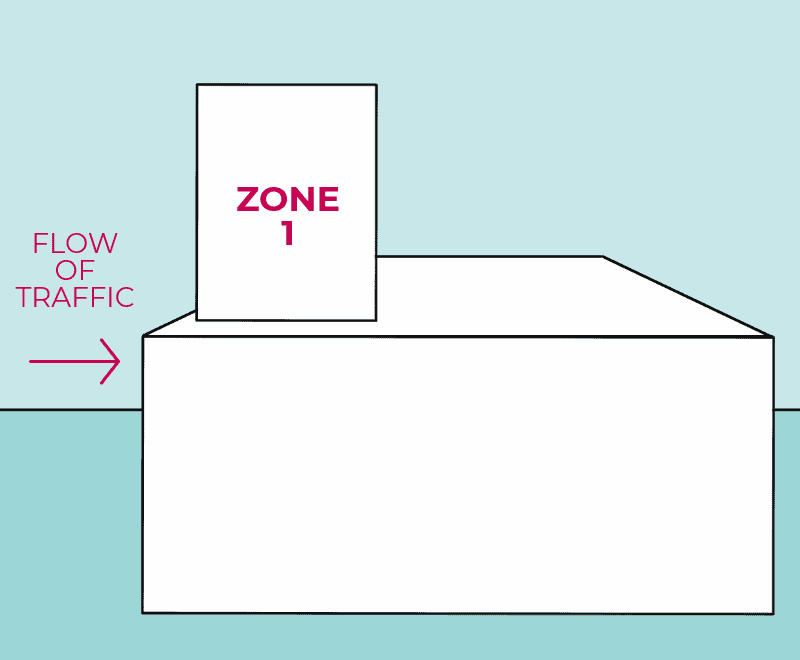
Retailers use this area to try and catch your attention as you’re walking by.
It’s also set up in a way to slow you down once you step inside the store so you don’t keep up the same pace you had before you entered.
It acts like a speed bump.
It’s typically reserved for new arrivals and best sellers. It may also advertise a sale or promotion.
CREATING A ZONE 1 FOR YOUR CRAFT SHOW TABLE
Here’s how you can create a zone 1 for your craft show table’s layout and create the same impact retailers do.
PURPOSE
Your craft show table’s zone 1 should grab shoppers’ attention, draw them in, and transition them into your shopping space.
Zone 1 of your craft show table should be a brief introduction to your brand (branding ideas for your craft show table can be found here) so you don’t have to hit each shopper with a “Let me tell you a bit about my products” the second they walk up.
Your zone 1 acts as a silent elevator pitch.
There are several ways you can catch a shopper’s eye (lots of tips shared in this free email course) but size and height should play an important role in every zone 1.
This section of your table should house the biggest and tallest display so it becomes the focal point of your table and people are naturally drawn to it first.
PLACEMENT
Zone 1 of your craft show table layout should be closest to shoppers as they approach and the first thing they notice in your space. Keep the flow of traffic in mind and the direction most shoppers will be coming from.
For example, if most shoppers approach your table from the left, your zone 1 will be on the left side of your table.
If most shoppers approach your table from the right, your zone 1 will be on the right side of your table.
Even if a shopper happens to approach your table from the opposite side, you want your zone 1 to be powerful enough to draw them over and work their way back.
PRODUCT
Zone 1 is perfect for:
- Bestsellers – the item you always sell out of at craft shows (keep in mind, what sells well online may not sell as well at a craft show and visa versa).
- Seasonal items – if spring or Mother’s Day is just around the corner, any spring or Mother’s Day themed products would be appropriate for your zone 1.
- Showstoppers – an item that always catches shoppers’ attention (it may not have the highest conversion rate, but it grabs interest).
- New items – be careful if an item is completely new and has no track record of selling. In which case, you may want to test the new item in zone 1, but be prepared to swap it out for a proven bestseller if it’s not performing. If you’re simply offering a bestseller in a new color/material/scent, etc. it should be perfect for zone 1. It also gives your regulars something new to shop.
- Featured items – many craft show organizers will have social media pages they use to promote: the event, vendors, and the products that will be at the show. If they’ve featured one of your products on their social media pages and it garnered a lot of likes, comments, shares, etc., consider placing it in your zone 1 so shoppers who saw it online recognize your booth.
Consider your typical customer and how they shop. That will impact what is best suited for your zone 1. For example:
>> The customer of a trend-focused brand is interested in seeing the latest trends and is going to be drawn in by them.
>> If your ideal customer is all about entertaining and throwing the best dinner parties, they’re going to be drawn in by napkins, place settings, etc. that follow the theme of the next major hosting event (e.g. Superbowl, Easter, Thanksgiving, etc.)
>> The health-nut, all-natural, clean-living customer has probably been hearing about the benefits of watermelon-infused skincare products and would be drawn to a display featuring one.
>> If your customers typically stock up on your products at craft shows, featuring bundles or a “stock up and save” promotion will catch their attention.
Don’t think about every craft show shopper and how you can wow them all. Think about your typical customer and what they would love to see.
EXAMPLE
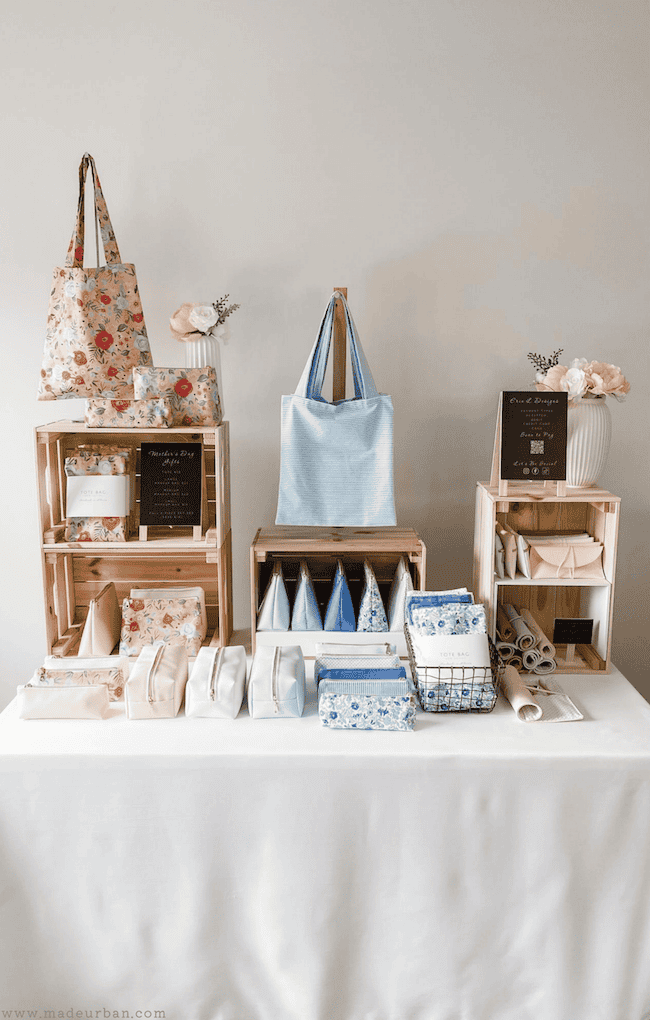
Here’s an example of a zone 1 when displaying bags.
- I may feature my pink floral collection for a Mother’s Day event
- I’m using a purse stand to elevate my display and grab attention from a distance
- Showing matching pieces also creates a strong visual statement
- Adding a prop (flowers in a vase) creates interest and another eye-catching element
- This area has more “display” elements (rather than trying to fit lots of stock in)

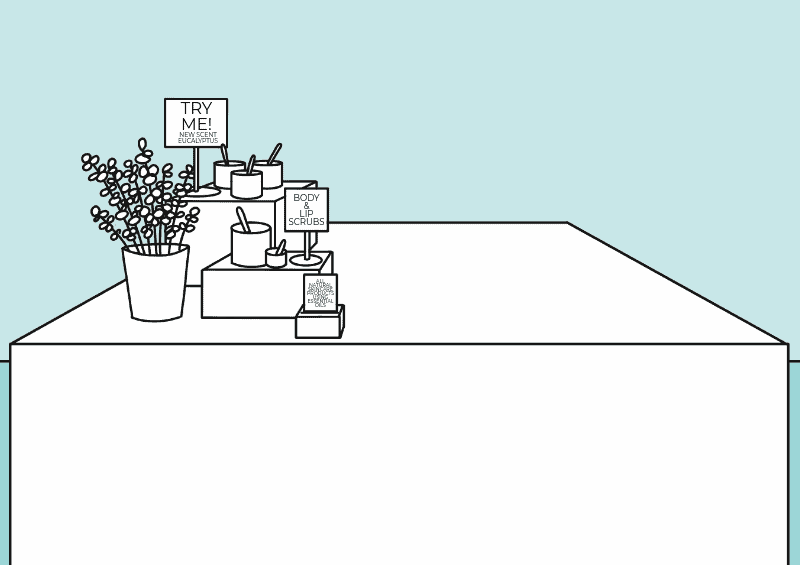
Here’s another visual example of what a zone 1 might look like for a bath & body vendor.
- A prop such as fresh eucalyptus helps catch the eye, as well as the nose
- Height of the plant and sign also helps catch the eye
- Signage encourages people to sample the products and explains a bit about the brand (e.g. all-natural skincare products)
- Levels created using risers draw the eye down to more products and signage
ZONE 2 – ENGAGE
Now imagine you’re at the mall and you’ve decided to stop into a store you’re unfamiliar with.
Once you’ve taken in their zone 1 display, you’re going to head in a little further and see if the rest of the items in the store suit your tastes.
(Have you ever been drawn into a store because of one item and then immediately get the feeling the store’s not a fit for you as you look around? We don’t want that for your craft show table. You should know your ideal customer, and have a strong brand, as well as a signature style. This ensures if a shopper likes one item, they’ll like everything you have to offer.)
You may start sifting and sorting through more items, checking out details, trying things on, or asking sales associates questions. You’re in full-on shopping mode now and are contemplating whether or not you want to spend your money with the store.
In the example store layout, the following areas would be considered zone 2.
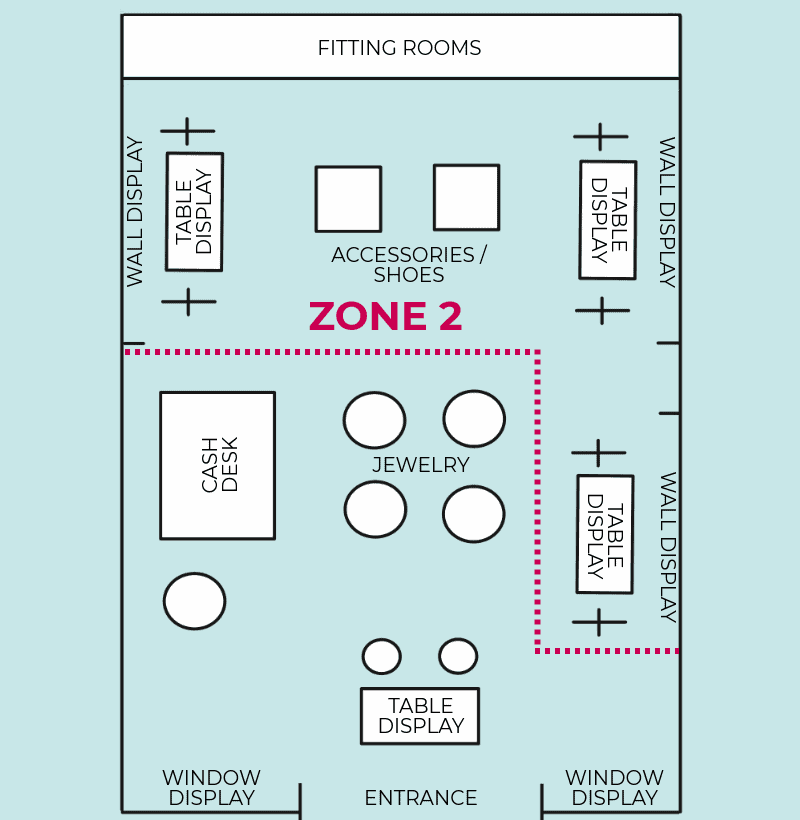
Zone 2 of a retail store will give you more options and help get you more comfortable and confident with the idea of spending.
CREATING A ZONE 2 FOR YOUR CRAFT SHOW TABLE
Here’s how you can create a zone 2 for your craft show table’s layout and create the same impact retailers do.
PURPOSE
Once you’ve drawn craft show shoppers in, zone 2 should allow them to browse more of your products and learn more about them and your brand.
This is the “getting to know you” area where you can get to know more about your shoppers and they can get to know more about your business.
PLACEMENT
Zone 2 should be the middle of your space so shoppers can continue to flow with traffic and through your display.
PRODUCTS
Zone 2 is the area you can house most of your stock. That stock may be:
- More products you offer – for example, if you featured your statement necklaces in zone 1, zone 2 may house your earrings, rings, and bracelets.
- More options in the product they checked out in zone 1 – for example, if you featured a knitted scarf, hat, and mittens in zone 1, you may house all the color options you offer in scarves, hats, and mittens.
- Additional stock of the sample featured in zone 1 – for example, if you displayed a sample of a hand cream people could try in zone 1, zone 2 would be sealed jars of the cream in different sizes or scents they can buy. Or if you put one bag on display in zone 1, zone 2 may be all the colors and patterns you offer that bag in.
- Products that play a supporting role to the ones featured in zone 1 – for example, if you featured your best selling travel bag in zone 1, makeup and toiletry bags may be housed in zone 2.
- Products that aren’t as current as the ones featured in zone 1 – for example, if you featured your latest neon-colored collection in zone 1 for summer, zone 2 may be the neutral colors you carry year-round.
Depending on your products, zone 2 may also be your “fitting room” and can house appropriate props. For example, if you sell jewelry, you may place a mirror in your zone 2 so shoppers can be “in” your space, trying pieces on and seeing how they look.
EXAMPLE
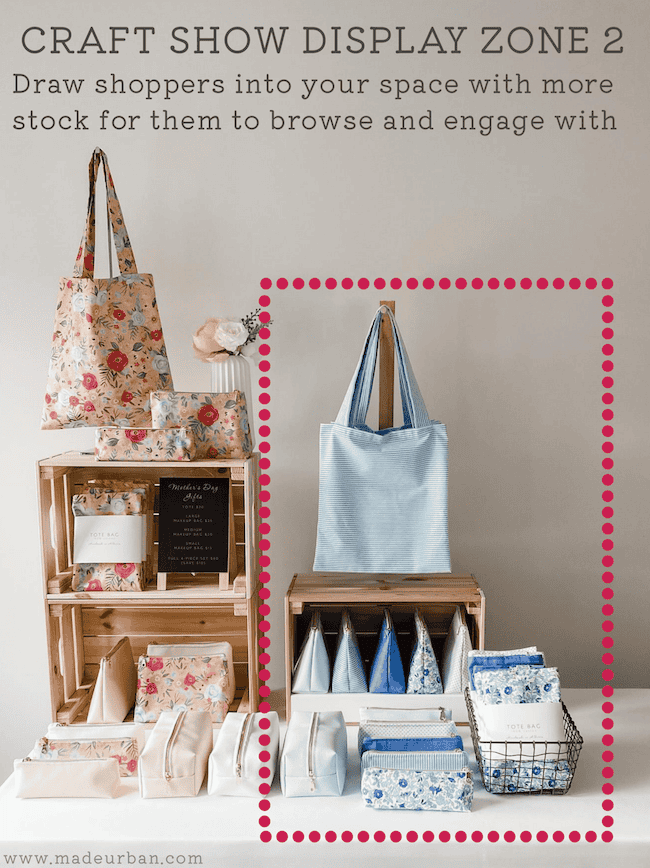
Here’s an example of a zone 2 when displaying bags.
- This section holds the bulk of my stock
- I may display different color options of the products displayed in zone 1
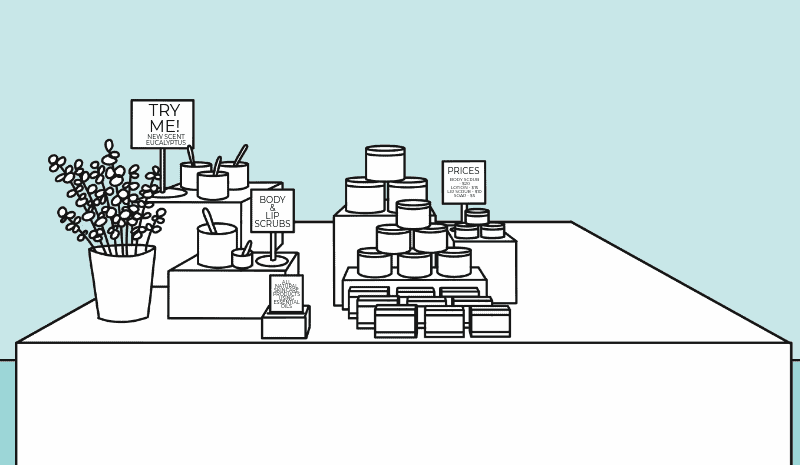
Here’s another visual example of what a zone 2 might look like for a bath & body vendor.
- Stocks sealed packages of the products they sampled in zone 1 as well as other product options
- Draws the eye back up and over to the right
- Signage shares more information about the products and options
- Is less dominant than the zone 1 display and lower so the vendor can easily communicate with shoppers
ZONE 3 – CLOSING
Before you exit a store in the mall, retailers are hoping you make one last stop…at the cash desk.
Whether it’s the grocery store or a clothing shop, there are usually smaller, lower-priced items near the till or on the cash desk for you to browse as you wait for them to scan your items, place them in shopping bags, and complete your transaction.
Sometimes there’s even a stack of catalogs or flyers to look at or take home so you can start dreaming about your next purchase.
The following area would be considered zone 3 in the example retail store layout:
Retailers want you to end your experience with them on a high note. If you weren’t sure where to pay, felt like you were in the way, or were being rushed out the door, they’re leaving you with a bad memory that isn’t likely to bring you back anytime soon.
CREATING A ZONE 3 FOR YOUR CRAFT SHOW TABLE
Here’s how you can create a zone 3 for your craft show table’s layout and create the same impact retailers do.
PURPOSE
Your zone 3 should be thought of as your checkout area and help you complete a sale or shopping experience in the best way possible. It doesn’t need to be a big space but working a “checkout” into your layout ensures the shoppers you’ve converted to customers aren’t blocking key elements of your display that help turn more shoppers into customers.
Zone 3 should not become too cluttered. Customers may need to set something down while they pay or you may want a place to set their purchase while you complete their transaction.
This is also a great place for you to market your business through business cards, lookbooks, or a newsletter signup form (use the free printable newsletter signup form here).
Zone 3 should ensure your shoppers’ experience ends on a high note. If they’ve decided to purchase something, it may be uncomfortable for them if they have other people hovering and reaching around them while their wallet is out.
It’s also not a great experience if they feel rushed out of the space because people are trying to shop around them or are distracting you with questions while you’re trying to complete their transaction…”Did you give me a $20 or a $10?”
Having a dedicated cash desk allows you to be organized and create a bit of separation from the other main shopping zones of your table.
If they decide not to purchase from you, it should be easy for them to grab a business card before they head off.
PLACEMENT
Zone 3 should be at the opposite end of zone 1 on your table. If shopping traffic at the event tends to flow from the left side of your table to the right, zone 3 will be on the right side of your table so it’s the last section they see as they continue to walk through the event.
PRODUCT
Zone 3 is a great place for add-ons. I like to think of add-ons as anything that completes, compliments, or cares for a customer’s purchase.
Add-ons should also be thought of as impulse-buy products; ones that don’t require a lot of thought and are easy to throw in with their purchase. Sort of how you might grab a pack of gum as the cashier is ringing through your purchase at the grocery store.
Zone 3 is also a great place for stocking stuffer items during the gift-giving season. Price points under $25 are usually a good fit.
An add-on could be:
- a product you make
- a product you don’t make but sell
- a service you provide
Some examples are:
- Jewelry – polishing cloths and cleaners, travel or storage cases, gift-wrapping service/boxes, etc.
- Art – prints on fridge magnets or other small items, frames for prints, picture lights, delivery, and hanging services for larger pieces of art, etc.
- Bath & body – sample sizes of soaps, bath salts, etc. lip balms, travel sizes or bundles, etc.
Check out: HOW TO USE ADD-ONS TO SELL MORE HANDMADE for more examples and tips to successfully implement the sales technique of adding on.
The add-on doesn’t necessarily need to be stocked in your zone 3.
For example, in the case of gift-wrapping, you can keep gift-wrapping supplies behind the table and one sample on the table so they can see how beautiful their gift will look wrapped by you.
Or an artist/photographer selling prints may suggest: “Would you like to add a frame to your order?” Point to a framed piece of art on their table so they can see how it will look but have the empty frames stored under the table.
Zone 3 is also the perfect place for marketing material. If people have shopped your table but aren’t ready to buy that day, you’re more likely to turn them into a customer after the event if they can easily grab a business card, flyer, lookbook, or sign up for your newsletter.
You also want to add a business card or flyer to each purchase and ask each customer if they’d like to join your newsletter (this is more enticing if you offer some type of a perk. E.g. “You’ll be entered into this month’s draw if you join my newsletter today” or “You’ll receive X discount off your order/your next order if you join my newsletter.” Plenty more effective ideas like this in HOW TO START, SEND & GROW A SUCCESSFUL NEWSLETTER.)
-> There’s a free printable newsletter signup form here
-> And ideas for what to send your newsletter list year-round here. As well as what to send your newsletter list to make a sale today here.
EXAMPLE
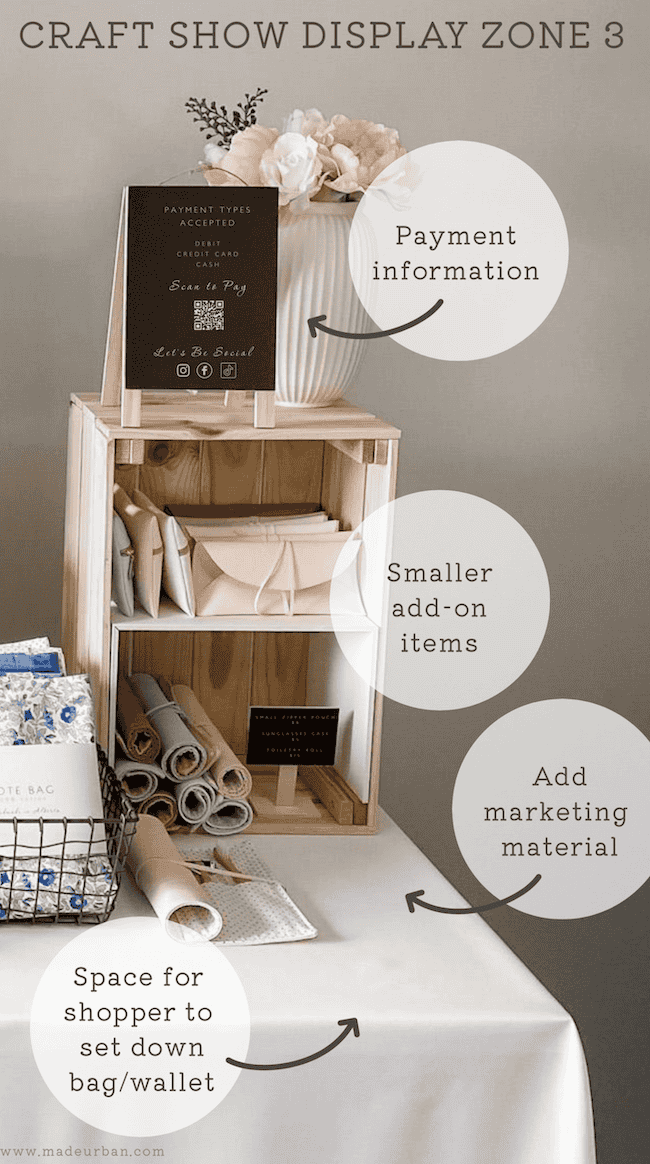
Here’s an example of a zone 3 when displaying bags.
- Signage communicating payment options
- Smaller and lower-priced add-on items (smaller zipper pouch, sunglass cases, toiletry rollups; items shoppers would buy with and use with the other bags on my table)
- I would add a stack of business cards or flyers advertising my upcoming craft shows
- Space for a shopper to set their items down so they can pay
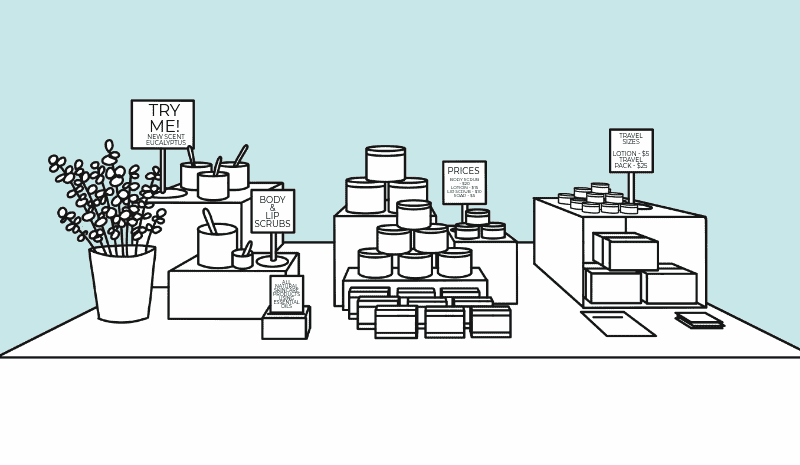
Here’s another visual example of what a zone 3 might look like for a bath & body vendor.
- Offers lower-priced addons (e.g. travel sizes or travel sets)
- Leaves space behind the table for vendor to complete transactions and wrap purchases
- Leave space at the front of the table for shopper to set items down
- Houses marketing material such as business cards, flyers or newsletter signup form
You’ll find more tips here for creating an impactful checkout station on your craft show table: How to Add a Point of Sale Section to your Craft Show Display
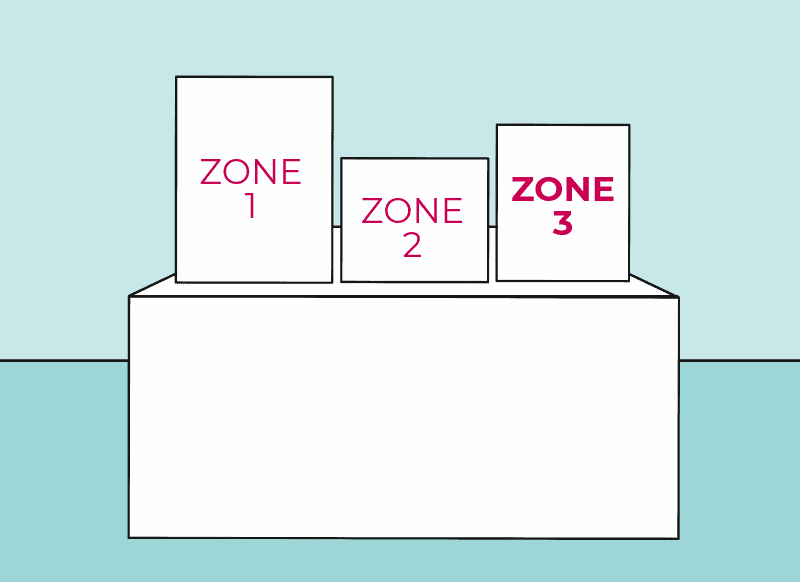
This is just one example of what a craft show display can look like when setting up zones. This is a small table (5 feet long). So you get an idea of how to break up your display and make it more shoppable, even when you’re short on space.
The more space you have, the bigger your zones can be. Stick to the 3 defined zones, but add more fixtures and stock. For example, in a 10′ x 10′ booth, your zone 1 may be a smaller table, zone 2 may be a bigger table and a rollbar or shelf, and zone 3 may be a free-standing checkout stand.
CRAFT SHOW TABLE LAYOUT NECESSITIES
Here are a few more basics that should always be a part of your craft show layout:
GROUPINGS
Your table should not be a display of product after product; there should be groupings…or a more fancy way to put it: compositions.
These should be groups of products placed together in a meaningful way.
The purpose of a grouping is to create interest within your display and stop-points where the eye is drawn to once it’s done taking in one group of products.
 Groups should be placed throughout your table and the placement of products and props within a grouping should create a focal point and then a path to other products.
 Products within a grouping should be ones that would be commonly purchased, used, worn, etc. together. In other words; don’t put bookmarks next to earrings.
Even when you’re selling one product in different color/material/scent options, create logical groupings that evoke a feeling or tell a story.
Groupings also help with sales when you group items according to use.
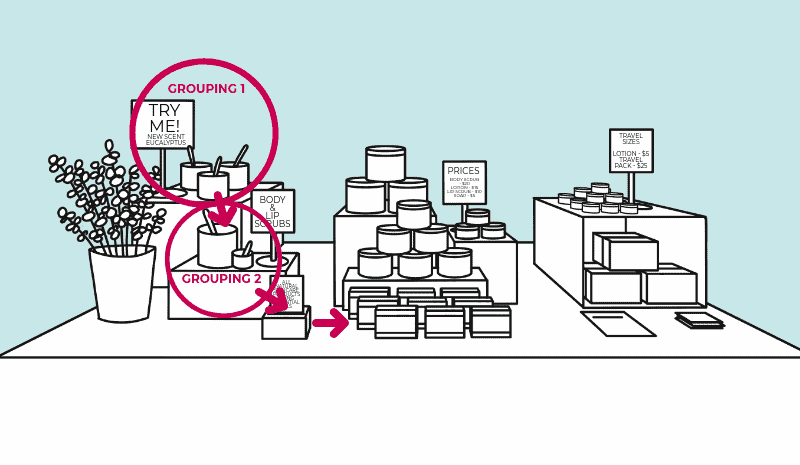
For example, let’s say a vendor sells a variety of home goods with their artwork printed on them: calendars, coasters, coffee mugs, pillows, mousepads, notepads, etc. They could be split into 2 groups:
- Group 1 – Calendars, mousepads, and notepads (office items)
- Group 2 – Coasters, coffee mugs, and pillows (home decor/coffee-time items)
Think about the story you want to tell with each grouping.
In the example above, group 1 tells the story of being organized in the office while group 2 tells the story of cozying up with a hot cup of coffee.
LINES
Each grouping should have lines that create a path from one product to the next within the composition; sort of like connect the dots.
Lines should also connect one grouping to the next, so the eye is guided on a path around your table.
Lines are created through the way products are set up. They’re not literal lines but more so a path. It may also help to think of lines as breadcrumbs. Little treasures within your display that lead the eye around it.
 SPACE
SPACE
Your layout needs to include negative space, even if it’s an inch or two between products or fixtures, to separate product groupings and give shoppers a visual break (sort of how the coffee beans create a break for the nose when it’s sniffing different perfumes).
Don’t try to fill your entire space with stock.
Negative space also gives a break between types of products or product collections. If you have a pink collection and a blue collection, space between them lets the shopper take in one collection at a time. They can pick up on the girly vibes of all your pink products and imagine how they would wear/use/display them, without getting confused or distracted by the more nautical vibe of the blue collection.
ODDS
Odd numbers are more visually pleasing because they create interest. Plan to have 3 or 5 groupings within your space.
Within a grouping, you can also use odds to your advantage. For example, three rows of product, three levels, three product options, etc.
COLOR
Don’t forget to use colors to your advantage. A display with a mish-mash of colors doesn’t tell a story or evoke a feeling. But imagine a display that uses soft blue and white. It might evoke a feeling of calm and be the perfect setting for bath products.
Here’s how to use color at a craft show.
QUICK TIP – SQUINT TEST
Once your table is set up, stand back and squint your eyes to blur your vision a bit. The details get lost so it’s easier to see the big picture.
I use this trick with all things visual:
- When I’m trying on an outfit – do the shoes stand out too much or do they work with the outfit?
- When I’m choosing a paint color to work with tile – do the tones look good together or does one come off as too dark, or cool-toned?
- When I’m creating a display – do the shapes work together? Does one side feel cluttered with too many small items while the other side feels too heavy with big items?
Stand back, squint, and make sure your table feels balanced, creates flow, has clear groupings, and that zone 1 stands out the most.
Here are some more odd tricks I use when setting up a display: 5 Odd Display Tricks I Always Use
AND DON’T FORGET…
REFRESH
Don’t let your craft show display get stale. You can stick with the same tried and true layout, but update the products that appear in each area, with each craft show.
You’re bound to have some repeat shoppers pass your table and if last week’s or month’s stock didn’t get them to stop, this week’s or month’s may, if it’s updated.
And if last week’s or month’s products got shoppers to stop and buy, turn them into repeat customers. They obviously won’t purchase the same product twice (unless the product you sell is consumable and they need to restock), so put something new on display that makes them feel they need to buy again.
DON’T STOP AT JUST HAVING A GREAT LAYOUT…
Make sure your craft show display is on-brand, tells a story and evokes a feeling. If you need help with that, join my free email course: 5 DAYS TO A STANDOUT CRAFT SHOW DISPLAY.
You’ll also find a ton of craft show advice and step-by-step instructions to be successful at craft shows in MAKE MORE MONEY AT CRAFT FAIRS.
You may also be interested in:
>> WHAT SELLS BEST AT A CRAFT SHOW

Hey, I’m Erin 🙂 I write about small business and craft show techniques I’ve learned from being a small business owner for almost 2 decades, selling at dozens of craft shows, and earning a diploma in Visual Communication Design. I hope you find my advice helpful!
Thank you Erin, you touch on so many good points! I am starting to think about marketing cards and it feels like a daunting process, but your article is helpful and great food for thought.
I’ve been struggling to organize my display table at shows, so your article has really helped me. Thanks!
Brilliant advice as usual. Thanks Erin
Today I really learned a lot about how to make a better display. (I also learned why I usually spend more money than planned when shopping!) Great insight and really good tips. Thanks!
Thank you so much Miss Erin, am learning alot and getting a better picture of how I should do my display for my first craft show
Hi, any suggestions for layout on a market stall where customers approach from both/all directions. We have a u-shaped layout so the customers enter into the gazebo. We sell figurines – dragons, fairies, buddhas, wolves – candles, incense holders and sticks, jewellery, etc.. We hang dreamcatchers and sun catchers, etc around the sides. I try to theme the display so the buddhas lead to the incense, etc but I can’t see how we can achieve a Zone 1. We do have a few large eye catching figurines (24 inches tall) which we place in the middle of the rear table – we only put one out and do vary the statue so it’s not always the same one which does attract people’s eye but it is a high price so they tend to say ‘oh no I can’t afford that’ so I put more affordable priced ones next to it. It does get disheartening for us when people barely glance at our stall and just keep on walking past. Any suggestions would be very welcome. Thanks. X
How do you create zones for a corner booth with tables on the perimeter of booth. Traffic comes from left and right of one side?
This was SO amazing, and so necessary. I have only just started doing craft shows within the last 6 months, and now have a full month’s break to not only think about my branding/collections lines I want to do, but think about my presentation. I am an introvert and though I have made decent sales, I end up doing my display a little differently every show because I KNOW something is off (though it also looks great), and this article helped me to understand how I can do it better. Thanks for doing such a thorough breakdown. Really helps those of us just starting out, and helps experienced crafters to give a refresh to their presentations.
I make and sell black dolls and angel ornaments. This article is helpful and give me something to work on before the Christmas season. What a mind opener.
I just wanted to tell you that you are Awesome for Sharing Your Knowledge with the world! In these times, it seems that the kindergarten “Sharing is Caring” motto has become a thing of the past…so very sad. But then someone loke you comes around and my hope in humanity is restored!!
Because of your AMAZING advice my sales have tripled!
So thank you again from the bottom of my Art and Craft Filled Heart!
Stumbled upon your wisdom. Thanks for sharing. I have a gourmet fudge business so gearing up for the holidays. Will use your insight.
Thank you so much for such a detailed article! The logical thought process of the retail store was perfect to help me understand how to apply that to my booth. And the illustrations were great. I just signed up for my first craft fair and started searching Pinterest for ideas, and that is where I found your site. I now have a sketch of what I want my table to look like and can’t wait to dive into your email course! 🙂
Thank you for all the wonderful and extremely helpful information. I intend to use it for my first event.
First time craft show, I’m so glad I found your articles. Thank you for the great advice!
Since i stumbled onto your site i bought a white canopy. Thank you for saving me from buying a gray or tan one. Unfortunately, I had already purchased black folding tables for my craft shows. Should I have bought white tables? I also painted my display board black. I’ll need to buy a new pegboard and white shelves. I appreciate your site. It is so insightful. Thank you.
I make and sell pottery. I have had a minimal amount of success selling, but it wasn’t until my last show that I realized my display was lacking design. In addition to needing more product, my display was lackluster.
I had walked away to visit another vendor and on my way back to my booth I looked at my display as if I were a shopper. Wow, to my dismay, I realized my selection looked very minimal and not eye catching. This was an “Aha” moment for me.
This past year, I’ve been concentrating on offering a wider variety of mugs, trays and bowls. This will definitely help, but I need some direction on displaying my wares.
I use two white crates and two wine crates for display (also doubling in storage and transporting). But I am considering making a foldable shelf that would stand about 18” tall and perhaps 2’ wide. The shelves would be adjustable, as they sit on rungs of the upright ends.
I need help creating zones to make my booth more appealing and drawing shoppers in. My booth size is 5’x10’ and will be an outside corner!
I now offer mugs, bowls, platters, spoon rests, garlic graters, vases (some with succulents), trinket trays, Christmas ornaments that can double as gift tags, ring holders and necklaces with pottery pendants hanging on leather or chains (and some pendants without chains or leather). In addition, there will be garden bells and wind-chimes.
I have a small 2’ lighted Christmas tree to display some of the ornaments. I also have some simple nativity scenes that have a votive inside. I also will have a couple of lamps to display. (and hopefully sell) I will have access to electricity for the lamps and the lighted Christmas tree.
Can you offer some insight on how to create zones? Also do you suggest I move forward with my table top shelves I plan to make?
I appreciate your emails and your expertise!
Sandra
Hi Sandra,
Thanks for reading! Based on the steps and advice above, can you tell me where you’re feeling stuck when it comes to creating zones?
~Erin
Hi. Do you make/sell your bags? They’re lovely. I do a weekly local farmers market. I already have 3 tables so I’d like to make the 3 zone work for my products.
Hi Sandra.
I’m considering selling my wreaths at craft shows as many people have recommended to me. Most of them are event-related: Hallowe’en (my favourite), Christmas, Easter, and perhaps down the road also summer and fall wreaths.
I enjoy reading your articles and believe they contain very good information and tips. I took to heart your advice about wardrobe to wear to the sales and bought myself some Halloween clothing and accessories already. I’ll definitely tailor what I wear to the subject of my wreaths according to the time of year when I begin participating at craft shows.
Unfortunately, most of your info and tips seem to apply to vendors who are selling small items. My wreaths generally range between 14″ and 22″, so are much larger than jewellery or jars of health and beauty items, crocheted potholders and the like.
Do you have any recommendations for me about displaying my wreaths?
I found you through Pinterest and wow I’ve learned so much from you on how to tweak my display! I also sell bags so the visuals have been perfect for me. I’ve seen others ask this as well, so I’m just echoing the request that I would love for you to give an example of a 10×10 layout. Currently I have an L set up of tables and two peg boards to hang my handbags on. Love your stuff, thanks so much!